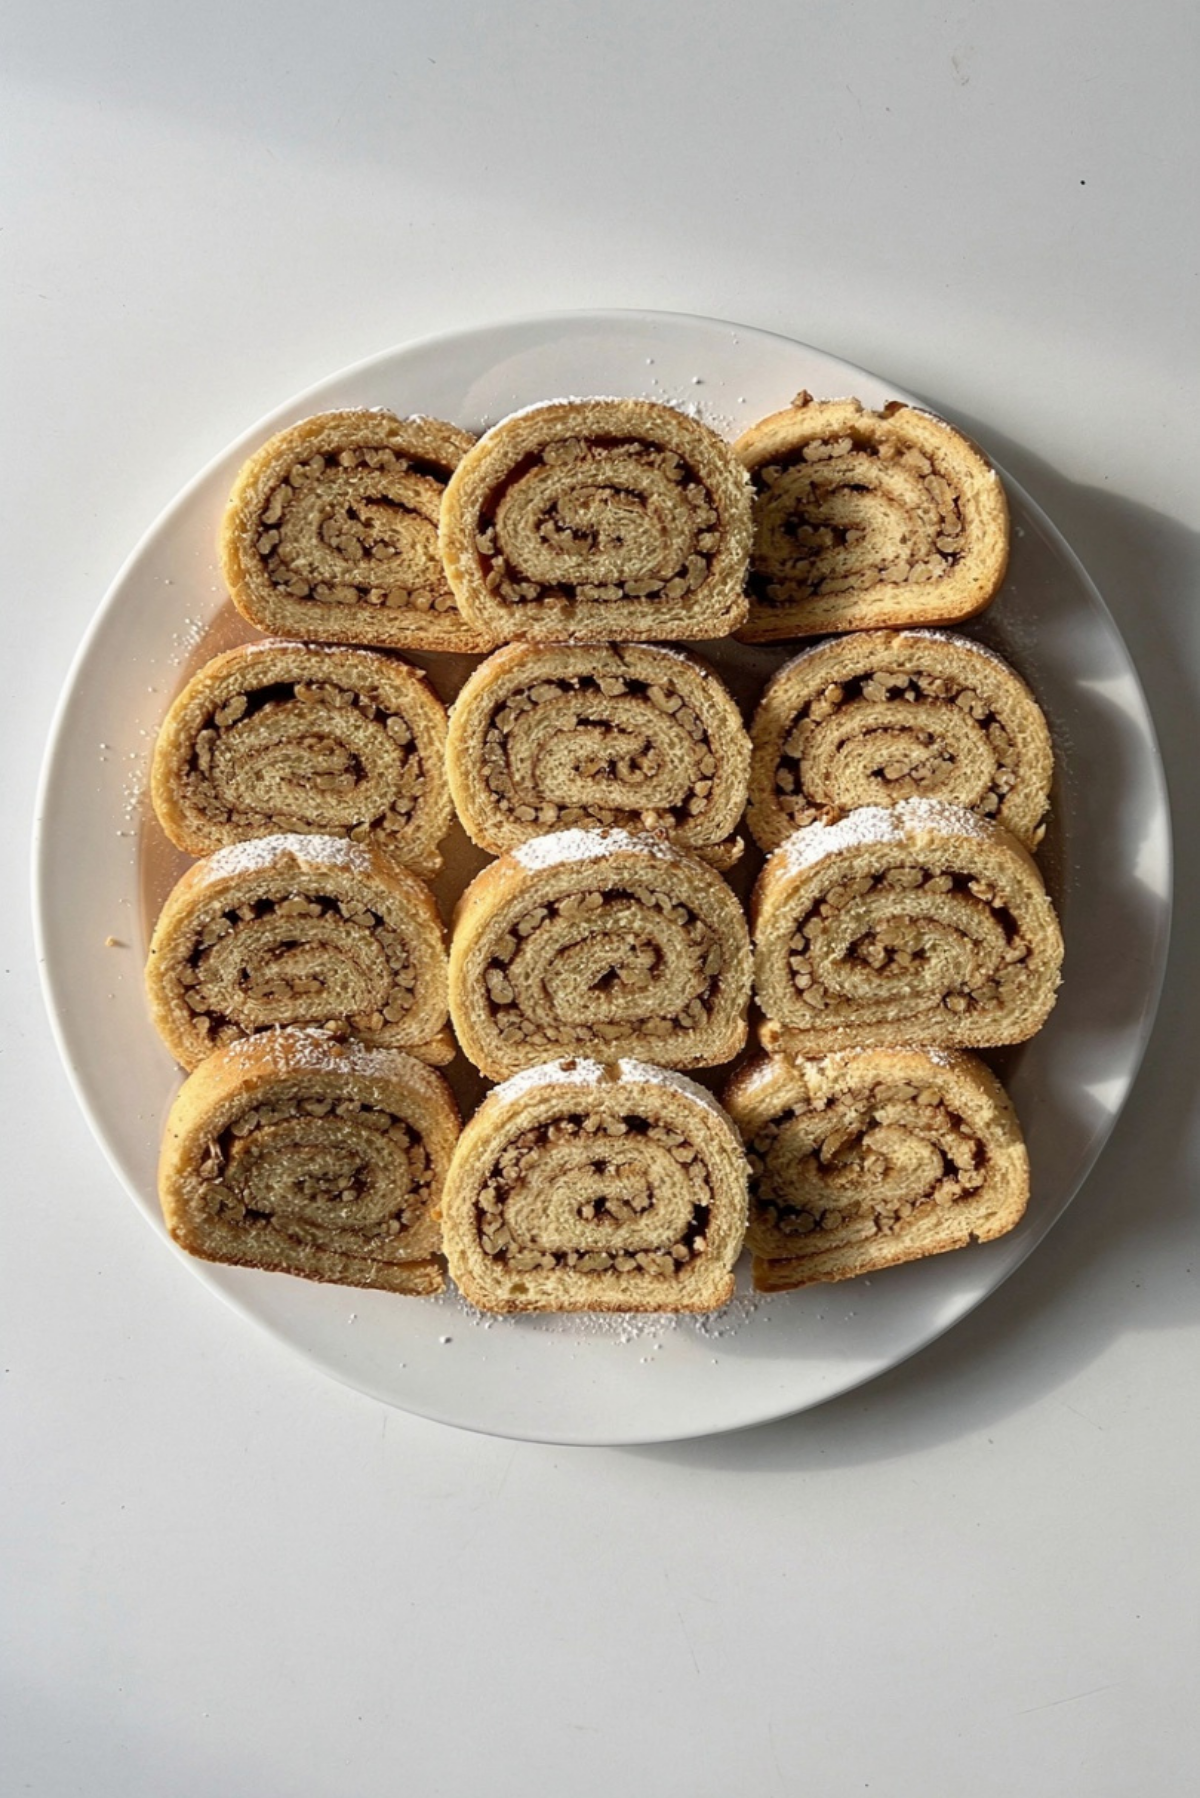
Italian Nut Roll Cookies
There is something incredibly comforting about a tray of freshly baked Italian Nut Roll Cookies sitting on the kitchen counter. The buttery pastry, the sweet walnut filling, and that delicate golden finish create the kind of homemade treat that instantly makes the whole house smell warm and inviting. Trust me, you’re going to love this. Every bite has that perfect balance of flaky dough and rich nutty sweetness that feels straight out of an old family bakery.
These cookies are the kind of dessert that quietly steals the spotlight during holidays, coffee gatherings, or cozy weekends at home. They look elegant, taste even better the next day, and honestly, they disappear faster than you expect. Let me tell you, it’s worth every bite.
A Sweet Little Tradition That Never Goes Out of Style
Italian Nut Roll Cookies have long been connected to family celebrations and festive baking traditions across many Italian households. Recipes like this were often passed down through generations, handwritten on stained recipe cards and made during holidays when the kitchen became the busiest room in the house.
The beauty of these cookies is how humble ingredients come together into something truly special. Walnuts, butter, flour, and sugar transform into delicate spirals packed with flavor and texture. In some regions, these pastries are served during Christmas and Easter celebrations, while in others they appear year-round alongside espresso or tea.
And now, these classic cookies continue to bring people together, one buttery swirl at a time.
Why These Cookies Always Win Everyone Over
The moment you take your first bite, it becomes obvious why this recipe has lasted for generations. Everything about these cookies feels comforting, reliable, and just a little bit nostalgic.
Versatile: These cookies fit almost any occasion. They work beautifully for holiday dessert trays, afternoon coffee breaks, or even as edible gifts wrapped in parchment paper.
Budget-Friendly: The ingredient list is simple and affordable, yet the final result tastes like something from a specialty bakery.
Quick and Easy: While they look impressive, the process is surprisingly approachable once you get rolling. The dough comes together smoothly and bakes quickly.
Customizable: You can switch up the filling with pecans, almonds, cinnamon, or even a touch of cocoa for a different flavor twist.
Crowd-Pleasing: The buttery pastry and sweet walnut filling appeal to both kids and adults. These disappear fast at gatherings.
Make-Ahead Friendly: The dough and filling can both be prepared ahead of time, which makes baking day much easier.
Great for Leftovers: These cookies stay delicious for days and the flavor actually deepens as they sit.
Little Bakery Secrets That Make a Big Difference
Before diving into the recipe, here are a few insider tricks that help create bakery-quality results every single time.
- Chill the dough slightly before rolling. It becomes easier to handle and creates flakier layers.
- Finely chop the walnuts so the filling spreads evenly without tearing the dough.
- Roll the dough tightly, but not too tight, otherwise the filling may spill out while baking.
- Use parchment paper for easier cleanup and more even browning.
- Allow the cookies to cool completely before dusting with powdered sugar so it stays beautiful and fresh.
Kitchen Tools That Make Everything Easier
Having the right tools nearby makes the baking process smoother and much more enjoyable.
Mixing Bowls: You’ll need separate bowls for the dough and walnut filling.
Rolling Pin: Essential for creating thin, even pastry layers.
Baking Sheet: A large sheet pan gives the cookies enough space to bake evenly.
Parchment Paper: Prevents sticking and keeps cleanup simple.
Sharp Knife: Helps create clean slices before baking.
Food Processor: Useful for finely chopping the walnuts quickly and evenly.
Everything You’ll Need for These Buttery Walnut Swirls
The ingredients in this recipe work together beautifully to create a tender pastry with a rich, sweet filling that tastes wonderfully homemade.
- All-Purpose Flour: 2 1/2 cups, creates the structure for the soft pastry dough.
- Unsalted Butter: 1 cup, softened, gives the dough its rich buttery flavor and flaky texture.
- Cream Cheese: 8 ounces, softened, adds tenderness and slight tanginess to the pastry.
- Granulated Sugar: 1/4 cup, lightly sweetens the dough without overpowering the filling.
- Salt: 1/4 teaspoon, balances and enhances the flavors.
- Vanilla Extract: 1 teaspoon, adds warmth and sweetness to both dough and filling.
- Finely Chopped Walnuts: 2 cups, create the signature rich nutty filling.
- Brown Sugar: 3/4 cup, gives the filling a deep caramel-like sweetness.
- Ground Cinnamon: 1 teaspoon, adds cozy warmth and spice.
- Milk: 2 tablespoons, helps bind the filling together.
- Powdered Sugar: 1/2 cup, for a delicate finishing dusting.
Easy Ingredient Swaps You Can Try
Sometimes you need flexibility in the kitchen, and thankfully this recipe adapts beautifully.
Walnuts: Pecans or almonds work wonderfully as alternatives.
Cream Cheese: Mascarpone can create an even richer pastry texture.
Brown Sugar: Coconut sugar adds a deeper caramel flavor.
Milk: Heavy cream or almond milk both work well in the filling.
Vanilla Extract: Almond extract creates a slightly more bakery-style flavor.
The Ingredients That Truly Make These Special
Some ingredients completely define the personality of these cookies, and these two are the stars.
Walnuts: The walnuts bring richness, texture, and that classic old-world flavor that makes these cookies unforgettable.
Cream Cheese: This ingredient keeps the dough tender and soft while adding a subtle richness that pairs perfectly with the sweet filling.
Let’s Bake These Beautiful Cookies Together
Now comes the fun part, and honestly, your kitchen is about to smell absolutely incredible.
1. Preheat Your Equipment:
Preheat your oven to 350°F. Line a large baking sheet with parchment paper and set it aside.
2. Combine Ingredients:
In a large bowl, beat together the softened butter and cream cheese until smooth and creamy. Add the granulated sugar, salt, and vanilla extract. Gradually mix in the flour until a soft dough forms.
In another bowl, combine the chopped walnuts, brown sugar, cinnamon, and milk until evenly mixed.
3. Prepare Your Cooking Vessel:
Lightly flour a clean surface and divide the dough into two portions for easier handling.
4. Assemble the Dish:
Roll each dough portion into a thin rectangle. Spread the walnut filling evenly over the surface, leaving a small border around the edges. Carefully roll the dough into a tight log.
Slice the logs into 1-inch pieces and place them cut-side up on the prepared baking sheet.
5. Cook to Perfection:
Bake the cookies for 20 to 25 minutes, or until lightly golden brown and fragrant.
6. Finishing Touches:
Allow the cookies to cool completely on the baking sheet before dusting generously with powdered sugar.
7. Serve and Enjoy:
Serve these buttery walnut swirls with coffee, tea, or a cold glass of milk. This one’s a total game-changer for cookie trays and holiday desserts.
The Texture and Flavor Are Pure Comfort
One of the best things about these cookies is the contrast between the flaky pastry and the rich walnut center. The dough stays tender and buttery while the filling becomes slightly caramelized during baking.
As they bake, the cinnamon and walnuts release this warm bakery aroma that fills the entire kitchen. The edges become lightly crisp while the inside stays soft and flavorful. Then that final dusting of powdered sugar adds a delicate sweetness that ties everything together beautifully.
Helpful Tricks for Foolproof Results
A few small adjustments can make these cookies even better.
- Chill the rolled logs for 15 minutes before slicing if the dough feels too soft.
- Use freshly chopped walnuts for the best flavor and texture.
- Roll the dough evenly so all cookies bake at the same rate.
- Let the cookies cool completely before storing to keep them crisp on the outside.
Common Mistakes and How to Avoid Them
Even classic recipes can have a few tricky moments, but these tips will help everything go smoothly.
- Avoid overfilling the dough because excess filling can spill during baking.
- Do not overbake the cookies or the pastry may become dry instead of tender.
- Skip warm butter when making the dough because overly soft dough becomes difficult to roll.
- Do not slice the rolls too thin or the cookies may lose their swirl shape.
A Quick Look at the Nutrition
Servings: 24 cookies
Calories per serving: 165
Note: These are approximate values.
Timing Everything Perfectly
Prep Time: 30 minutes
Cook Time: 25 minutes
Total Time: 55 minutes
How to Make Them Ahead and Store Them Properly
One of the reasons bakers love this recipe is how wonderfully it stores. The dough can be prepared up to two days in advance and kept refrigerated until ready to roll and bake.
Once baked, store the cookies in an airtight container at room temperature for up to five days. For longer storage, freeze them in layers separated by parchment paper for up to two months.
To reheat, simply warm them in a low oven for a few minutes to refresh the flaky texture.
Delicious Ways to Serve These Cookies
These cookies pair beautifully with so many cozy drinks and desserts.
Serve them with espresso, cappuccino, or black tea for a classic bakery-style experience. They also look gorgeous on holiday dessert platters alongside powdered sugar cookies and fruit pastries.
For an extra indulgent touch, drizzle them lightly with honey or serve with vanilla ice cream.
Creative Ways to Use Leftovers
If you somehow end up with leftovers, there are plenty of delicious ways to enjoy them again.
Crumble the cookies over vanilla yogurt for a sweet breakfast treat. You can also layer crushed pieces into parfaits with whipped cream and fruit.
Another favorite trick is warming a few cookies and serving them alongside coffee ice cream for an easy dessert.
Extra Little Tricks Worth Remembering
Small details really make these cookies shine.
Use room temperature cream cheese for smoother dough. Lightly toast the walnuts beforehand if you want deeper nutty flavor. And always flour your surface gently because too much flour can toughen the pastry.
Trust me, once you make these once, they’ll become part of your regular baking rotation.
Make Them Look Bakery Worthy
Presentation turns these homemade cookies into something truly special.
Arrange them in overlapping circles on a white serving platter and dust powdered sugar right before serving for the prettiest finish. Adding a few whole walnuts nearby creates a warm rustic bakery feel without overwhelming the plate.
Soft natural lighting makes the golden pastry swirls look especially beautiful for photos and gatherings.
Fun Variations You’ll Want to Try Next
Once you master the classic version, there are so many delicious directions to explore.
- Add mini chocolate chips to the walnut filling for extra richness.
- Swap walnuts for pecans and add maple extract for a cozy autumn flavor.
- Stir orange zest into the filling for a bright citrus twist.
- Add a touch of cocoa powder to the filling for a chocolate walnut version.
- Sprinkle finely chopped almonds on top before baking for extra crunch.
FAQ’s
1. Can I freeze the dough before baking?
Yes, the dough freezes beautifully for up to two months when wrapped tightly.
2. Can I use pre-ground walnuts?
You can, but freshly chopped walnuts provide better flavor and texture.
3. Why did my filling leak out?
Overfilling or loosely rolling the dough can cause leakage during baking.
4. Can I make these gluten free?
Yes, a good quality gluten-free flour blend can work well.
5. How do I keep the dough from sticking?
Lightly flour your work surface and rolling pin.
6. Can I add raisins?
Absolutely. Raisins pair wonderfully with the walnut filling.
7. Should the cookies be crispy or soft?
They should have lightly crisp edges with a tender center.
8. Can I prepare them the night before?
Yes, the rolled logs can be refrigerated overnight before slicing and baking.
9. What’s the best way to store them?
An airtight container at room temperature works best.
10. Can I drizzle icing on top?
Definitely. A light vanilla glaze tastes amazing on these cookies.
Conclusion
Italian Nut Roll Cookies are one of those timeless recipes that instantly make any kitchen feel warm and welcoming. Between the flaky pastry, sweet walnut filling, and cozy cinnamon aroma, every bite feels comforting and nostalgic in the best possible way.
Whether you’re baking these for the holidays, a weekend coffee break, or simply because you’re craving something homemade, this recipe delivers every single time. Let me tell you, once you taste these buttery little swirls fresh from the oven, you’ll understand exactly why families keep making them year after year.
Print
Italian Nut Roll Cookies
- Total Time: 55 minutes
- Yield: 24 cookies
- Diet: Vegetarian
Description
Buttery Italian Nut Roll Cookies filled with a sweet walnut and cinnamon mixture, baked until lightly golden and finished with a dusting of powdered sugar. These classic cookies are tender, flaky, rich, and perfect for holidays, coffee breaks, or cozy homemade dessert trays.
Ingredients
- 2 1/2 cups all-purpose flour
- 1 cup unsalted butter, softened
- 8 ounces cream cheese, softened
- 1/4 cup granulated sugar
- 1/4 teaspoon salt
- 1 teaspoon vanilla extract
- 2 cups finely chopped walnuts
- 3/4 cup brown sugar
- 1 teaspoon ground cinnamon
- 2 tablespoons milk
- 1/2 cup powdered sugar
Instructions
- Preheat oven to 350°F and line a baking sheet with parchment paper.
- In a large bowl, beat the softened butter and cream cheese until smooth and creamy.
- Add granulated sugar, salt, and vanilla extract, then gradually mix in the flour until a soft dough forms.
- In another bowl, combine chopped walnuts, brown sugar, cinnamon, and milk until evenly mixed.
- Lightly flour a clean surface and divide the dough into two portions.
- Roll each portion into a thin rectangle and spread the walnut filling evenly over the dough.
- Carefully roll each dough rectangle into a tight log.
- Slice the logs into 1-inch pieces and place them cut-side up on the prepared baking sheet.
- Bake for 20 to 25 minutes or until lightly golden brown.
- Allow the cookies to cool completely before dusting with powdered sugar.
- Serve and enjoy with coffee, tea, or milk.
Notes
- Chill the dough slightly if it becomes too soft to roll.
- Freshly chopped walnuts provide the best flavor and texture.
- Store cookies in an airtight container for up to 5 days.
- The dough can be prepared ahead and refrigerated for up to 2 days.
- Prep Time: 30 minutes
- Cook Time: 25 minutes
- Category: Dessert
- Method: Baking
- Cuisine: Italian
Nutrition
- Serving Size: 1 cookie
- Calories: 165
- Sugar: 8g
- Sodium: 55mg
- Fat: 11g
- Saturated Fat: 4g
- Unsaturated Fat: 6g
- Trans Fat: 0g
- Carbohydrates: 15g
- Fiber: 1g
- Protein: 3g
- Cholesterol: 20mg