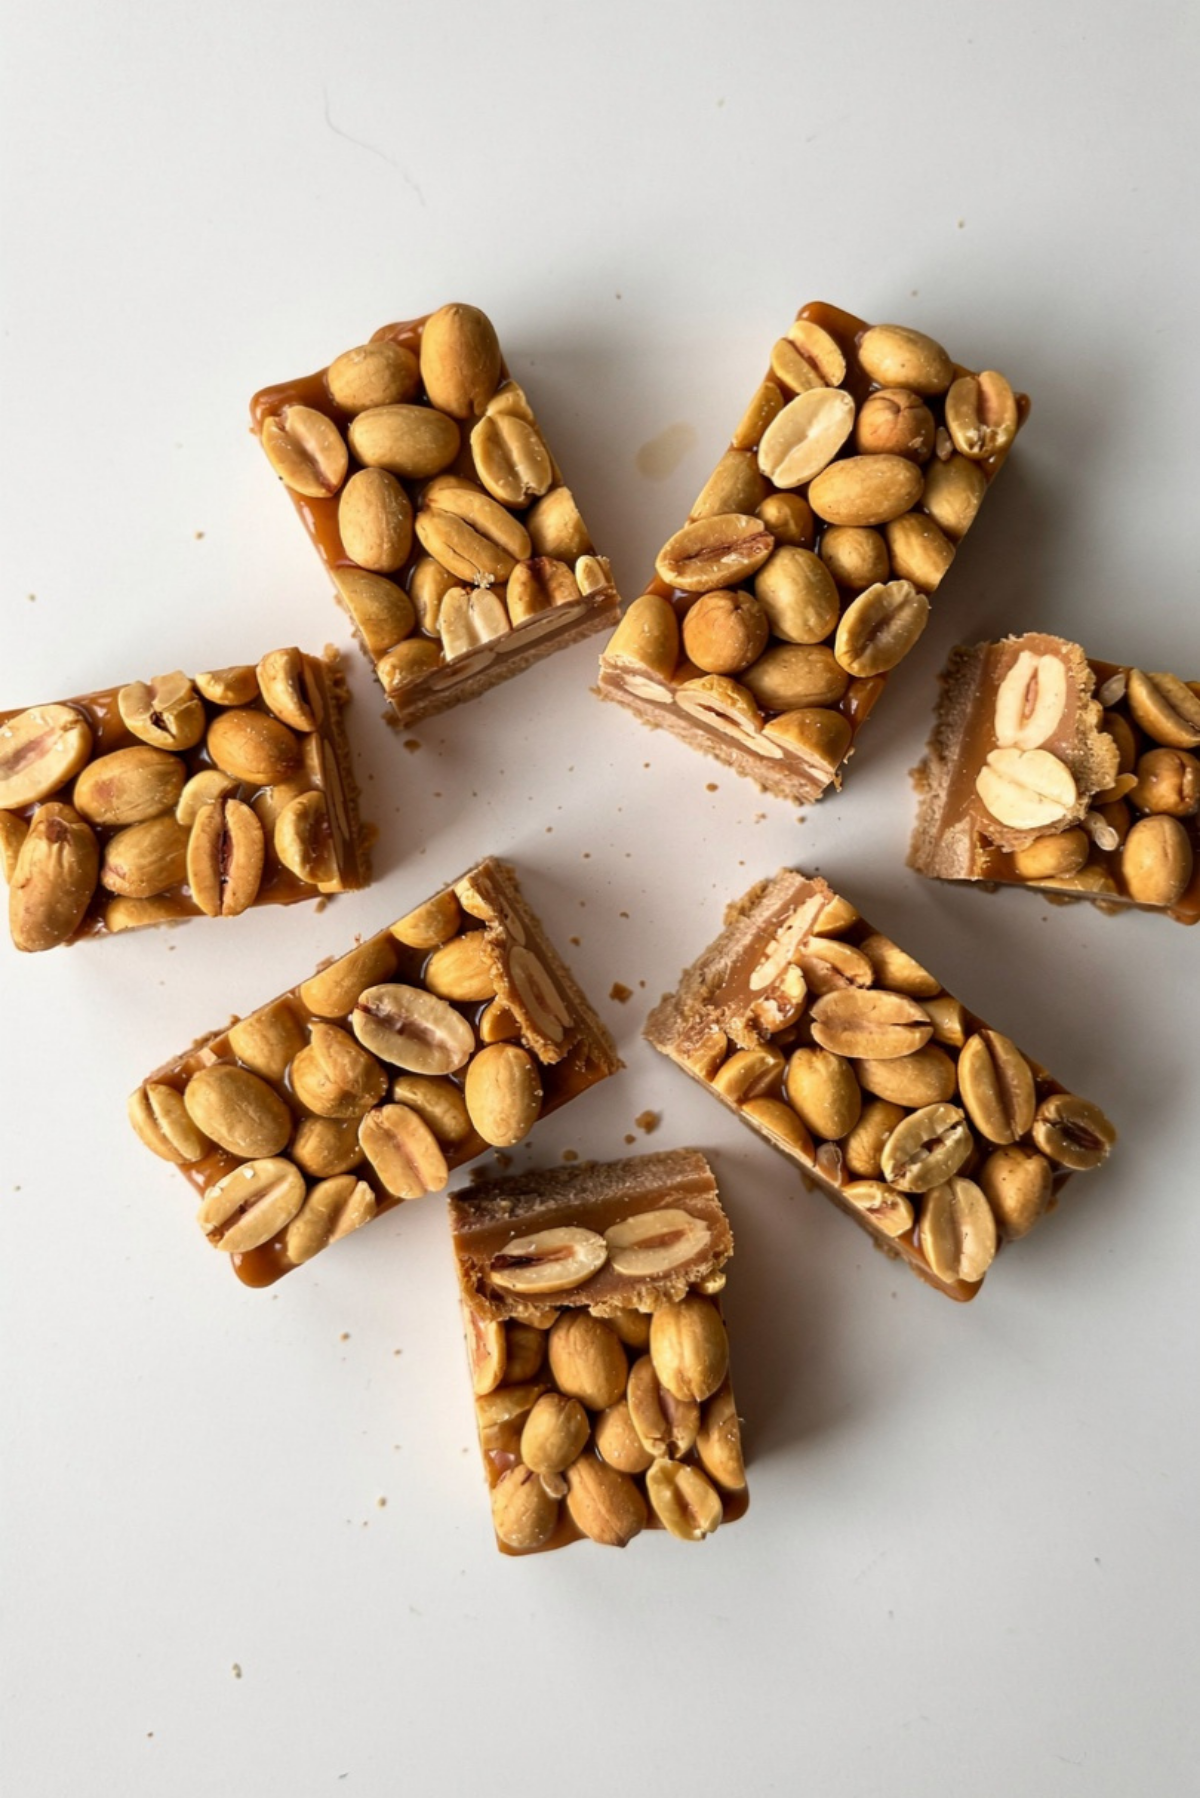
Easy PayDay Candy Bars
There is something so cozy about a chewy peanut candy bar that tastes like it came from a little corner store, but somehow feels even better because it was made in your own kitchen. These bars are salty, sweet, creamy, nutty, and just chewy enough to make every bite feel like a tiny dessert win.
Trust me, you’re going to love this, especially if you like candy that does not need fancy baking skills or a long ingredient list. The peanuts bring crunch, the creamy filling melts into everything, and the whole pan chills into neat little squares that are ready for lunch boxes, parties, or late-night snack cravings.
Why These Homemade Candy Bars Feel So Fun
And now let’s dive into why this treat works so well. It has that classic peanut and caramel-style flavor, but instead of standing over a candy thermometer, you melt a few simple ingredients together and let the fridge do the hard part.
The texture is the real magic here. The outside has that roasted peanut crunch, while the center is soft, sweet, and slightly stretchy. Let me tell you, it’s worth every bite.
A Little Candy Shop Inspiration
These bars take inspiration from old-fashioned peanut candy bars that became popular because they balanced salty peanuts with a sweet chewy center. That mix has always been clever because it keeps the candy from tasting too sugary.
The homemade version keeps the same spirit, but it feels more personal. You can cut the pieces bigger, smaller, or somewhere in the middle, which is usually where I land because one more tiny square always sounds reasonable.
Why This Recipe Belongs in Your Dessert Rotation
Once you make these, you will see why they are such a reliable little dessert. They are easy enough for a weekday, but fun enough to bring to a party.
Versatile: These bars work as a dessert tray treat, a holiday candy, or a quick homemade gift. You can cut them into tiny bites or generous squares.
Budget-Friendly: The ingredients are simple pantry-style items, and one batch makes plenty. It is a sweet way to stretch a few basics into something special.
Quick and Easy: The stovetop part is short, and there is no baking involved. Most of the time is just chilling.
Customizable: You can use salted or lightly salted peanuts, add a chocolate drizzle, or make the bars thicker by using a smaller pan.
Crowd-Pleasing: Peanut lovers usually reach for these fast. The sweet and salty balance makes them hard to ignore.
Make-Ahead Friendly: These chill beautifully, so you can prepare them a day before serving. They slice cleaner after a full rest.
Great for Leftovers: Leftover pieces keep well in the fridge and taste just as good cold. Some people might even like them better that way.
Little Candy-Making Tips From the Kitchen
Before we start melting and layering, here are a few small tricks that make the pan come out cleaner, neater, and tastier.
- Use parchment paper with overhang so you can lift the whole slab out easily.
- Melt the filling over low heat because gentle heat keeps it smooth and creamy.
- Press the top peanut layer lightly so the peanuts stick without crushing the filling.
- Chill fully before slicing because warm bars can turn messy fast.
- Use a sharp knife and wipe it between cuts for neat candy-shop squares.
Tools That Make the Process Easy
You do not need anything fancy here, which is one reason this recipe feels so friendly. A few simple tools will make the process smooth.
9 by 13-inch pan: This gives you a good candy bar thickness and enough servings for sharing.
Parchment paper: This keeps the sticky filling from clinging to the pan.
Medium saucepan: You will use this to melt the creamy filling ingredients together.
Rubber spatula: This helps stir the mixture and spread it evenly over the peanuts.
Sharp knife: A clean, sharp blade makes the chilled bars easier to slice.
Ingredients You Will Need For These Sweet Peanut Bars
Now we get to the good part, the ingredients. Each one has a simple job, and together they create that chewy, salty, creamy bite.
- Salted roasted peanuts: 3 cups, divided. They create the crunchy top and bottom layers.
- Peanut butter chips: 2 cups. These melt into the filling and deepen the peanut flavor.
- Unsalted butter: 2 tablespoons. It adds richness and helps the filling turn glossy.
- Sweetened condensed milk: 1 can, 14 ounces. This gives the filling its creamy sweetness.
- Mini marshmallows: 10 ounces. They melt into a chewy, soft candy center.
- Vanilla extract: 1 teaspoon. It rounds out the sweetness with a warm bakery note.
- Fine salt: 1/4 teaspoon. It sharpens the peanut flavor and balances the sweetness.
Easy Swaps That Still Taste Wonderful
And now, if your pantry is almost ready but not quite, here are a few swaps that still keep the bars delicious.
Salted roasted peanuts: Use lightly salted peanuts if you prefer a softer saltiness.
Peanut butter chips: Use butterscotch chips for a warmer, sweeter flavor.
Unsalted butter: Use salted butter and skip the added fine salt.
Mini marshmallows: Use regular marshmallows, chopped into smaller pieces so they melt evenly.
Vanilla extract: Use maple extract for a cozy twist, but use only 1/2 teaspoon because it is stronger.
The Ingredients That Carry the Flavor
Every ingredient matters, but a couple of them really carry the whole experience.
Salted roasted peanuts: These are the crunchy backbone of the recipe. They give each bite that bold nutty snap and keep the candy from tasting flat.
Sweetened condensed milk: This is what makes the filling creamy and smooth. It blends with the melted chips and marshmallows to create that soft, candy-like center.
Let’s Make the Candy Bars
Here are the steps you’re going to follow. Nothing stressful, just a little melting, layering, chilling, and slicing.
- Preheat Your Equipment: No oven is needed for this recipe. Line a 9 by 13-inch pan with parchment paper, leaving extra over the sides so you can lift the candy out later.
- Combine Ingredients: Add the peanut butter chips, butter, sweetened condensed milk, mini marshmallows, vanilla extract, and fine salt to a medium saucepan. Warm over low heat, stirring often, until the mixture is melted and smooth.
- Prepare Your Cooking Vessel: Sprinkle 1 1/2 cups of the salted roasted peanuts evenly across the bottom of the lined pan. Try to cover the base well so every bar gets that crunchy bottom layer.
- Assemble the Dish: Pour the warm filling over the peanut layer and spread it gently with a spatula. Sprinkle the remaining 1 1/2 cups peanuts evenly over the top.
- Cook to Perfection: Chill the pan for at least 2 hours, or until the candy is firm enough to slice cleanly.
- Finishing Touches: Lift the chilled slab from the pan using the parchment. Cut into 24 bars or squares with a sharp knife.
- Serve and Enjoy: Serve cold or let the bars sit at room temperature for a few minutes for a softer chew. This one’s a total game-changer for peanut candy fans.
How the Texture and Flavor Build Together
The peanuts stay crisp because they sit on the outside, almost like a crunchy little shell around the soft center. The filling starts creamy and warm, then firms as it chills into a chewy bite that still feels smooth.
The salt wakes everything up. Without it, the candy would be sweet but a little sleepy. With it, the roasted peanuts taste deeper, the filling tastes richer, and every bite has that sweet-salty pull that keeps you reaching for one more piece.
Helpful Tips for Better Bars
Once you have the basic method down, these little tips make the finished candy even better.
- Chill before slicing: The bars hold their shape best when fully cold.
- Press gently: A light press helps the top peanuts stick without flattening the candy.
- Use fresh peanuts: Fresh roasted peanuts give the best crunch and flavor.
- Cut small pieces: These are rich, so smaller squares are perfect for serving.
Mistakes to Skip for Cleaner Candy Bars
Candy can feel tricky, but this recipe is forgiving. Just watch for these common little issues.
- Heating too fast: High heat can make the filling thick or uneven. Keep it low and gentle.
- Skipping parchment: The candy is sticky, so parchment makes removal much easier.
- Slicing too soon: If the center is still soft, the bars can smear. Chill until firm.
- Using stale peanuts: Old peanuts taste dull, so use a fresh bag for the best flavor.
Sweet Details and Nutrition
Servings: 24 bars
Calories per serving: 215
Note: These are approximate values.
Time You’ll Need
Prep Time: 15 minutes
Cook Time: 2 hours 5 minutes
Total Time: 2 hours 20 minutes
Make-Ahead and Storage Tips
These bars are made for planning ahead. In fact, they slice better after a long chill, so making them the night before is a smart move.
Store them in an airtight container in the refrigerator for up to 1 week. Place parchment between layers so they do not stick together. You can also freeze them for up to 2 months, then thaw in the fridge before serving. Reheating is not needed, but a few minutes at room temperature will make the center a little softer.
How to Serve
Serve these on a dessert board with fresh fruit, pretzels, chocolate squares, or simple vanilla cookies. The salty peanut flavor pairs beautifully with cold milk, hot coffee, or a creamy vanilla milkshake.
For parties, cut them into small squares and place them in mini paper liners. They look tidy, they are easy to grab, and they make the whole dessert table feel a little more homemade.
Creative Ways to Use Leftovers
Leftovers are not usually a problem, but when they happen, you have options. Chop a few bars and sprinkle them over vanilla ice cream for a crunchy sundae topping.
You can also fold chopped pieces into brownie batter before baking, scatter them over pudding cups, or tuck small cubes into lunch box snack containers. They add instant sweet-salty fun.
Extra Notes for Best Flavor
For the best flavor, choose peanuts that smell fresh and roasted the moment you open the bag. If the peanuts taste flat, the candy will too.
A tiny pinch of extra salt on top can be lovely if you enjoy a stronger salty finish. Just keep it light because the peanuts already bring salt.
Make It Look Bakery-Worthy
Presentation is simple here. Cut the bars into even squares, wipe the knife between slices, and stack them slightly off-center on a clean serving plate.
For a pretty finish, drizzle a little melted chocolate over the top and let it set before serving. Keep the drizzle thin so the peanut flavor still shines.
Variations to Try
- Chocolate Drizzle Bars: Melt 1/2 cup chocolate chips and drizzle over the chilled slab before slicing.
- Butterscotch Peanut Bars: Swap half of the peanut butter chips with butterscotch chips for a warmer candy flavor.
- Extra Salty Crunch Bars: Add a tiny sprinkle of flaky salt on top after pressing in the peanuts.
- Thicker Candy Squares: Use an 8 by 8-inch pan for thicker pieces and chill a little longer.
- Trail Mix Style Bars: Replace 1/2 cup peanuts with chopped pretzels for extra crunch.
FAQ’s
Q1: Can I make these without a candy thermometer?
A1: Yes, and that is one of the best parts. You only need to melt the filling until smooth, then chill it.
Q2: Do the bars need to be refrigerated?
A2: Yes, they stay firmer and fresher in the refrigerator. They can sit out briefly for serving.
Q3: Can I use unsalted peanuts?
A3: You can, but the flavor will be sweeter and less balanced. Add a little extra salt if needed.
Q4: Can I make these gluten free?
A4: The ingredients are naturally gluten free if every package you buy is labeled gluten free.
Q5: Why are my bars too soft?
A5: They probably need more chilling time. Let them firm up fully before cutting.
Q6: Can I freeze them?
A6: Yes, freeze them in layers with parchment between them for up to 2 months.
Q7: Can I use regular marshmallows instead of mini?
A7: Yes, chop them smaller so they melt more evenly.
Q8: How do I get clean slices?
A8: Chill the slab well, use a sharp knife, and wipe the blade between cuts.
Q9: Can I add chocolate?
A9: Yes, a thin chocolate drizzle is delicious and makes the bars look extra special.
Q10: Are these good for gifting?
A10: Absolutely. Wrap them in parchment, place them in a small box, and keep them cool until giving.
Conclusion
Easy PayDay Candy Bars are the kind of homemade treat that feels nostalgic, simple, and a little irresistible. They bring together salty peanuts, creamy filling, and that chewy candy-shop texture without making you fuss over complicated steps.
Make a pan, chill it well, and share a few pieces with people who love sweet and salty snacks. Or keep some tucked in the fridge for yourself, because honestly, this is one of those treats that disappears faster than expected.
Print
Easy PayDay Candy Bars
- Total Time: 2 hours 20 minutes
- Yield: 24 bars
- Diet: Vegetarian
Description
A sweet and salty no-bake peanut candy bar with crunchy roasted peanuts and a soft chewy peanut butter filling.
Ingredients
- 3 cups salted roasted peanuts, divided
- 2 cups peanut butter chips
- 2 tablespoons unsalted butter
- 1 can sweetened condensed milk, 14 ounces
- 10 ounces mini marshmallows
- 1 teaspoon vanilla extract
- 1/4 teaspoon fine salt
Instructions
- Line a 9 by 13-inch pan with parchment paper, leaving overhang on the sides.
- Sprinkle 1 1/2 cups salted roasted peanuts evenly across the bottom of the pan.
- Add peanut butter chips, unsalted butter, sweetened condensed milk, mini marshmallows, vanilla extract, and fine salt to a medium saucepan.
- Warm over low heat, stirring often, until melted and smooth.
- Pour the warm filling over the peanut layer and spread gently with a spatula.
- Sprinkle the remaining 1 1/2 cups salted roasted peanuts evenly over the top.
- Press the top peanut layer lightly so it sticks to the filling.
- Chill for at least 2 hours, or until firm.
- Lift the candy slab from the pan and cut into 24 bars or squares.
- Serve chilled or let sit briefly at room temperature for a softer chew.
Notes
- Use parchment paper so the candy lifts out cleanly.
- Keep the heat low when melting the filling so it stays smooth.
- Chill fully before slicing for the neatest bars.
- Store leftovers in the refrigerator with parchment between layers.
- Prep Time: 15 minutes
- Cook Time: 2 hours 5 minutes
- Category: Dessert
- Method: No-Bake
- Cuisine: American
Nutrition
- Serving Size: 1 bar
- Calories: 215
- Sugar: 18g
- Sodium: 145mg
- Fat: 12g
- Saturated Fat: 5g
- Unsaturated Fat: 6g
- Trans Fat: 0g
- Carbohydrates: 23g
- Fiber: 2g
- Protein: 6g
- Cholesterol: 8mg