Frozen Greek Yogurt Peanut Butter Bites
There is something incredibly satisfying about opening the freezer and finding a little stash of creamy, nutty bites waiting for you. These frozen treats bring together the tang of yogurt and the richness of peanut butter in a way that feels both indulgent and refreshing. Trust me, you’re going to love this, especially on warm days when you want something sweet without turning on the oven.
A Sweet Treat That Feels Light Yet Indulgent
And now, as we settle into what makes these bites so special, imagine that first bite. The outside has a gentle chill, while the inside stays creamy and smooth, almost like a frozen mousse. The balance between slightly tangy yogurt and nutty peanut butter makes every bite feel satisfying but not heavy. This one’s a total game changer when you need a quick dessert that feels homemade without much effort.
A Little Backstory Behind This Simple Delight
As we continue, it’s interesting how frozen yogurt-based treats became popular as a lighter alternative to ice cream. Inspired by classic Greek yogurt desserts and modern snack trends, these bites combine simple pantry staples into something that feels fresh and current. Peanut butter has long been loved across many cultures, and when paired with yogurt, it creates a creamy base that freezes beautifully while keeping a soft bite.
Why These Bites Just Work Every Time
Before we dive deeper, let me tell you why this recipe earns a permanent spot in your freezer.
Versatile: You can enjoy these as a snack, dessert, or even a quick post-workout bite. They fit into almost any moment.
Budget-Friendly: The ingredients are simple and easy to find, which means you can make a batch anytime without thinking twice.
Quick and Easy: Minimal prep and no cooking needed, which makes it perfect for busy days.
Customizable: You can switch up flavors with add-ins like chocolate chips or a drizzle of honey.
Crowd-Pleasing: Both kids and adults reach for these without hesitation.
Make-Ahead Friendly: Store them in the freezer and enjoy whenever you want.
Great for Leftovers: They hold well for days, so nothing goes to waste.
Little Secrets That Make a Big Difference
Now let’s step into a few insider tips that take these from good to amazing.
- Use thick Greek yogurt for the creamiest texture, it makes a noticeable difference.
- Slightly warm the peanut butter so it mixes smoothly without lumps.
- Freeze in small portions to ensure even chilling and easy serving.
- Line your tray with parchment paper to prevent sticking.
Tools That Make It Effortless
Before we jump into ingredients, having the right tools makes everything smoother.
Mixing Bowl: For combining everything evenly.
Spatula: Helps fold the mixture gently without overmixing.
Baking Tray: Used for shaping and freezing the bites.
Parchment Paper: Keeps everything from sticking and makes cleanup easier.
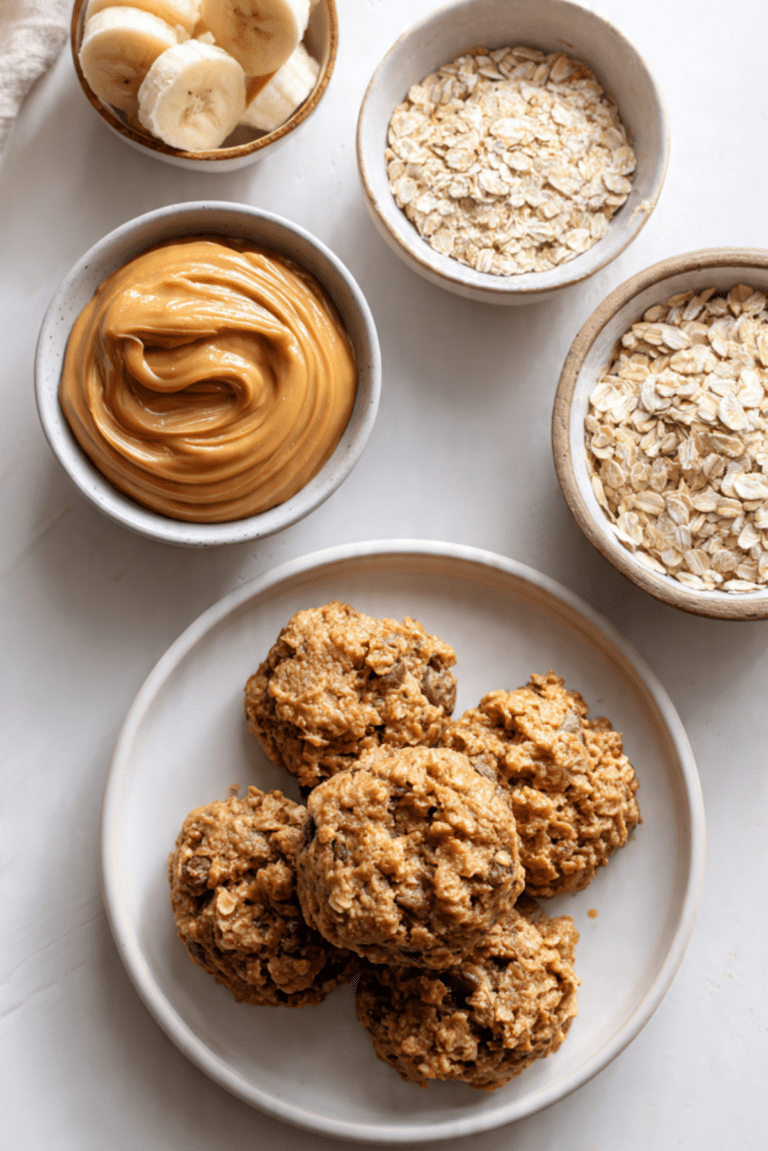
Ingredients You Will Need For This Creamy Snack
Now comes the heart of it all, where simple ingredients come together beautifully.
- Greek Yogurt: 1 cup, thick and plain, it creates the creamy base and adds a slight tang
- Peanut Butter: 1/2 cup, smooth and rich, it brings depth and nutty flavor
- Honey: 2 tablespoons, adds natural sweetness and balances the tang
- Vanilla Extract: 1 teaspoon, enhances the overall flavor
- Mini Chocolate Chips: 1/4 cup, adds texture and a little sweetness in every bite
Easy Swaps If You Want to Experiment
And now, if you feel like switching things up, here are some simple ideas.
Peanut Butter: Almond butter or cashew butter
Honey: Maple syrup
Mini Chocolate Chips: Chopped dark chocolate
Greek Yogurt: Dairy free yogurt alternative
Spotlight on the Stars of the Recipe
Before we mix everything, let’s appreciate what makes this recipe shine.
Greek Yogurt: Thick, creamy, and slightly tangy, it creates that smooth frozen texture.
Peanut Butter: Rich and nutty, it adds depth and a comforting flavor that ties everything together.
Let’s Make These Bites Together
Alright, here are the steps you’re going to follow, and it’s easier than you think.
- Preheat Your Equipment: Place a baking tray lined with parchment paper in your workspace.
- Combine Ingredients: In a bowl, mix Greek yogurt, peanut butter, honey, and vanilla extract until smooth.
- Prepare Your Cooking Vessel: Ensure the tray is ready and flat for even freezing.
- Assemble the Dish: Scoop small portions onto the tray and sprinkle mini chocolate chips on top.
- Cook to Perfection: Place the tray in the freezer and freeze for about 1 hour until firm.
- Finishing Touches: Check that the bites are set but still slightly creamy inside.
- Serve and Enjoy: Enjoy straight from the freezer for the best texture.
A Perfect Balance of Creamy and Chilled
And now that they’re ready, let’s talk about texture. The outside has a gentle firmness, while the inside stays creamy and smooth. The peanut butter adds richness, and the chocolate chips give a slight crunch that contrasts beautifully with the soft center.
Helpful Tips to Make It Even Better
If you want to get the best results every time, keep these in mind.
- Use full-fat yogurt for a richer texture
- Do not overfreeze, or they can become too hard
- Keep portions small for easier snacking
What to Avoid for the Best Results
A few small mistakes can change the outcome, so here’s what to watch for.
- Using thin yogurt can make the bites icy instead of creamy
- Skipping parchment paper can cause sticking
- Freezing too long can make them overly hard
Nutrition Facts You Should Know
Servings: 12
Calories per serving: 90
Note: These are approximate values.
Time Breakdown for This Easy Treat
Prep Time: 10 minutes
Cook Time: 0 minutes
Total Time: 1 hour 10 minutes
Make Ahead and Storage Tips
These bites are perfect for planning ahead. You can prepare them in advance and store them in an airtight container in the freezer for up to a week. If stacking, place parchment paper between layers to prevent sticking. No reheating needed, just grab and enjoy.
How to Serve These Delicious Bites
Serve them straight from the freezer for that perfect creamy texture. Pair them with fresh fruit or enjoy alongside a cup of tea or coffee for a simple treat.
Creative Ways to Use Leftovers
If you happen to have extras, here are some fun ideas.
- Crumble them over yogurt bowls
- Blend into a smoothie for extra creaminess
- Use as a topping for desserts
Extra Tips for Best Results
A little extra care goes a long way.
- Taste the mixture before freezing and adjust sweetness
- Use a cookie scoop for even portions
- Freeze in a single layer for best texture
Make Them Look As Good As They Taste
Presentation makes everything better. Arrange the bites neatly on a plate and add a light drizzle of melted chocolate if you want a more elegant look.
Fun Variations to Try
Want to get creative, here are a few ideas.
- Add crushed nuts for crunch
- Mix in shredded coconut for texture
- Swirl in a bit of jam for fruity flavor
- Use cocoa powder for a chocolate version
FAQ’s
Q1: Can I use flavored yogurt?
Yes, but adjust sweetness since flavored yogurt already contains sugar.
Q2: How long do they last in the freezer?
Up to one week when stored properly.
Q3: Can I skip the chocolate chips?
Absolutely, they are optional.
Q4: Are they very sweet?
They are lightly sweet, you can adjust to taste.
Q5: Can I make them vegan?
Yes, use plant-based yogurt and maple syrup.
Q6: Why are my bites too hard?
They may have been frozen too long.
Q7: Can I add protein powder?
Yes, mix it in with the yogurt base.
Q8: Do I need molds?
No, a simple spoon works just fine.
Q9: Can I use crunchy peanut butter?
Yes, it adds extra texture.
Q10: Can kids help make this?
Definitely, it’s a fun and easy recipe.
Conclusion
And just like that, you have a batch of frozen yogurt bites that feel both simple and special. They are creamy, satisfying, and incredibly easy to make. Let me tell you, it’s worth every bite. Keep a batch in your freezer and you’ll always have something delicious ready to go.
Print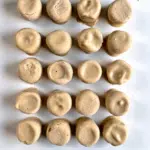
Frozen Greek Yogurt Peanut Butter Bites
- Total Time: 1 hour 10 minutes
- Yield: 12 bites
- Diet: Vegetarian
Description
Creamy, nutty, and lightly sweet frozen bites made with Greek yogurt and peanut butter, perfect for a refreshing snack or quick dessert.
Ingredients
- 1 cup Greek yogurt
- 1/2 cup peanut butter
- 2 tablespoons honey
- 1 teaspoon vanilla extract
- 1/4 cup mini chocolate chips
Instructions
- Prepare a baking tray lined with parchment paper.
- In a mixing bowl, combine Greek yogurt, peanut butter, honey, and vanilla extract. Mix until smooth and creamy.
- Ensure the tray is flat and ready for even freezing.
- Scoop small portions of the mixture onto the tray and sprinkle mini chocolate chips on top.
- Place the tray in the freezer and freeze for about 1 hour until firm.
- Check that the bites are set but still slightly creamy inside.
- Serve directly from the freezer and enjoy.
Notes
- Use thick Greek yogurt for the best creamy texture.
- Do not overfreeze to avoid overly hard bites.
- Store in an airtight container in the freezer for up to one week.
- Prep Time: 10 minutes
- Cook Time: 0 minutes
- Category: Dessert
- Method: Freezing
- Cuisine: International
Nutrition
- Serving Size: 1 bite
- Calories: 90
- Sugar: 5g
- Sodium: 35mg
- Fat: 6g
- Saturated Fat: 2g
- Unsaturated Fat: 3g
- Trans Fat: 0g
- Carbohydrates: 7g
- Fiber: 1g
- Protein: 3g
- Cholesterol: 5mg