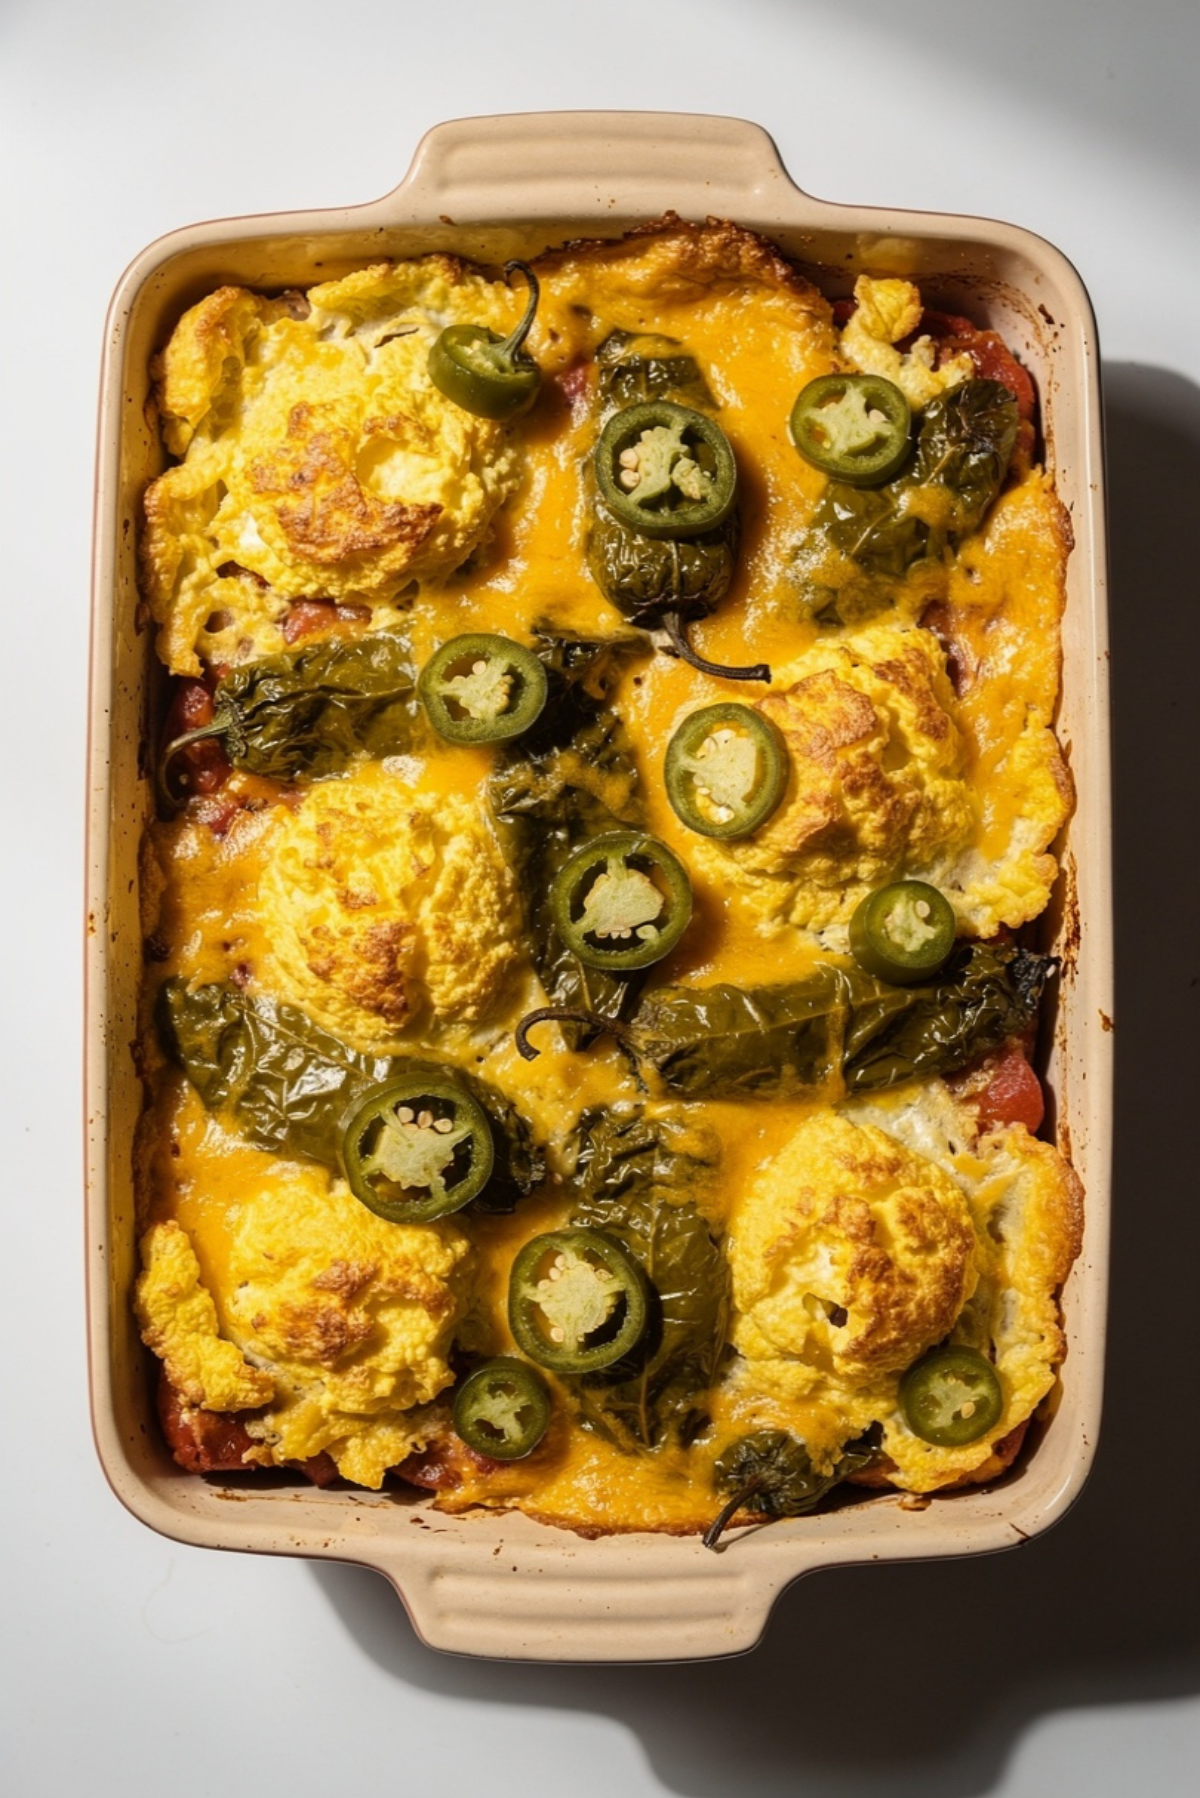
Easy Chile Relleno Casserole
There’s something incredibly comforting about pulling a bubbling casserole out of the oven, especially when the kitchen smells like roasted chiles, melted cheese, and warm spices. This Easy Chile Relleno Casserole brings all those cozy flavors together in one satisfying dish that feels both hearty and effortless. Every bite has soft roasted chiles tucked into fluffy eggs with layers of gooey cheese that stretch perfectly with each forkful. Trust me, you’re going to love this one because it tastes like something that took hours, even though it comes together surprisingly fast.
Why This Cozy Casserole Always Wins at the Table
Some recipes just have a way of making everyone happy the second they hit the table, and this casserole definitely falls into that category. It has that balance of creamy, savory, cheesy goodness that works for breakfast, brunch, or even a simple weeknight dinner.
The roasted green chiles bring a gentle smoky flavor without overpowering the dish, while the eggs puff up beautifully around the melted cheese. Let me tell you, it’s worth every bite. It feels comforting, filling, and just a little nostalgic in the best way possible.
And now that your mouth is probably watering already, let’s dive a little deeper into where this delicious dish comes from.
The Story Behind This Beloved Southwestern Favorite
Chile relleno flavors have roots in Mexican cuisine, where roasted peppers are traditionally stuffed with cheese, dipped in batter, and fried until golden. Over time, home cooks created easier baked versions that captured those same flavors without the extra work.
This casserole version became especially popular because it transforms the classic dish into something family-friendly and practical for busy kitchens. Instead of individually stuffing peppers, everything gets layered together into one bubbling pan of comfort food.
The result is a meal that still celebrates roasted peppers and cheese while making the process much simpler for everyday cooking.
Why You’ll Keep Coming Back to This Recipe
This casserole is one of those dependable dishes you’ll want to keep in regular rotation because it checks so many boxes at once.
Versatile: It works beautifully for breakfast, brunch, lunch, or dinner. You can even serve it during holidays or casual weekend gatherings.
Budget-Friendly: Most of the ingredients are simple pantry and refrigerator staples, which makes this recipe easy on the grocery budget.
Quick and Easy: The prep is straightforward, and the oven does most of the work for you.
Customizable: You can adjust the spice level, swap cheeses, or add extra vegetables depending on what you have on hand.
Crowd-Pleasing: Even picky eaters tend to love the cheesy, fluffy texture and mild chile flavor.
Make-Ahead Friendly: You can prep everything ahead of time and bake it later when needed.
Great for Leftovers: The flavors become even richer the next day, making leftovers something to look forward to.
Smart Kitchen Secrets for the Best Results
A few simple tricks can take this casserole from good to absolutely irresistible.
- Use roasted whole green chiles instead of diced chiles whenever possible because they create beautiful layers throughout the casserole.
- Drain the chiles well before layering them so the casserole stays fluffy instead of watery.
- Freshly shredded cheese melts more smoothly than pre-shredded cheese, which often contains anti-caking agents.
- Let the casserole rest for about 10 minutes after baking so the layers can settle before slicing.
- If you want extra color on top, broil the casserole for 1 to 2 minutes at the very end.
Kitchen Tools That Make Everything Easier
Before you start mixing and layering, it helps to have a few reliable kitchen tools ready to go.
Mixing Bowls: You’ll need these for whisking together the eggs, milk, and seasonings.
Whisk: Helps create a smooth and fluffy egg mixture.
9×13 Baking Dish: The perfect size for even baking and clean slices.
Cheese Grater: Freshly grated cheese melts beautifully and adds better texture.
Measuring Cups and Spoons: Keeping measurements accurate helps the casserole bake evenly.
Rubber Spatula: Useful for spreading layers evenly in the baking dish.
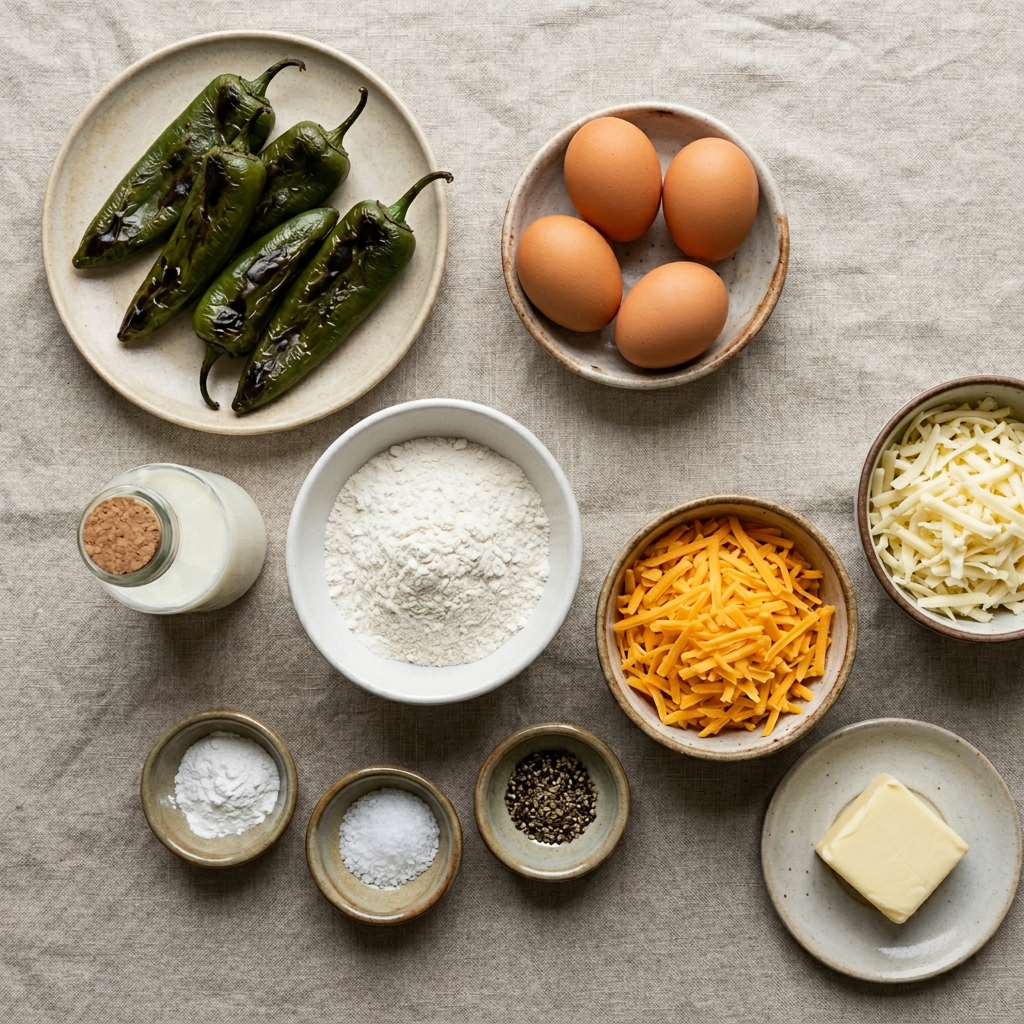
Ingredients That Bring Everything Together
Every ingredient in this casserole works together to create rich flavor, creamy texture, and that irresistible cheesy finish everyone loves.
- Whole Green Chiles: 2 cans (7 ounces each), drained well, these create the signature roasted chile flavor and soft texture throughout the casserole.
- Large Eggs: 5 large eggs, they form the fluffy base that holds everything together.
- Whole Milk: 1 cup, adds richness and keeps the casserole tender.
- All-Purpose Flour: 1/4 cup, helps stabilize the egg mixture for a soft but sliceable texture.
- Baking Powder: 1 teaspoon, gives the casserole a light and airy consistency.
- Salt: 1/2 teaspoon, enhances the savory flavors.
- Black Pepper: 1/4 teaspoon, adds gentle warmth.
- Shredded Cheddar Cheese: 2 cups, creates bold cheesy flavor and golden melted texture.
- Shredded Monterey Jack Cheese: 1 cup, melts beautifully and balances the sharp cheddar.
- Unsalted Butter: 1 tablespoon, softened, helps grease the baking dish and prevents sticking.
Easy Ingredient Swaps You Can Try
One of the best things about this recipe is how adaptable it can be depending on your preferences.
Whole Milk: Half-and-half or evaporated milk.
Cheddar Cheese: Pepper Jack for extra heat.
Monterey Jack Cheese: Mozzarella for a milder flavor.
Whole Green Chiles: Fire-roasted poblano peppers.
All-Purpose Flour: Gluten-free flour blend.
Ingredients That Truly Shine in This Dish
Some ingredients completely transform this casserole into something unforgettable.
Whole Green Chiles: These roasted peppers bring gentle smokiness and authentic flavor that makes the dish taste rich and comforting without being overly spicy.
Cheddar Cheese: Sharp cheddar melts into every layer, creating gooey pockets of cheesy goodness that balance perfectly with the roasted chiles.
Let’s Get Cooking
Now comes the fun part, bringing everything together into one bubbling, cheesy casserole that smells incredible while it bakes.
- Preheat Your Equipment: Preheat your oven to 350°F. Lightly grease a 9×13 baking dish with the softened butter.
- Combine Ingredients: In a large mixing bowl, whisk together the eggs, milk, flour, baking powder, salt, and black pepper until smooth.
- Prepare Your Cooking Vessel: Arrange half of the whole green chiles evenly across the bottom of the greased baking dish.
- Assemble the Dish: Sprinkle half of the cheddar cheese and Monterey Jack cheese over the chiles. Repeat with the remaining chiles and cheeses. Slowly pour the egg mixture evenly over the top.
- Cook to Perfection: Bake uncovered for 40 to 45 minutes, or until the casserole is puffed, golden, and set in the center.
- Finishing Touches: Let the casserole rest for 10 minutes before slicing so the layers can settle properly.
- Serve and Enjoy: Slice into squares and serve warm with salsa, sour cream, or fresh avocado if desired.
The Texture and Flavor Magic Happening in Every Bite
As the casserole bakes, the eggs puff around the layers of roasted chiles and melted cheese, creating a texture that feels creamy yet light at the same time. The edges become slightly golden while the center stays soft and rich.
The roasted peppers bring gentle smoky depth, while the cheddar adds sharpness and the Monterey Jack keeps everything silky and smooth. Every forkful feels warm, savory, and incredibly satisfying.
Helpful Tips for Foolproof Results
A few little details can make a big difference when preparing this casserole.
- Use room temperature eggs for a smoother and fluffier texture.
- Drain canned chiles very thoroughly to avoid excess moisture.
- Let the casserole cool slightly before cutting for cleaner slices.
- Add sliced jalapeños on top if you enjoy extra heat.
Mistakes You’ll Want to Avoid
Even easy casseroles can run into a few common issues, but thankfully they’re simple to avoid.
- Avoid overbaking because the eggs can become rubbery instead of soft and fluffy.
- Do not skip greasing the baking dish or the casserole may stick around the edges.
- Avoid using cold shredded cheese straight from the refrigerator because it melts less evenly.
- Do not slice immediately after baking because the casserole needs a few minutes to set.
A Quick Look at the Nutrition
Servings: 8
Calories per serving: 310
Note: These are approximate values.
Timing Your Cooking Session
Prep Time: 15 minutes
Cook Time: 45 minutes
Total Time: 1 hour
Make-Ahead and Storage Tips That Save Time
This casserole is fantastic for busy schedules because you can prep it ahead without sacrificing flavor or texture.
You can assemble the entire casserole the night before, cover it tightly, and refrigerate until ready to bake. When baking from cold, simply add about 5 extra minutes to the cooking time.
Leftovers store beautifully in an airtight container in the refrigerator for up to 4 days. For longer storage, freeze individual portions wrapped tightly for up to 2 months.
To reheat, warm slices in the oven or microwave until heated through.
Delicious Ways to Serve This Comforting Dish
This casserole pairs wonderfully with fresh toppings and simple side dishes that brighten the rich cheesy flavors.
Serve it with:
- Fresh salsa
- Sliced avocado
- Sour cream
- Crisp green salad
- Roasted potatoes
- Fresh fruit for brunch
Creative Ideas for Leftovers
Leftover casserole can easily become something completely new and equally delicious.
Try stuffing slices into warm tortillas for breakfast burritos, or serve cubes over roasted potatoes with extra cheese for a hearty skillet meal.
You can even layer leftovers inside toasted sandwich rolls for a cheesy Southwestern-style melt.
Extra Tips That Make Cooking Easier
Little touches can make this recipe even more enjoyable from start to finish.
Use freshly grated cheese whenever possible because it melts more smoothly and tastes richer. If you want a smokier flavor, try adding roasted poblano peppers alongside the green chiles.
And if you love crispy edges, bake the casserole in a slightly shallower dish for more golden surface area.
Turn This Into a Stunning Table Centerpiece
Presentation makes this casserole feel even more inviting.
Sprinkle chopped cilantro and sliced jalapeños across the top right before serving for bright color contrast. Serve it directly from the baking dish while it’s still bubbling warm for that cozy homemade feel everyone loves.
A dollop of sour cream and a spoonful of salsa on the side make each plate look restaurant-worthy.
Fun Variations Worth Trying
Once you’ve made the classic version, there are plenty of delicious ways to switch things up.
- Add cooked breakfast sausage for a heartier brunch version.
- Mix in sautéed onions and bell peppers for extra flavor and texture.
- Use Pepper Jack cheese for a spicier casserole.
- Add corn kernels for a touch of sweetness and color.
- Top with crushed tortilla chips before baking for added crunch.
FAQ’s
1. Can I make this casserole ahead of time?
Yes, you can fully assemble it the night before and refrigerate until ready to bake.
2. Is this casserole spicy?
The flavor is usually mild, but you can add jalapeños for extra heat.
3. Can I freeze leftovers?
Absolutely. Wrap portions tightly and freeze for up to 2 months.
4. What cheese melts best in this recipe?
Cheddar and Monterey Jack create the perfect balance of flavor and creaminess.
5. Can I use fresh roasted peppers instead of canned chiles?
Yes, roasted poblano peppers work wonderfully.
6. Why is my casserole watery?
The chiles may not have been drained thoroughly enough.
7. Can I make this gluten-free?
Yes, simply use a gluten-free flour blend.
8. What should I serve alongside it?
Fresh salad, salsa, avocado, or roasted potatoes all pair beautifully.
9. How do I know when it’s done baking?
The center should be set and the top lightly golden.
10. Can I reheat it in the microwave?
Yes, individual slices reheat very well in the microwave.
Conclusion
Easy Chile Relleno Casserole is one of those comforting dishes that somehow feels both effortless and special at the same time. Between the roasted chiles, fluffy eggs, and layers of melted cheese, every bite feels warm, rich, and satisfying. Whether you’re making it for brunch, dinner, or meal prep for the week ahead, this one’s a total game-changer. Once you try it, there’s a good chance it’ll become a regular favorite in your kitchen too.
Print
Easy Chile Relleno Casserole
- Total Time: 1 hour
- Yield: 8 servings
- Diet: Vegetarian
Description
A warm and cheesy Easy Chile Relleno Casserole packed with roasted green chiles, fluffy eggs, cheddar cheese, and Monterey Jack cheese. Perfect for brunch, breakfast, or an easy family dinner.
Ingredients
- 2 cans (7 ounces each) whole green chiles, drained well
- 5 large eggs
- 1 cup whole milk
- 1/4 cup all-purpose flour
- 1 teaspoon baking powder
- 1/2 teaspoon salt
- 1/4 teaspoon black pepper
- 2 cups shredded cheddar cheese
- 1 cup shredded Monterey Jack cheese
- 1 tablespoon unsalted butter, softened
Instructions
- Preheat oven to 350°F and grease a 9×13 baking dish with softened butter.
- Whisk together eggs, milk, flour, baking powder, salt, and black pepper in a large bowl until smooth.
- Arrange half of the green chiles in the prepared baking dish.
- Sprinkle half of the cheddar cheese and Monterey Jack cheese over the chiles.
- Repeat with remaining chiles and cheeses.
- Pour the egg mixture evenly over the layered ingredients.
- Bake uncovered for 40 to 45 minutes until golden and set in the center.
- Let the casserole rest for 10 minutes before slicing and serving.
Notes
- Drain the chiles thoroughly to avoid excess moisture.
- Freshly shredded cheese melts more smoothly than pre-shredded cheese.
- Add sliced jalapeños for extra heat if desired.
- Let the casserole rest before slicing for cleaner servings.
- Prep Time: 15 minutes
- Cook Time: 45 minutes
- Category: Breakfast
- Method: Baking
- Cuisine: Southwestern
Nutrition
- Serving Size: 1 slice
- Calories: 310
- Sugar: 3g
- Sodium: 520mg
- Fat: 22g
- Saturated Fat: 11g
- Unsaturated Fat: 9g
- Trans Fat: 0g
- Carbohydrates: 8g
- Fiber: 1g
- Protein: 18g
- Cholesterol: 165mg