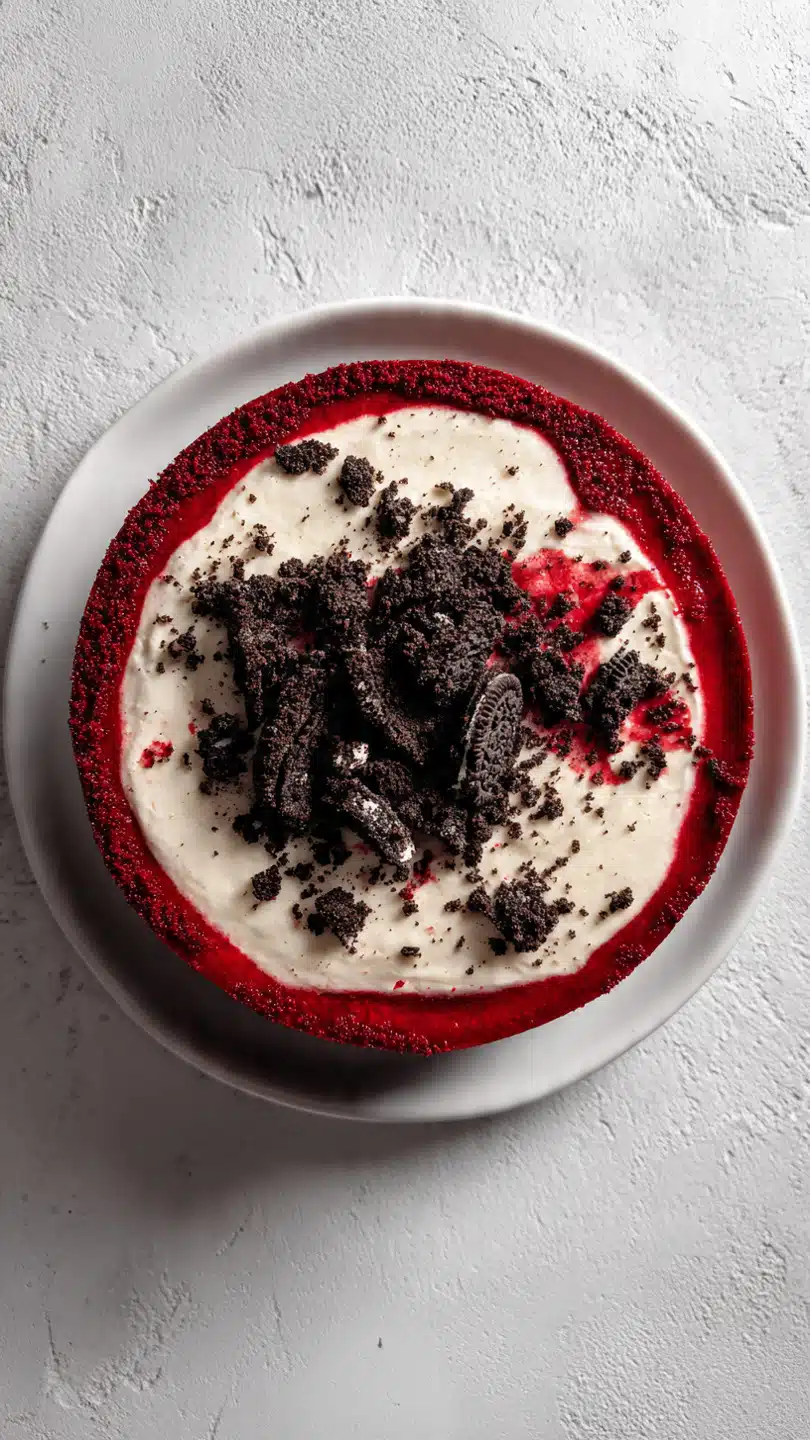
Red velvet Oreo cheesecake
The moment you slice into this beauty, you already know you are in for something special. That deep red base paired with creamy layers and little surprises of Oreo in every bite, it just hits differently. The texture is rich yet smooth, the flavor is slightly tangy with a chocolatey crunch, and honestly, trust me, you’re going to love this.
What makes this dessert impossible to resist
There is something about the contrast in this cheesecake that makes it unforgettable. The soft, velvety base meets the creamy filling, while Oreo pieces add that familiar crunch we all crave. Each bite feels balanced, not too sweet, not too heavy, just pure comfort.
A little story behind the flavors
Red velvet has always been a classic, known for its subtle cocoa flavor and signature color. Cheesecake, on the other hand, has roots that go way back in European kitchens before becoming a staple in American desserts. When these two come together with Oreos, it feels like a modern twist that blends tradition with indulgence. Let me tell you, it’s worth every bite.
Why this recipe works every single time
This is one of those desserts you can rely on, whether it’s your first try or your tenth.
Versatile: You can dress it up for celebrations or keep it simple for a cozy night in.
Budget-Friendly: Uses simple ingredients that are easy to find.
Quick and Easy: The steps are straightforward, even if it looks fancy.
Customizable: You can adjust sweetness or Oreo quantity easily.
Crowd-Pleasing: Everyone loves the mix of cheesecake and cookies.
Make-Ahead Friendly: It actually tastes better after chilling.
Great for Leftovers: The flavor deepens the next day.
Pro tips that make all the difference
Before we jump into the kitchen, here are a few tricks that elevate the result.
- Use room temperature cream cheese so the filling stays smooth
- Do not overmix once eggs are added to avoid cracks
- Bake with a water bath for a creamy texture
- Let it cool slowly to prevent sinking
Tools you will want nearby
Having the right tools makes everything smoother.
Springform Pan: Essential for easy removal without damaging the cake
Mixing Bowls: Keeps your ingredients organized
Hand Mixer or Stand Mixer: Helps achieve that silky texture
Spatula: Perfect for scraping every bit of batter
Oven Tray: Needed if you use a water bath
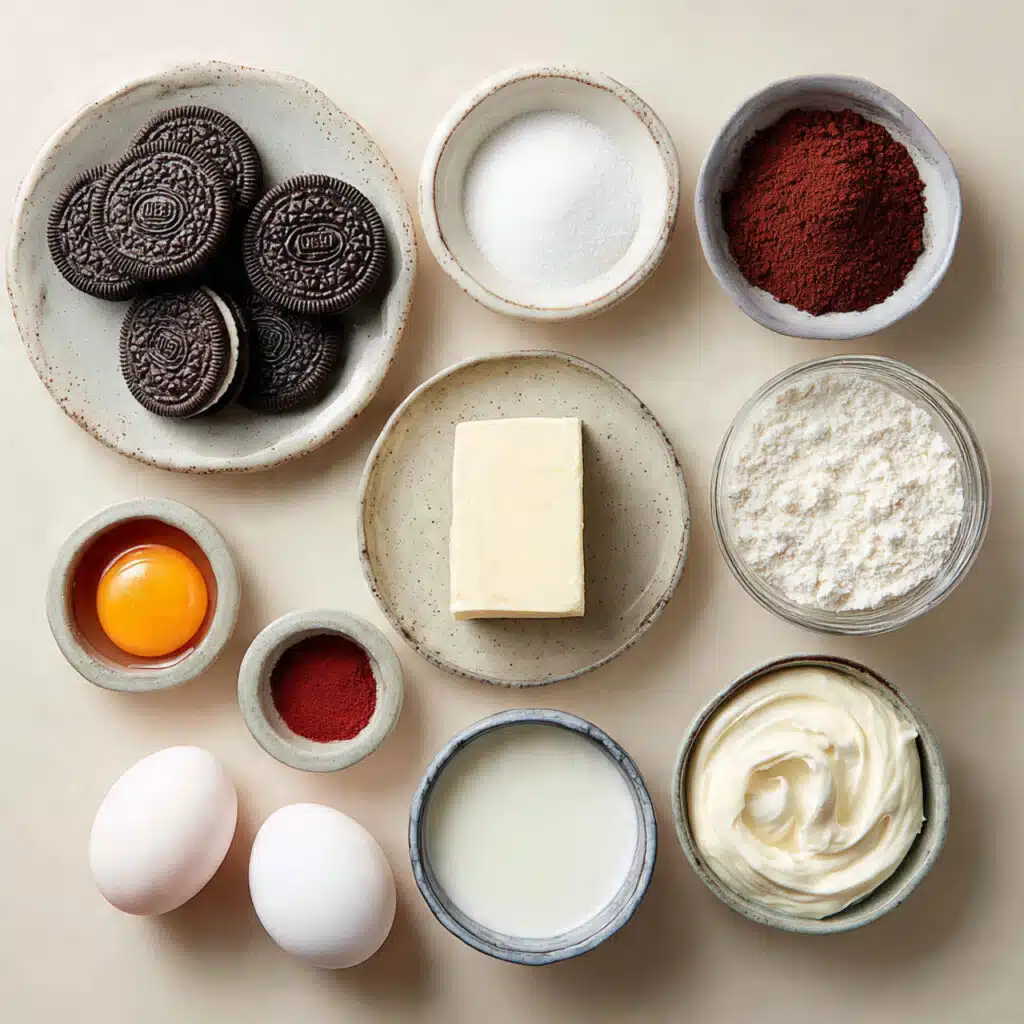
Ingredients that come together beautifully
Every ingredient here plays a role in building layers of flavor and texture.
- Chocolate sandwich cookies: 24 cookies, crushed, these form the base and add crunch
- Unsalted butter: 1/2 cup melted, binds the crust together
- Cream cheese: 24 oz softened, creates the creamy filling
- Granulated sugar: 3/4 cup, adds sweetness and balance
- Eggs: 3 large, helps set the structure
- Vanilla extract: 1 tsp, enhances flavor
- Sour cream: 1/2 cup, adds tanginess and smoothness
- Cocoa powder: 2 tbsp, gives a subtle chocolate note
- Red food coloring: 1 tbsp, creates that signature color
- Heavy cream: 1/4 cup, adds richness to the filling
Easy swaps if you need them
Sometimes you work with what you have, and that is perfectly fine.
Cream cheese: Mascarpone for a lighter texture
Sour cream: Greek yogurt as a tangy substitute
Granulated sugar: Brown sugar for a deeper flavor
Oreos: Any chocolate sandwich cookie
The stars of the show
A couple of ingredients really stand out here.
Cream Cheese: The heart of the cheesecake, giving that rich and creamy texture
Chocolate Sandwich Cookies: They bring crunch and that nostalgic chocolate flavor
Let’s bring it all together
Now comes the fun part, and honestly, this is where the magic happens.
- Preheat Your Equipment: Set your oven to 325°F and prepare a springform pan
- Combine Ingredients: Mix crushed cookies with melted butter until it looks like wet sand
- Prepare Your Cooking Vessel: Press the crust into the pan and chill briefly
- Assemble the Dish: Beat cream cheese and sugar, add eggs one by one, then mix in vanilla, sour cream, cocoa powder, food coloring, and heavy cream. Fold in chopped cookies
- Cook to Perfection: Pour filling over crust and bake for about 50 minutes using a water bath
- Finishing Touches: Let it cool slowly, then refrigerate for at least 4 hours
- Serve and Enjoy: Slice and enjoy every creamy, crunchy bite
A balance of texture and flavor
What makes this dessert stand out is the contrast. The crust is slightly firm with a buttery bite, while the filling is smooth and creamy. Then you get those Oreo pieces that add crunch and a little burst of chocolate. It is layered, rich, and incredibly satisfying.
Helpful tips to keep in mind
- Chill overnight for the best texture
- Use a warm knife for clean slices
- Do not rush the cooling process
What to avoid while making it
It is easy to get things right, but here are a few things to watch out for.
- Overmixing the batter can cause cracks
- Skipping the chilling time affects texture
- Baking at too high a temperature dries it out
Nutrition snapshot
Servings: 10
Calories per serving: 420
Note: These are approximate values.
Time you need to plan for
Prep Time: 20 minutes
Cook Time: 50 minutes
Total Time: 1 hour 10 minutes
Make ahead and storage ideas
You can easily prepare this a day in advance, which actually improves the flavor. Store it in the fridge covered for up to 4 days. If you want to freeze it, wrap slices individually and thaw in the fridge overnight before serving.
Serving ideas that make it shine
Serve it chilled with a drizzle of chocolate sauce or a dollop of whipped cream. Fresh berries on the side add a nice contrast too.
Turning leftovers into something new
Leftovers can be turned into mini parfaits by layering pieces with whipped cream. You can even blend it into a milkshake for something fun.
Extra tips for best results
Use high quality cocoa powder for deeper flavor. Also, always taste your batter before baking, it helps you adjust sweetness.
Make it look stunning
Top it with crushed cookies or a smooth chocolate drizzle. A clean slice and simple garnish already make it look impressive.
Variations you can try
Try adding white chocolate chips for extra sweetness. Swap Oreos with golden cookies for a different flavor. Add a chocolate ganache topping for a richer finish. You can even make it into mini cheesecakes.
FAQ’s
1. Can I make this without a water bath?
Yes, but the texture may be slightly less creamy and cracks might appear.
2. How do I know it is done?
The center should still jiggle slightly when you shake the pan.
3. Can I use low fat cream cheese?
Yes, but the texture will be less rich.
4. How long should it chill?
At least 4 hours, but overnight is best.
5. Can I freeze it?
Yes, wrap it tightly and freeze up to 2 months.
6. Why did my cheesecake crack?
Usually due to overmixing or sudden temperature changes.
7. Can I skip the food coloring?
Yes, it will still taste great, just without the red color.
8. Can I use a different crust?
Absolutely, graham crackers work well too.
9. How do I get clean slices?
Use a warm knife and wipe it between cuts.
10. Can I add toppings?
Of course, chocolate sauce, whipped cream, or berries all work beautifully.
Conclusion
This one is truly a showstopper, from its vibrant color to its creamy texture and crunchy surprises. It is rich, comforting, and just a little bit indulgent in the best way. Give it a try, and you might find it becoming your go to dessert for every special occasion.
Print
Red velvet Oreo cheesecake
- Total Time: 1 hour 10 minutes
- Yield: 10 servings
- Diet: Vegetarian
Description
A rich and creamy red velvet cheesecake layered with crunchy chocolate sandwich cookies, perfectly balanced with a smooth, velvety filling and a buttery cookie crust.
Ingredients
- 24 chocolate sandwich cookies, crushed
- 1/2 cup unsalted butter, melted
- 24 oz cream cheese, softened
- 3/4 cup granulated sugar
- 3 large eggs
- 1 tsp vanilla extract
- 1/2 cup sour cream
- 2 tbsp cocoa powder
- 1 tbsp red food coloring
- 1/4 cup heavy cream
Instructions
- Preheat oven to 325°F and prepare a springform pan.
- Mix crushed chocolate sandwich cookies with melted butter until combined.
- Press mixture into the bottom of the pan and chill briefly.
- Beat cream cheese and sugar until smooth, then add eggs one at a time.
- Mix in vanilla extract, sour cream, cocoa powder, red food coloring, and heavy cream until combined.
- Fold in additional chopped chocolate sandwich cookies.
- Pour filling over the crust and place pan in a water bath.
- Bake for about 50 minutes until the center slightly jiggles.
- Turn off oven and let cheesecake cool slowly inside.
- Refrigerate for at least 4 hours before serving.
Notes
- Use room temperature cream cheese for a smooth batter
- Avoid overmixing after adding eggs to prevent cracks
- Chill overnight for best texture and flavor
- Use a warm knife for clean slices
- Prep Time: 20 minutes
- Cook Time: 50 minutes
- Category: Dessert
- Method: Baking
- Cuisine: American
Nutrition
- Serving Size: 1 slice
- Calories: 420
- Sugar: 28g
- Sodium: 320mg
- Fat: 28g
- Saturated Fat: 16g
- Unsaturated Fat: 10g
- Trans Fat: 0g
- Carbohydrates: 35g
- Fiber: 1g
- Protein: 6g
- Cholesterol: 110mg