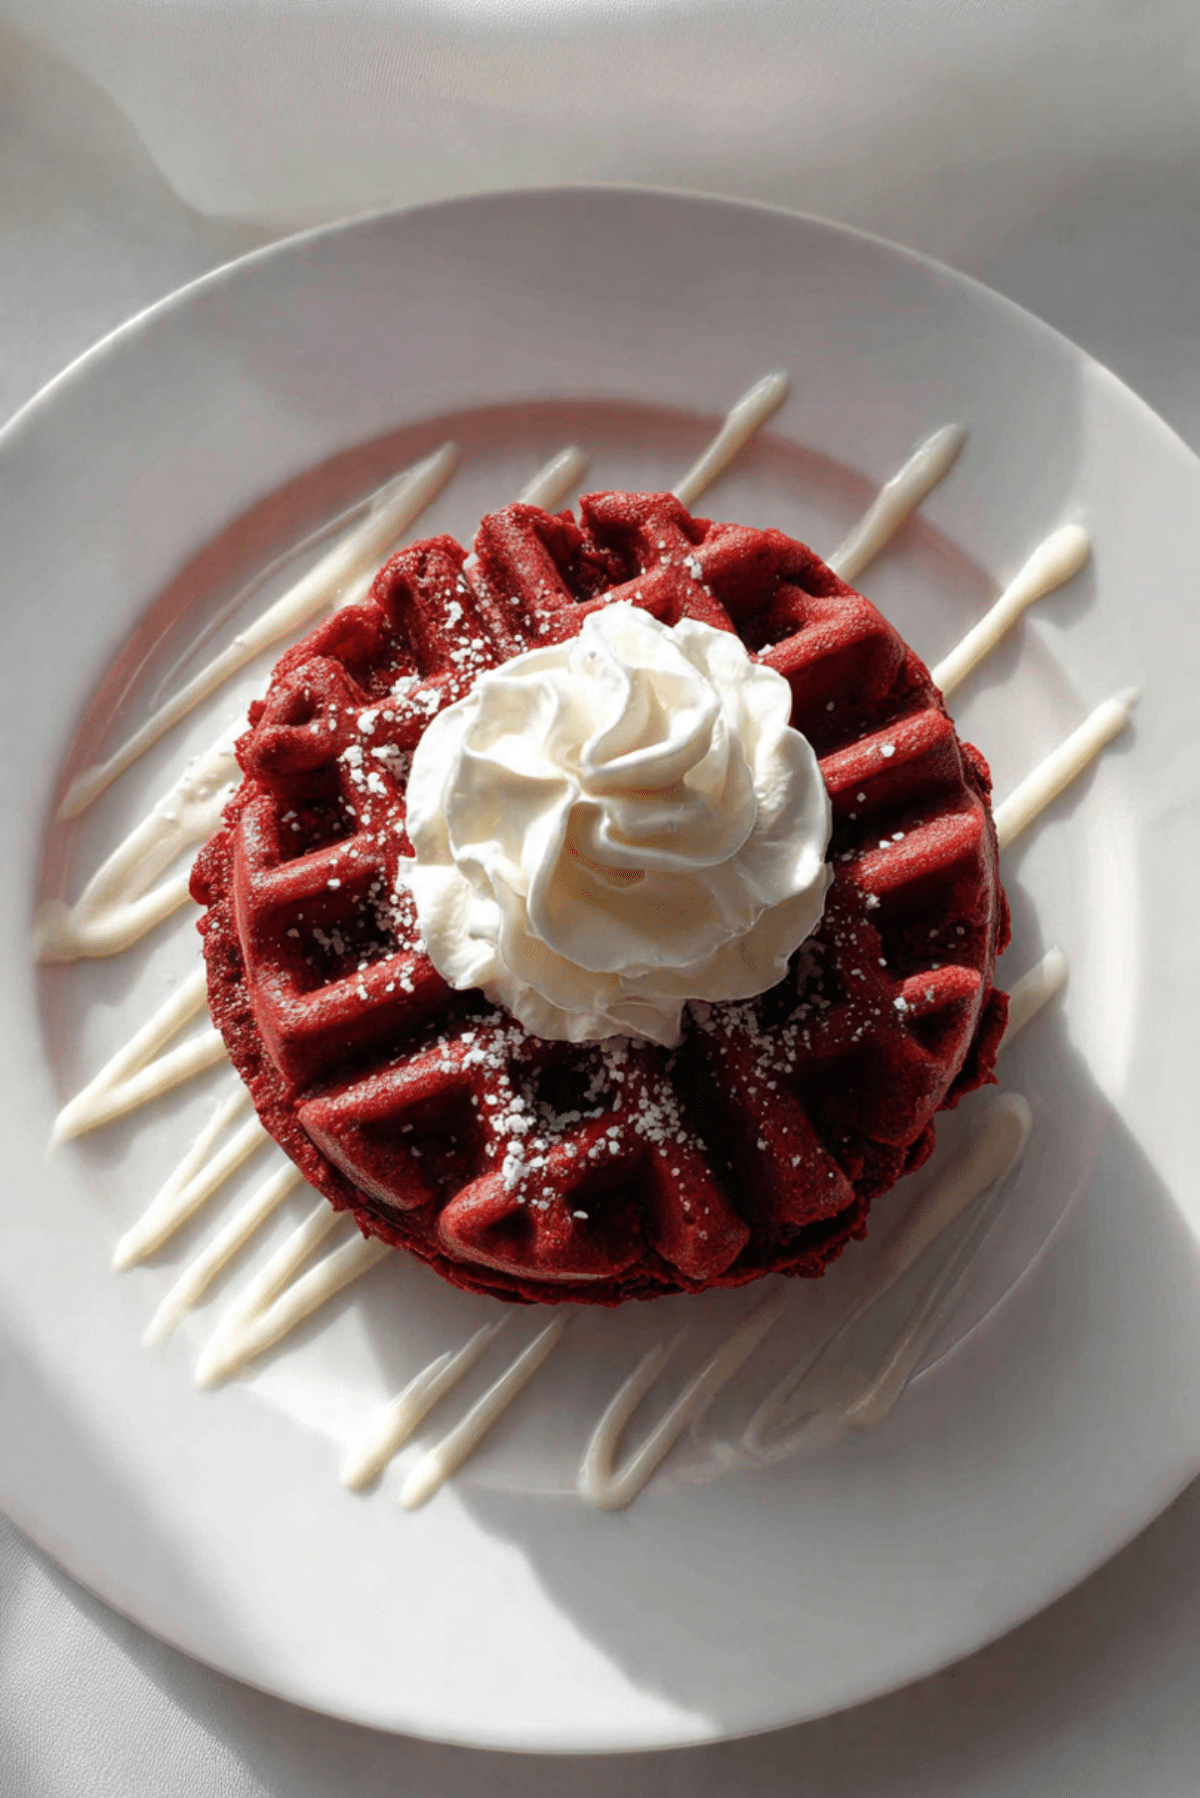
Red Velvet Waffles
There’s something downright magical about red velvet waffles. That rich ruby color, the faint hint of cocoa, and the soft, tender bite all wrapped into a perfectly crisped waffle. Top that with a swirl of cream cheese glaze and maybe a few berries, and you’ve got a breakfast that feels like dessert — or a dessert that’s perfectly welcome at breakfast. Trust me, you’re going to love this one.
Behind the Recipe
It all started on a slow Sunday morning when I was craving something cozy and indulgent. Pancakes felt too predictable, and I wanted a bit of drama on the plate — something that would make my kitchen smell like a bakery and look like I spent hours crafting it (even if I didn’t). That’s when red velvet waffles came to life. A twist on a classic cake, poured into a waffle iron and crisped to perfection.
Recipe Origin or Trivia
Red velvet cake has roots tracing back to the early 20th century, often linked to Southern U.S. baking traditions. Originally made with cocoa powder and acidic ingredients to bring out the red hues in natural cocoa, it was a showstopper even before food coloring became a staple. Turning this into waffles? Well, that’s the modern magic of brunch innovation.
Why You’ll Love Red Velvet Waffles
These aren’t just pretty — they’re packed with flavor and comforting texture.
Versatile: Serve them for breakfast, brunch, dessert, or even a cheeky midnight snack.
Budget-Friendly: Uses pantry staples like flour, sugar, and cocoa — no fancy ingredients required.
Quick and Easy: The batter comes together fast, and the waffle iron does most of the work.
Customizable: Swap out toppings, play with glazes, or even make them mini for fun bites.
Crowd-Pleasing: The color, aroma, and flavor are impossible to resist — everyone loves them.
Make-Ahead Friendly: Batter can be prepped ahead and stored in the fridge overnight.
Great for Leftovers: Toast them up the next day for a just-made texture.
Chef’s Pro Tips for Perfect Results
Even if you’ve never made red velvet anything, these tips will help you waffle like a pro:
- Use buttermilk: It adds tanginess and helps keep the waffles fluffy inside and crisp outside.
- Don’t overmix: Stir until just combined to avoid dense waffles.
- Let the batter rest: A 5–10 minute rest gives the baking powder and soda time to activate.
- Grease your waffle iron well: These waffles are rich, and a little nonstick spray goes a long way.
- Don’t rush the cook time: Let them cook fully until golden at the edges for that perfect crisp.
Kitchen Tools You’ll Need
You don’t need much to make these beauties, just a few trusty tools:
Waffle Iron: Essential for getting those signature ridges and crisp texture.
Mixing Bowls: One for dry, one for wet, and a big one to bring it all together.
Whisk or Hand Mixer: To get that batter smooth and well-combined.
Measuring Cups and Spoons: Precision is key with baking-based recipes.
Spatula: Helps you fold without overmixing and scrape every bit of batter.
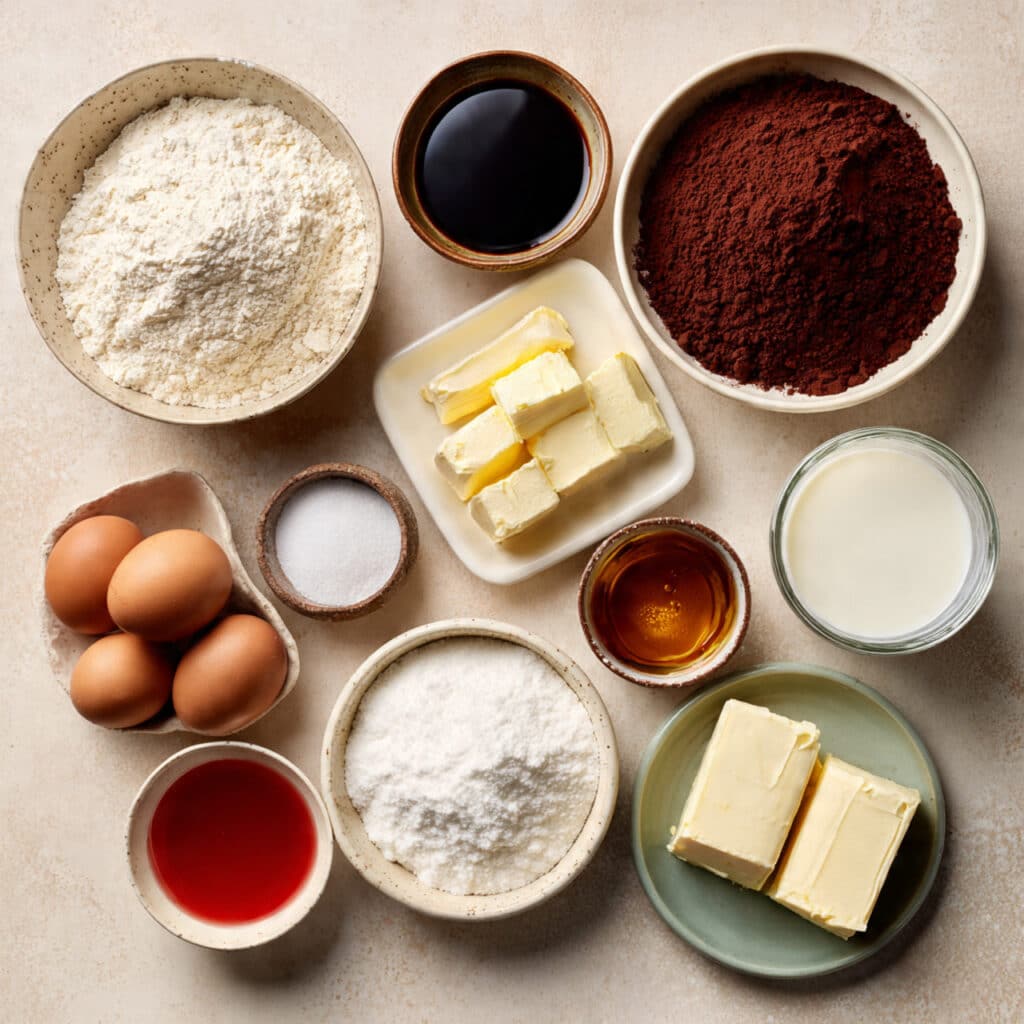
Ingredients in Red Velvet Waffles
This lineup of ingredients is where all the flavor and fluffiness begins. Everything plays a part in creating that rich red bite.
- All-purpose flour: 2 cups – The base that gives the waffles their structure.
- Granulated sugar: 1/4 cup – Just enough sweetness without overpowering.
- Unsweetened cocoa powder: 2 tablespoons – Adds that signature velvet flavor.
- Baking powder: 1 tablespoon – Gives the waffles their lift.
- Baking soda: 1/2 teaspoon – Works with the acidic ingredients for fluffiness.
- Salt: 1/2 teaspoon – Balances all the sweet flavors.
- Buttermilk: 1 3/4 cups – Adds tang and keeps everything tender.
- Large eggs: 2 – Helps bind everything together.
- Unsalted butter (melted): 1/3 cup – Richness and moisture in every bite.
- Red food coloring: 1 tablespoon – For that deep, dramatic hue.
- Vanilla extract: 1 teaspoon – Adds warmth and depth.
- White vinegar: 1 teaspoon – Reacts with cocoa for flavor and color.
- Cream cheese: 4 oz (softened) – The base for our luscious glaze.
- Powdered sugar: 1 cup – Sweetens and smooths the glaze.
- Milk: 2–3 tablespoons – Thins the glaze to drizzle perfection.
Ingredient Substitutions
Don’t stress if you’re missing a thing or two — here’s how to adapt:
Buttermilk: Use milk with a splash of lemon juice or vinegar.
Red food coloring: Leave it out for a more natural cocoa waffle.
Unsalted butter: Swap with neutral oil like vegetable or canola.
Cream cheese: Mascarpone works beautifully too.
Powdered sugar: Blend granulated sugar to make a DIY version.
Ingredient Spotlight
Buttermilk: This creamy, tangy liquid makes all the difference. It activates the baking soda and gives the waffles their dreamy texture.
Cocoa Powder: It’s not just for color — it gives a whisper of chocolate that balances the sweetness.
Instructions for Making Red Velvet Waffles
These waffles are fun to make and even more fun to eat. Here’s the step-by-step:
- Preheat Your Equipment:
Fire up your waffle iron so it’s hot and ready when your batter is. - Combine Ingredients:
In one bowl, whisk together flour, sugar, cocoa powder, baking powder, baking soda, and salt.
In another, whisk buttermilk, eggs, melted butter, vanilla, food coloring, and vinegar. Pour wet into dry and stir gently until just combined. - Prepare Your Cooking Vessel:
Lightly grease your waffle iron with nonstick spray or melted butter. - Assemble the Dish:
Pour batter into the center of the waffle iron, spreading gently if needed. - Cook to Perfection:
Close the lid and cook until waffles are set, edges are crisp, and steam slows down. - Finishing Touches:
While waffles cook, beat cream cheese until smooth. Add powdered sugar and milk to reach drizzling consistency. - Serve and Enjoy:
Stack waffles high, drizzle with cream cheese glaze, and add toppings like berries or nuts if you like.
Texture & Flavor Secrets
These waffles are everything you want — crispy edges, soft centers, and that signature cocoa-kissed flavor. The tang from buttermilk and cream cheese balances the sweetness, and the drizzle adds a silky finish that melts into the ridges.
Cooking Tips & Tricks
Get the most out of your red velvet masterpiece with these handy tips:
- Let the batter rest before cooking for fluffier results.
- Avoid opening the waffle iron too early — let it fully cook.
- Use room-temperature ingredients for a smoother batter.
- Make extra glaze for dipping — trust me on this one.
What to Avoid
A few small missteps can mess with the magic — here’s how to avoid them:
- Overmixing the batter, which leads to dense waffles.
- Using cold butter or eggs that can seize the batter.
- Skimping on the grease, which causes sticking.
- Pouring too much batter, which creates overflow.
Nutrition Facts
Servings: 6
Calories per serving: 370
Note: These are approximate values.
Preparation Time
Prep Time: 10 minutes
Cook Time: 15 minutes
Total Time: 25 minutes
Make-Ahead and Storage Tips
You can absolutely plan ahead with these. Mix the batter the night before and refrigerate. Leftover waffles? Store them in an airtight container and reheat in the toaster or oven for that fresh-made crunch. The cream cheese glaze keeps well in the fridge too.
How to Serve Red Velvet Waffles
Go big with toppings like fresh strawberries, whipped cream, or even a scoop of vanilla ice cream. Serve with a side of crisp bacon or a hot cup of coffee for contrast. For a fancy brunch, dust with powdered sugar and edible flowers.
Creative Leftover Transformations
Turn leftovers into waffle sandwiches with fruit and whipped cream. Or cube and toast the waffles, then layer them into a red velvet trifle with yogurt or pudding. You can even crumble them for a fun parfait topping.
Additional Tips
- Add a pinch of cinnamon or espresso powder for depth.
- For crispier waffles, let them cool on a wire rack instead of stacking.
- Double the glaze and store in a jar — it’s perfect on pancakes or fruit.
Make It a Showstopper
Serve your stack on a cake stand for extra height. Garnish with a mint sprig, drizzle in a zigzag for drama, and place a berry or two on top. You eat with your eyes first, after all.
Variations to Try
- Red Velvet Waffle Pops: Pour into mini molds and add sticks for party treats.
- Chocolate Chip Red Velvet: Fold in mini chips before cooking.
- Stuffed Waffles: Add cream cheese filling inside for a surprise.
- Gluten-Free Version: Use a gluten-free flour blend.
- Vegan Option: Use flax eggs, dairy-free milk, and vegan butter.
FAQ’s
Q1: Can I freeze red velvet waffles?
Yes, let them cool completely, then freeze in a single layer. Reheat in a toaster or oven for best texture.
Q2: Can I make these without food coloring?
Absolutely. The color will be more natural, but the taste stays the same.
Q3: Is the glaze necessary?
It’s highly recommended — but you can swap it with maple syrup or whipped cream.
Q4: What waffle maker works best?
Any standard or Belgian waffle iron works. Just don’t overfill.
Q5: How do I keep waffles warm?
Place cooked waffles on a baking sheet in a 200°F oven while making the rest.
Q6: Can I make the batter ahead?
Yes, refrigerate overnight and stir gently before using.
Q7: Are these good for kids?
Totally. The fun color and sweetness make them a hit.
Q8: Can I add nuts?
Sure! Chopped pecans or walnuts add great crunch.
Q9: How do I know when waffles are done?
When the steam slows and edges are crisp, they’re ready.
Q10: Can I use a pancake mix?
Not for red velvet flavor. Stick with homemade batter for best results.
Conclusion
Red velvet waffles are the kind of recipe that instantly upgrades any morning. They’re bold, beautiful, and bursting with flavor. Whether you’re making them for brunch guests or just yourself in pajamas, they bring that little something extra to the table. Let me tell you, it’s worth every bite.
Print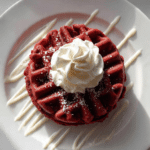
Red Velvet Waffles
- Total Time: 25 minutes
- Yield: 6 waffles
- Diet: Vegetarian
Description
Fluffy, vibrant red velvet waffles with a hint of cocoa, topped with a luscious cream cheese glaze. A decadent twist on breakfast or brunch that’s as beautiful as it is delicious.
Ingredients
- 2 cups all-purpose flour
- 1/4 cup granulated sugar
- 2 tablespoons unsweetened cocoa powder
- 1 tablespoon baking powder
- 1/2 teaspoon baking soda
- 1/2 teaspoon salt
- 1 3/4 cups buttermilk
- 2 large eggs
- 1/3 cup unsalted butter, melted
- 1 tablespoon red food coloring
- 1 teaspoon vanilla extract
- 1 teaspoon white vinegar
- 4 oz cream cheese, softened
- 1 cup powdered sugar
- 2–3 tablespoons milk
Instructions
- Preheat your waffle iron so it’s ready for the batter.
- In a large bowl, whisk together flour, sugar, cocoa powder, baking powder, baking soda, and salt.
- In another bowl, whisk together buttermilk, eggs, melted butter, red food coloring, vanilla extract, and white vinegar.
- Pour the wet ingredients into the dry and mix until just combined. Let the batter rest for 5–10 minutes.
- Grease your waffle iron and pour in the batter. Cook until waffles are crisp and golden at the edges.
- While waffles cook, beat cream cheese until smooth. Add powdered sugar and enough milk to reach drizzling consistency.
- Top cooked waffles with the cream cheese glaze and any desired toppings.
Notes
- Don’t overmix the batter for fluffy texture.
- Use room temperature ingredients for smooth blending.
- Let waffles rest on a wire rack to stay crispy.
- The glaze can be made in advance and stored in the fridge.
- Prep Time: 10 minutes
- Cook Time: 15 minutes
- Category: Breakfast, Brunch, Dessert
- Method: Waffle Iron
- Cuisine: American
Nutrition
- Serving Size: 1 waffle
- Calories: 370
- Sugar: 18g
- Sodium: 310mg
- Fat: 18g
- Saturated Fat: 9g
- Unsaturated Fat: 7g
- Trans Fat: 0g
- Carbohydrates: 45g
- Fiber: 1g
- Protein: 7g
- Cholesterol: 85mg