Peppermint Mocha Cookie Cups
There’s just something magical about the combination of peppermint and mocha when the holidays roll around. Imagine biting into a soft, chocolatey cookie cup, only to be met with a swirl of peppermint whipped cream, hints of espresso, and a touch of candy cane crunch. That festive balance of rich and refreshing makes these Peppermint Mocha Cookie Cups an irresistible treat you’ll be dreaming about long after the season ends. Let’s just say, once these show up on the dessert table, they disappear fast.
Behind the Recipe
This recipe was born during one of those cozy December nights when the scent of cocoa and peppermint fills the house, the fireplace is crackling, and there’s a warm mug of mocha in hand. I wanted to bottle that exact feeling into a bite-sized dessert. These cookie cups bring all the holiday vibes with them and feel like a joyful hug in edible form. They’ve become a go-to for gifting, cookie swaps, and just making a cold day feel a little warmer.
Recipe Origin or Trivia
Peppermint and mocha is a flavor duo that really took off thanks to festive coffeehouse drinks. But did you know peppermint has been used in sweets since ancient times? In the 1800s, candy canes became a Christmas staple, and their crushed version adds that nostalgic sparkle to modern treats like this one. Mocha, a mix of coffee and chocolate, originated from Yemen and found its place in dessert culture as a rich and complex flavor that pairs beautifully with mint. This dessert brings it all together in the cutest little cookie cup form.
Why You’ll Love Peppermint Mocha Cookie Cups
This isn’t just another holiday dessert. These cookie cups check all the boxes, from flavor to presentation.
Versatile: They’re perfect for holiday trays, edible gifts, or after-dinner treats.
Budget-Friendly: Made with pantry staples, these don’t require any pricey ingredients.
Quick and Easy: The dough comes together fast and the frosting is a simple whip-up job.
Customizable: You can swap out the toppings, tweak the chocolate intensity, or go frosting-free if you like.
Crowd-Pleasing: Kids love the cookie base and adults swoon over the mocha twist.
Make-Ahead Friendly: Bake the cups ahead and frost later to save time.
Great for Leftovers: If there are any left, they store beautifully and still taste fresh the next day.
Chef’s Pro Tips for Perfect Results
To make sure your cookie cups turn out bakery-quality every time, here are a few of my favorite tricks.
- Chill the dough: A short chill helps prevent spreading and gives that nice thick cup shape.
- Grease the muffin tin well: You don’t want to wrestle these out after baking.
- Use a shot glass or the back of a spoon: This helps form perfect cup indents after baking.
- Don’t overbake: They should look slightly underdone in the center to stay soft as they cool.
- Whip the cream until stiff peaks form: This makes the frosting pipeable and stable.
Kitchen Tools You’ll Need
You won’t need anything fancy here, just a few basics.
Mixing bowls: For dough and frosting prep.
Electric mixer: Makes creaming butter and whipping cream easy.
Muffin tin: Standard size works best for forming the cups.
Cooling rack: To let those cups cool evenly.
Piping bag or zip-top bag: For topping the cups with a swirl of frosting.
Small spoon or glass: For pressing down the center after baking.
Ingredients in Peppermint Mocha Cookie Cups
These ingredients come together in perfect holiday harmony with each playing its part.
- All-Purpose Flour: 1 and 1/4 cups – forms the structure of the cookie cups.
- Unsweetened Cocoa Powder: 1/4 cup – adds deep, chocolatey richness.
- Baking Soda: 1/2 teaspoon – gives the dough a light lift.
- Salt: 1/4 teaspoon – enhances all the other flavors.
- Unsalted Butter: 1/2 cup (1 stick), softened – makes the base rich and tender.
- Granulated Sugar: 1/2 cup – adds sweetness and helps with texture.
- Brown Sugar: 1/4 cup – brings moisture and a subtle caramel note.
- Egg: 1 large – binds everything together.
- Vanilla Extract: 1 teaspoon – adds depth to the chocolate.
- Peppermint Extract: 1/4 teaspoon – gives that classic minty finish.
- Instant Espresso Powder: 1 teaspoon – boosts the chocolate and mocha notes.
- Mini Chocolate Chips: 1/2 cup – melted slightly into the dough for gooey bites.
- Heavy Cream: 1 cup – whipped into a fluffy peppermint frosting.
- Powdered Sugar: 1/2 cup – sweetens the whipped topping.
- Crushed Peppermint Candies: 2 tablespoons – for topping with a holiday crunch.
- Candy Canes: Optional – for garnish or festive flair.
Ingredient Substitutions
Want to switch things up or adapt to what you have?
All-Purpose Flour: Use gluten-free all-purpose flour for a GF version.
Butter: Try plant-based butter for a dairy-free alternative.
Espresso Powder: Can be left out or replaced with decaf powder.
Heavy Cream: Coconut cream works beautifully for a dairy-free frosting.
Peppermint Extract: Mint extract can substitute, but go light as it’s stronger.
Ingredient Spotlight
Peppermint Extract: Just a tiny bit of this powerful flavor turns your dessert into something festive and bright. It’s concentrated, so don’t overdo it.
Instant Espresso Powder: A little touch of espresso intensifies the chocolate flavor without making the dessert taste like coffee. It’s the secret to that rich mocha base.

Instructions for Making Peppermint Mocha Cookie Cups
Let’s dive right into the fun part. Making these little holiday gems is almost as enjoyable as eating them.
1. Preheat Your Equipment:
Preheat your oven to 350°F (175°C). Grease a 12-cup muffin tin with non-stick spray or butter.
2. Combine Ingredients:
In a mixing bowl, whisk together flour, cocoa powder, baking soda, and salt.
In another bowl, cream together the butter, granulated sugar, and brown sugar until fluffy. Beat in the egg, vanilla, peppermint extract, and espresso powder. Slowly add in the dry ingredients, then stir in the mini chocolate chips.
3. Prepare Your Cooking Vessel:
Scoop dough into the muffin tin, filling each cup about 3/4 full. Press slightly to flatten the tops.
4. Assemble the Dish:
Bake for 10–12 minutes, or until the tops are set. Immediately after removing from the oven, use the back of a spoon or a small glass to gently press the center down, forming a cup.
5. Cook to Perfection:
Let the cups cool in the tin for 10 minutes, then carefully transfer to a wire rack to cool completely.
6. Finishing Touches:
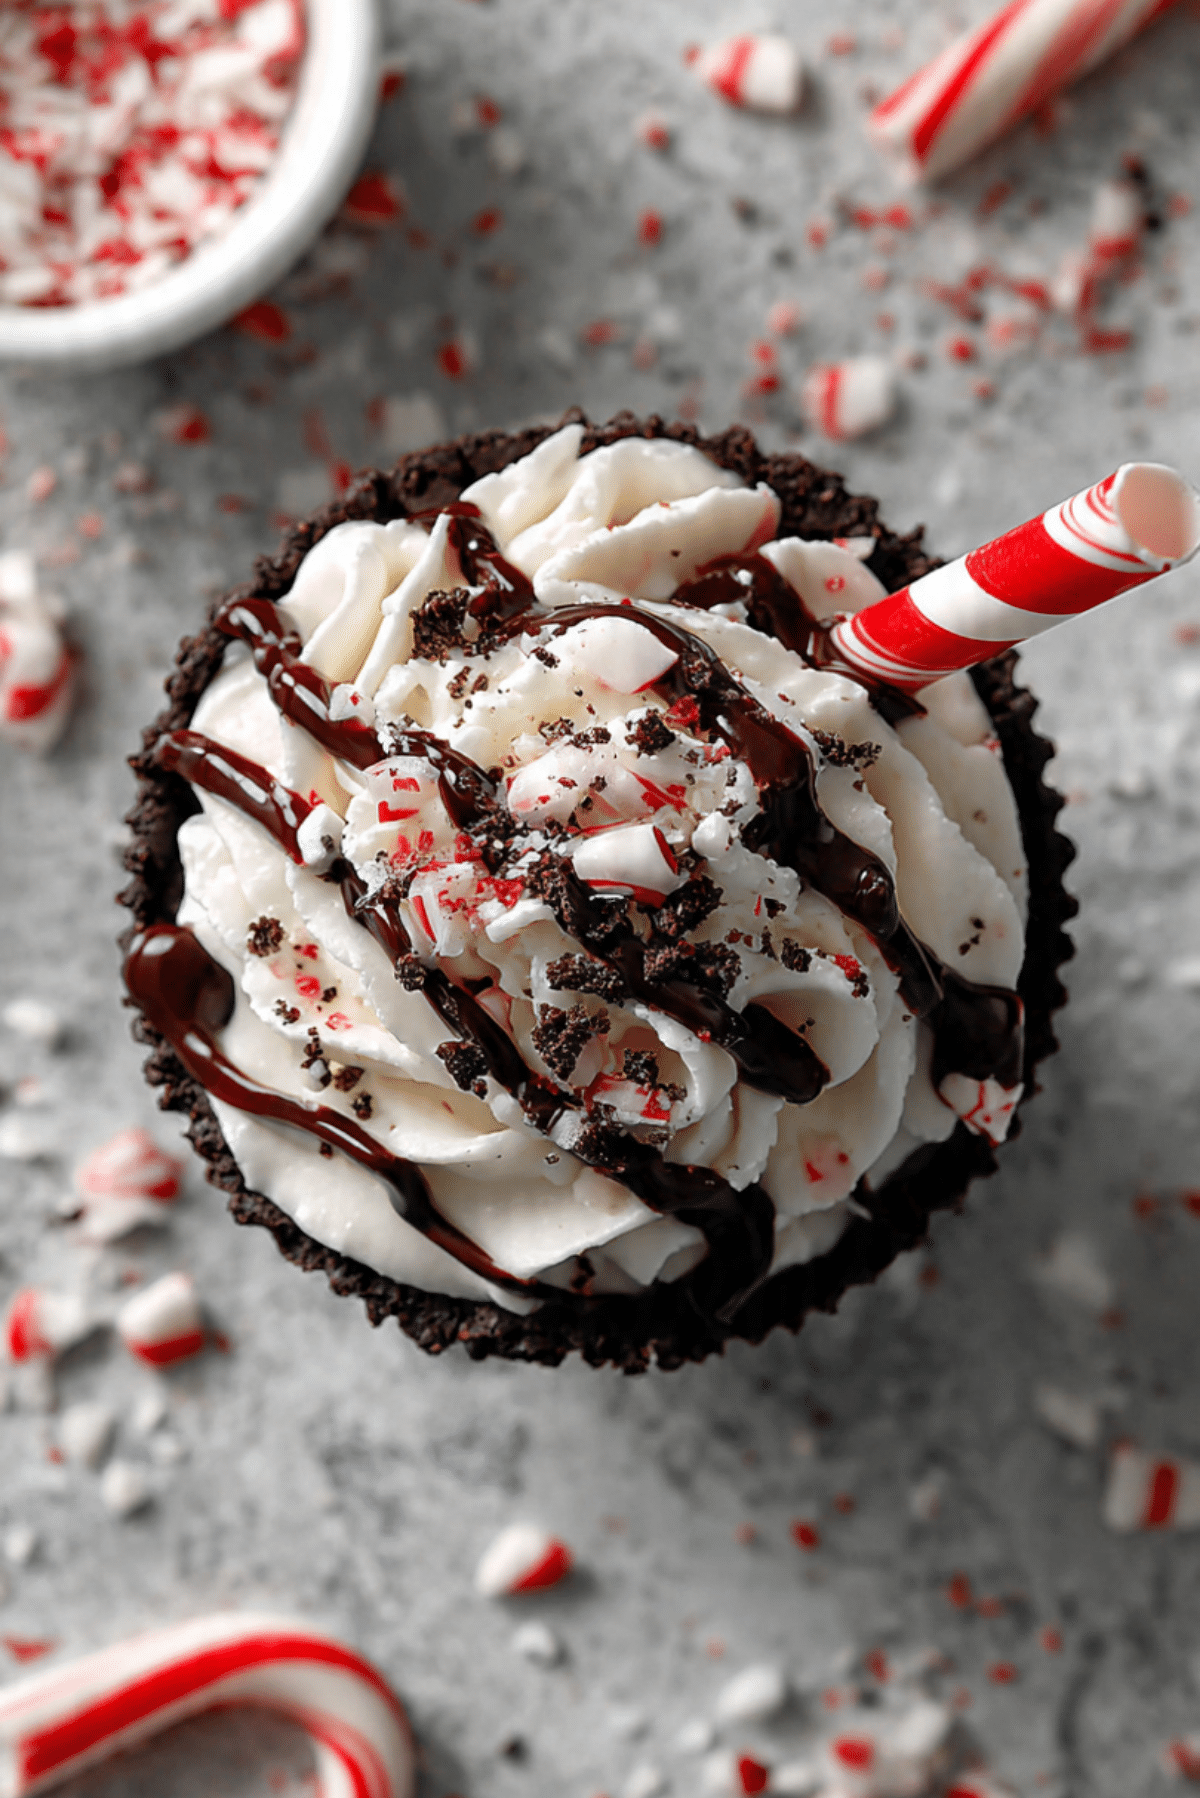
In a chilled bowl, whip heavy cream until soft peaks form. Add powdered sugar and a tiny splash of peppermint extract, and whip to stiff peaks. Pipe into the cooled cookie cups. Sprinkle with crushed peppermint candies and top with half a candy cane or a striped straw for fun.
7. Serve and Enjoy:
These are best served slightly chilled or at room temp. Perfect with a cup of hot cocoa or coffee.
Texture & Flavor Secrets
What makes these cookie cups so irresistible? The outer edge has a soft chew like a brownie, while the center stays tender and a little fudgy. The whipped cream frosting is airy and cool, with a peppermint kick that balances the mocha richness. Crushed candy canes on top bring a crisp bite that melts into a refreshing finish.
Cooking Tips & Tricks
A few extra tips to help you level up:
- Don’t skip pressing the cups after baking. That shape is key.
- Use cold heavy cream and chilled bowl for best whipped cream.
- For neat edges, use a cookie scoop to portion dough evenly.
- Add the frosting just before serving if making ahead.
What to Avoid
Keep these in mind to avoid cookie cup disasters:
- Overbaking the cups, which makes them dry and crumbly.
- Adding too much peppermint extract. A little goes a long way.
- Not greasing the muffin tin well enough. Use nonstick spray or butter generously.
- Frosting while cups are still warm. It’ll melt your topping.
Nutrition Facts
Servings: 12
Calories per serving: 260
Note: These are approximate values.
Preparation Time
Prep Time: 20 minutes
Cook Time: 12 minutes
Total Time: 32 minutes
Make-Ahead and Storage Tips
You can easily make these ahead by baking the cookie cups a day or two in advance. Just store them in an airtight container at room temperature. Whip up the cream frosting on the day of serving. You can also freeze the cookie cups (without topping) for up to 2 months and thaw before decorating. Leftovers stay great in the fridge for 2–3 days.
How to Serve Peppermint Mocha Cookie Cups
Serve these little beauties on a festive platter with extra crushed peppermint on the side. They pair perfectly with hot coffee, peppermint tea, or a creamy hot chocolate. They also look adorable nestled in cupcake liners with ribbons if you’re gifting them.
Creative Leftover Transformations
Turn your leftovers into something new:
- Crumble them over ice cream for a frozen sundae with crunch.
- Chop and layer into a trifle with whipped cream and chocolate pudding.
- Break into chunks and mix into a milkshake for peppermint mocha bliss.
Additional Tips
- Want extra mocha flavor? Add more espresso powder to the dough.
- If you don’t have a piping bag, use a zip-top bag with the corner snipped.
- Top with mini marshmallows or chocolate curls for extra flair.
Make It a Showstopper
Presentation matters. Try serving these in festive paper liners with mini candy canes sticking out of the cream. A light dusting of cocoa powder or edible glitter on top makes them sparkle. Use a rustic wooden board or a white cake stand for that Pinterest-perfect look.
Variations to Try
- Double Chocolate: Add chocolate chunks to the dough for more richness.
- Mint Chocolate Chip: Fold mint chips into the dough instead of espresso.
- White Mocha: Swap cocoa for white chocolate chips and skip espresso.
- Salted Caramel Twist: Drizzle caramel sauce over the whipped cream topping.
- Vegan Delight: Use dairy-free butter and coconut cream for frosting.
FAQ’s
Q1: Can I make these without espresso powder?
Yes, you can leave it out or use decaf. It just enhances the chocolate flavor.
Q2: Can I freeze them with the frosting?
It’s best to freeze the cookie cups unfrosted. Add whipped cream after thawing.
Q3: What piping tip should I use?
A star tip works great for a pretty swirl, but any large round tip works too.
Q4: Can I use store-bought frosting?
Absolutely, if you’re in a hurry. But homemade peppermint whipped cream is worth it.
Q5: Can I make them gluten-free?
Yes, just use a gluten-free flour blend made for baking.
Q6: Do I need to chill the dough?
It’s optional, but a short chill helps with shaping and texture.
Q7: How long do they stay fresh?
They’re best within 3 days, especially if topped with whipped cream.
Q8: Can I make mini versions?
Yes, use a mini muffin tin and reduce baking time to about 8 minutes.
Q9: Can kids help make these?
Definitely! They’ll love pressing the dough and adding the toppings.
Q10: What other toppings work well?
Try crushed Oreos, mini marshmallows, or chocolate curls.
Conclusion
If you’re looking for that perfect festive treat to impress at your next gathering or just want a cozy dessert to share with loved ones, these Peppermint Mocha Cookie Cups deliver all the holiday joy in one bite. Rich, cool, minty, and so much fun to make and eat. Trust me, you’re going to love this one. Ready to bake up some holiday magic?
Print
Peppermint Mocha Cookie Cups
- Total Time: 32 minutes
- Yield: 12 cookie cups
- Diet: Vegetarian
Description
Festive and fun, these Peppermint Mocha Cookie Cups combine rich chocolate, espresso, and peppermint into one irresistible holiday treat. Topped with fluffy peppermint whipped cream and candy cane crunch, they’re perfect for any winter gathering.
Ingredients
- 1 1/4 cups all-purpose flour
- 1/4 cup unsweetened cocoa powder
- 1/2 teaspoon baking soda
- 1/4 teaspoon salt
- 1/2 cup (1 stick) unsalted butter, softened
- 1/2 cup granulated sugar
- 1/4 cup brown sugar
- 1 large egg
- 1 teaspoon vanilla extract
- 1/4 teaspoon peppermint extract
- 1 teaspoon instant espresso powder
- 1/2 cup mini chocolate chips
- 1 cup heavy cream
- 1/2 cup powdered sugar
- 2 tablespoons crushed peppermint candies
- Candy canes (for garnish, optional)
Instructions
- Preheat your oven to 350°F (175°C). Grease a 12-cup muffin tin with non-stick spray or butter.
- In a bowl, whisk together flour, cocoa powder, baking soda, and salt.
- In another bowl, cream together the butter, granulated sugar, and brown sugar until fluffy. Beat in the egg, vanilla extract, peppermint extract, and espresso powder.
- Gradually mix in the dry ingredients until just combined. Stir in mini chocolate chips.
- Scoop dough into the muffin tin, filling each about 3/4 full. Flatten tops slightly.
- Bake for 10–12 minutes. Immediately after baking, press the center of each cookie gently to form a cup shape.
- Cool in the tin for 10 minutes, then transfer to a wire rack to cool completely.
- In a chilled bowl, whip the heavy cream to soft peaks. Add powdered sugar and a small splash of peppermint extract, then whip to stiff peaks.
- Pipe the whipped cream into the cooled cookie cups. Top with crushed peppermint and candy canes or straws if desired.
Notes
- Chilling the dough helps create thicker cookie cups.
- Use a shot glass or back of a spoon to form perfect cup centers.
- Add the whipped cream just before serving for best texture.
- Prep Time: 20 minutes
- Cook Time: 12 minutes
- Category: Dessert
- Method: Baking
- Cuisine: American
Nutrition
- Serving Size: 1 cookie cup
- Calories: 260
- Sugar: 20g
- Sodium: 80mg
- Fat: 14g
- Saturated Fat: 8g
- Unsaturated Fat: 5g
- Trans Fat: 0g
- Carbohydrates: 31g
- Fiber: 1g
- Protein: 2g
- Cholesterol: 45mg