One Pan Taiwanese Pineapple Cake
There is something so comforting about a cake that fills your kitchen with a warm, buttery aroma while it bakes. This one pan Taiwanese pineapple cake does exactly that, and let me tell you, it is worth every bite. With its golden top, soft crumb, and sweet tangy pineapple flavor tucked into every slice, this one feels like a little celebration you can make any day of the week.
And now as that first slice comes out of the pan, slightly warm and perfectly tender, you already know this is going to become one of those recipes you come back to again and again.
A Sweet Treat That Feels Like Sunshine in Every Bite
There is a beautiful balance happening here. The richness of butter meets the brightness of pineapple, and together they create a dessert that feels both indulgent and refreshing. The texture is soft but structured, with a gentle crispness on top that adds just enough contrast to keep every bite interesting.
It is simple enough for a weekday bake, yet special enough to serve when you want to impress someone. Trust me, you are going to love this.
A Little Story Behind This Beloved Pineapple Dessert
Taiwanese pineapple cakes have long been a symbol of prosperity and good fortune. Traditionally, they are small pastries filled with pineapple jam, often gifted during holidays or celebrations.
This version takes that beloved flavor and turns it into something more relaxed and homey. Instead of shaping individual pastries, everything comes together in one pan, making it easier while still honoring those classic flavors. It is like bringing a piece of tradition into your own kitchen, with a modern twist.
Why This Recipe Just Works Every Time
Before we dive deeper, let me walk you through why this one is such a keeper.
Versatile: You can serve it warm, chilled, or even toasted slightly the next day. It adapts beautifully to any mood.
Budget-Friendly: The ingredients are simple pantry staples, nothing fancy required.
Quick and Easy: No complicated steps, just mix, pour, and bake.
Customizable: You can adjust sweetness or add a hint of citrus if you like.
Crowd-Pleasing: Soft, sweet, and fruity, it is hard to resist for anyone.
Make-Ahead Friendly: Bake it in advance and it still tastes amazing later.
Great for Leftovers: The texture holds up beautifully, even after a day or two.
Pro Tips That Make All the Difference
Now let’s make sure you get that perfect result every time.
- Use well-drained crushed pineapple so the cake does not become too wet
- Cream the butter and sugar properly to create a light texture
- Do not overmix once the flour is added, keep it gentle
- Bake until the top is golden and slightly firm to the touch
Tools You Will Want Within Reach
Before starting, it helps to gather everything so the process feels smooth.
Mixing Bowl: For combining your ingredients evenly
Whisk or Hand Mixer: Helps create a light and airy batter
Measuring Cups and Spoons: For accurate results
Square Baking Pan: Gives you those perfect even slices
Spatula: Useful for folding and spreading the batter
Ingredients That Bring Everything Together
And now let’s take a closer look at what goes into this cake and why each one matters.
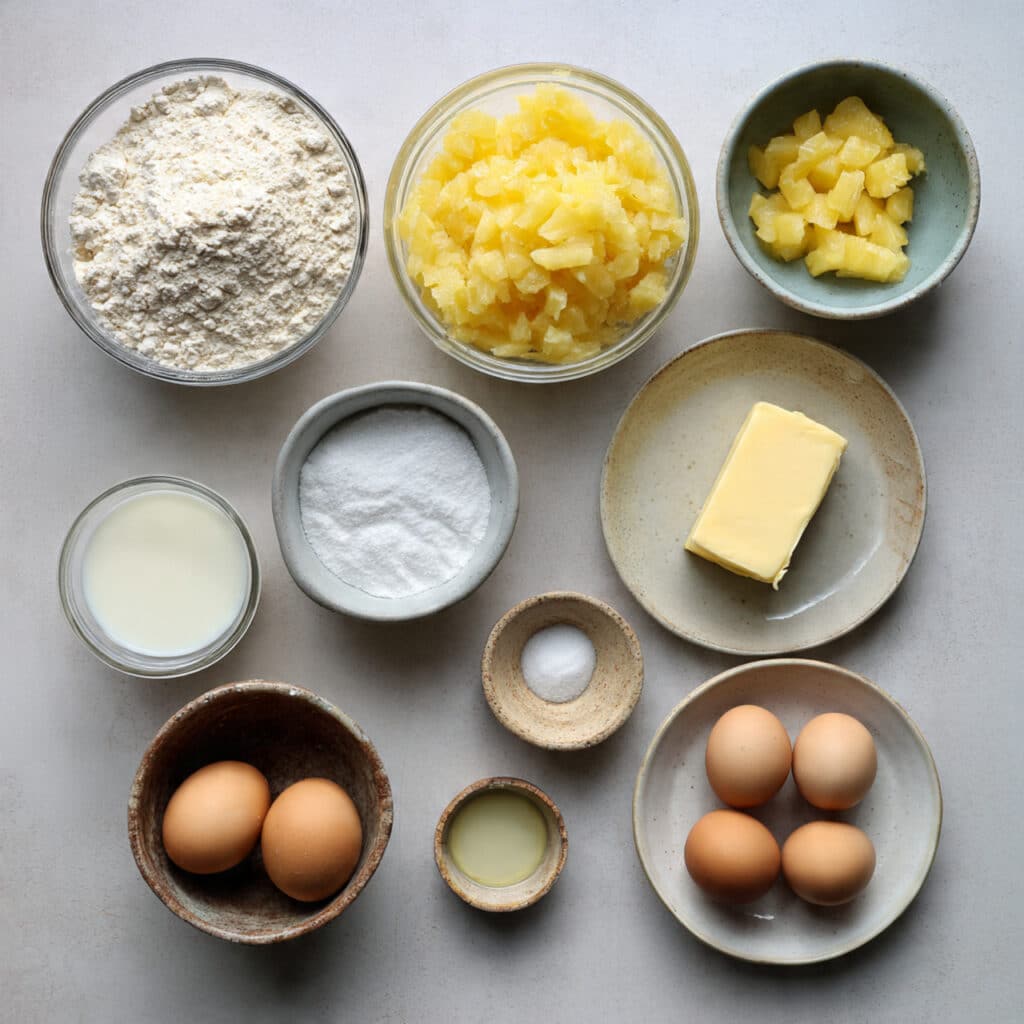
- Crushed Pineapple: 1 cup, drained well, adds sweetness and moisture with a gentle tang
- All Purpose Flour: 1 1/2 cups, provides structure and softness
- Granulated Sugar: 3/4 cup, balances the tartness and adds sweetness
- Unsalted Butter: 1/2 cup, softened, brings richness and flavor
- Eggs: 2 large, help bind everything together and add softness
- Baking Powder: 1 1/2 teaspoons, gives the cake its lift
- Milk: 1/4 cup, adds moisture and smooth texture
- Vanilla Extract: 1 teaspoon, enhances all the flavors
Easy Swaps If You Want to Get Creative
Sometimes you want to tweak things a little, and that is totally fine.
All Purpose Flour: Can be replaced with a gluten free blend
Milk: Use plant based milk like almond or oat
Butter: Swap with margarine if needed
Granulated Sugar: Try coconut sugar for a deeper flavor
The Star Ingredients That Make It Shine
There are a couple of elements here that truly define this cake.
Crushed Pineapple: This is where all that fruity brightness comes from, slightly tangy and naturally sweet
Butter: It creates that rich base and helps form the golden top we all love
Let’s Bake This Together Step by Step
Alright, and now let’s dive into the process, this is where the magic really starts.
- Preheat Your Equipment: Preheat your oven to 180°C or 350°F and lightly grease your baking pan
- Combine Ingredients: In a bowl, cream together butter and sugar until light, then add eggs and vanilla, mixing until smooth
- Prepare Your Cooking Vessel: Make sure your pan is evenly greased so nothing sticks
- Assemble the Dish: Add flour and baking powder to the mixture, then gently mix in milk and crushed pineapple until just combined
- Cook to Perfection: Pour the batter into the pan and bake for about 30 minutes until golden on top
- Finishing Touches: Let it cool slightly so the structure sets properly
- Serve and Enjoy: Slice into squares and enjoy warm or at room temperature
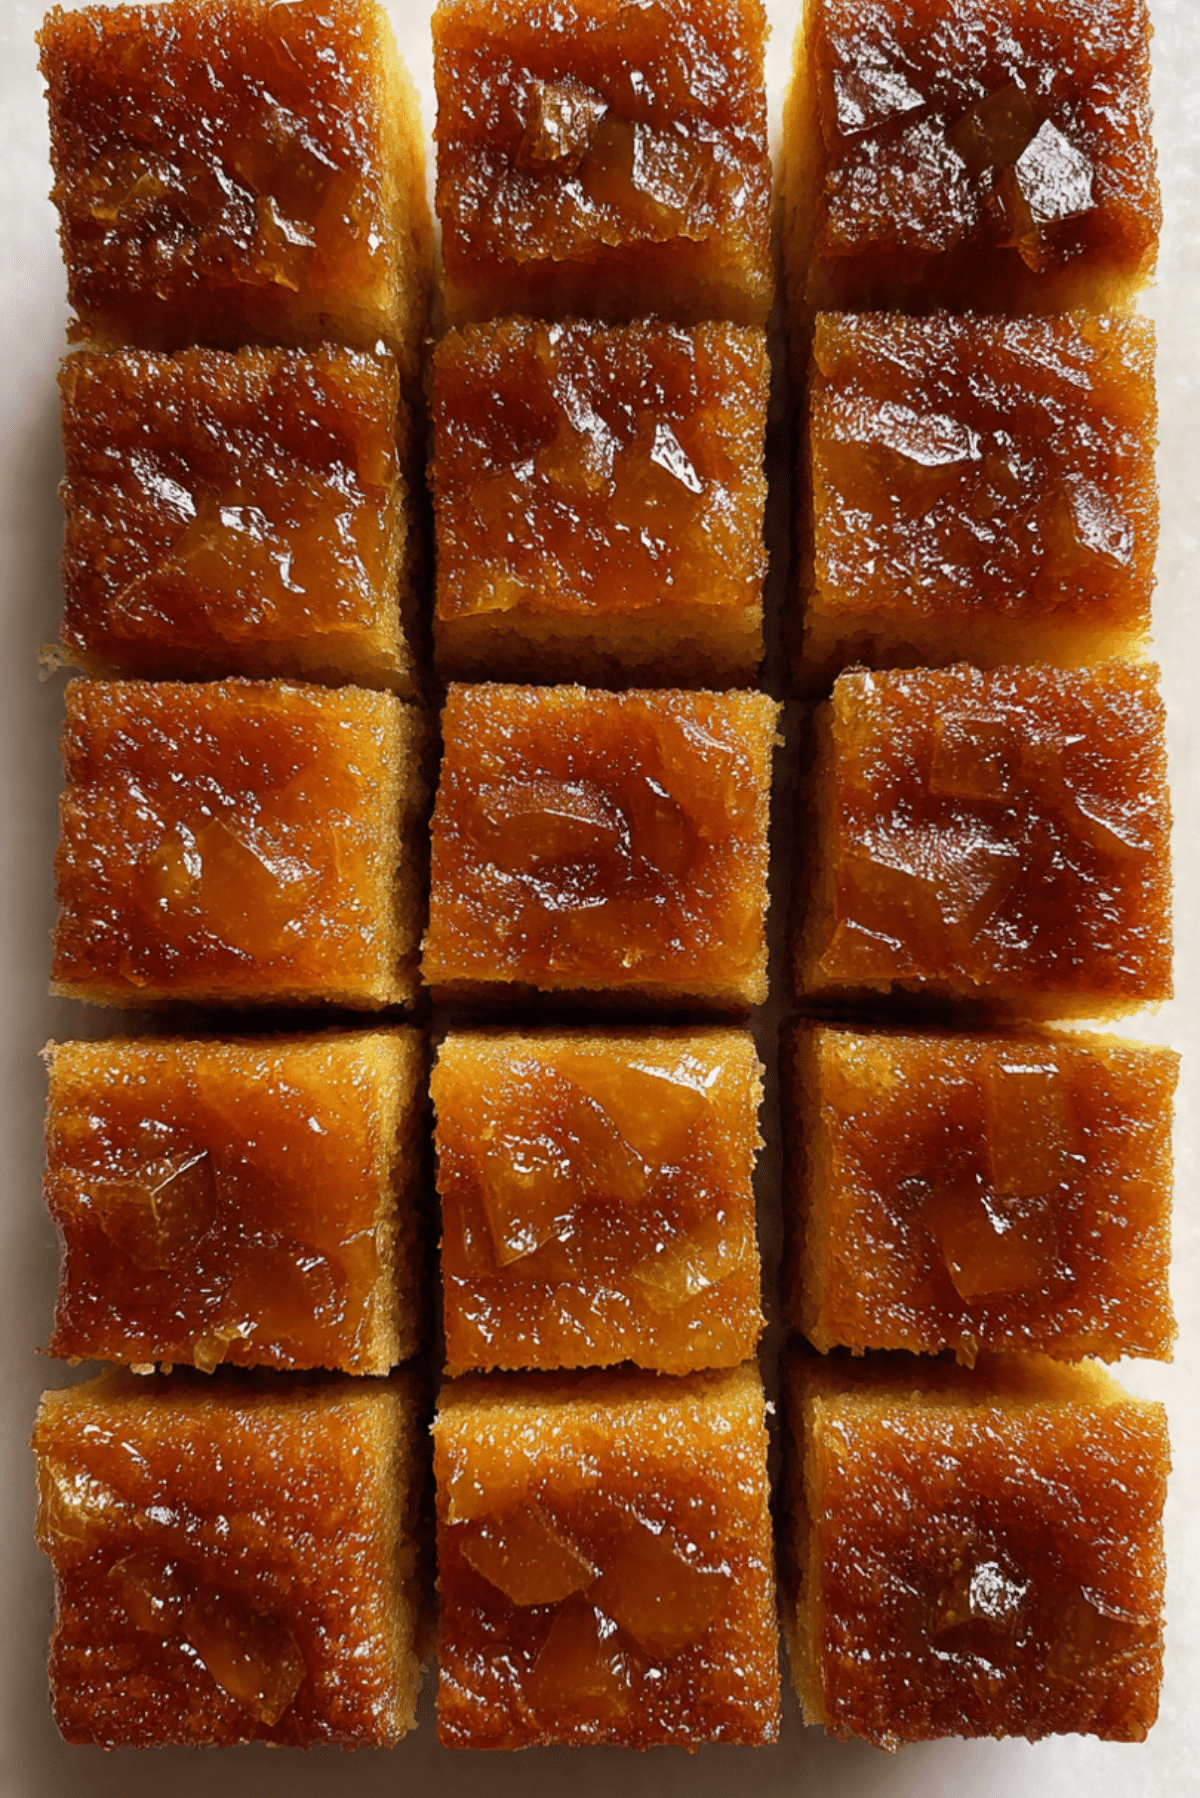
A Perfect Balance of Texture and Flavor
As it bakes, the top develops a light golden crust while the inside stays soft and tender. The pineapple melts into the batter, creating little pockets of sweetness that feel almost jam-like.
The flavor is rich yet refreshing, buttery with a bright fruity finish that keeps you coming back for another bite.
Helpful Tips to Get It Just Right
Here are a few extra tips to make your baking experience smoother.
- Use room temperature ingredients for better mixing
- Do not skip draining the pineapple
- Check doneness with a toothpick inserted in the center
What to Watch Out For While Baking
Even simple recipes can have small pitfalls, so here is what to avoid.
- Adding too much pineapple, which can make the cake soggy
- Overmixing the batter, which can make it dense
- Underbaking, which leaves the center too soft
Nutrition Snapshot You Should Know
Servings: 9
Calories per serving: 210
Note: These are approximate values.
Time Breakdown for This Recipe
Prep Time: 15 minutes
Cook Time: 30 minutes
Total Time: 45 minutes
Make Ahead and Storage Made Simple
You can bake this cake ahead and store it at room temperature for up to 2 days in an airtight container. If you want to keep it longer, refrigerate it and gently warm slices before serving.
Freezing works too. Just wrap slices individually and thaw when needed.
Serving Ideas That Make It Even Better
Serve it slightly warm with a cup of tea or coffee, or add a light dusting of powdered sugar for a simple finish. It also pairs beautifully with a scoop of vanilla ice cream if you want to make it extra special.
Turn Leftovers Into Something New
If you somehow have leftovers, here are a few fun ideas.
- Toast slices lightly and add a bit of butter
- Use it as a base for a quick dessert with yogurt and fruit
- Crumble it over ice cream for a textured topping
Extra Little Tips for Success
Keep your ingredients measured and ready before starting, it makes everything smoother. And do not rush the cooling process, it really helps the texture settle nicely.
Make It Look As Good As It Tastes
Cut clean squares and serve on a simple plate to highlight the golden color. A light sprinkle of powdered sugar or a few pineapple pieces on the side can make it look even more inviting.
Fun Variations to Try Next Time
- Add shredded coconut for a tropical twist
- Mix in a little lemon zest for extra brightness
- Use brown sugar for a deeper caramel note
- Add a thin glaze on top for sweetness
FAQ’s
Q1: Can I use fresh pineapple instead of canned?
Yes, just make sure it is finely crushed and well drained.
Q2: How do I know when it is done baking?
Insert a toothpick in the center, if it comes out clean, it is ready.
Q3: Can I reduce the sugar?
You can slightly reduce it, but keep in mind it may affect texture.
Q4: What size pan works best?
An 8×8 inch pan is ideal for even baking.
Q5: Can I make it dairy free?
Yes, use plant based butter and milk.
Q6: Why is my cake too dense?
It may be due to overmixing or too much liquid.
Q7: Can I add toppings?
Absolutely, a light glaze or powdered sugar works well.
Q8: How should I store leftovers?
Keep them in an airtight container at room temperature or in the fridge.
Q9: Can I double the recipe?
Yes, just use a larger pan and adjust baking time.
Q10: Is it good cold?
Yes, it has a slightly firmer texture but still tastes great.
Conclusion
This one pan Taiwanese pineapple cake brings together simplicity and flavor in the best possible way. It is warm, soft, slightly tangy, and incredibly satisfying. Whether you are baking for yourself or sharing with others, this one is a total game changer. Give it a try, and you might just find it becoming a favorite in your kitchen too.
Print
One Pan Taiwanese Pineapple Cake
- Total Time: 45 minutes
- Yield: 9 servings
- Diet: Vegetarian
Description
A soft and buttery one pan Taiwanese pineapple cake with a golden top and a sweet tangy pineapple flavor in every bite, simple to make and perfect for any occasion.
Ingredients
- 1 cup crushed pineapple, drained well
- 1 1/2 cups all purpose flour
- 3/4 cup granulated sugar
- 1/2 cup unsalted butter, softened
- 2 large eggs
- 1 1/2 teaspoons baking powder
- 1/4 cup milk
- 1 teaspoon vanilla extract
Instructions
- Preheat your oven to 180°C or 350°F and lightly grease an 8×8 inch baking pan.
- Cream together the softened butter and granulated sugar until light and fluffy.
- Add the eggs and vanilla extract, then mix until smooth and well combined.
- In a separate step, combine the flour and baking powder, then gradually add to the wet mixture.
- Pour in the milk and gently mix until just combined.
- Fold in the drained crushed pineapple evenly throughout the batter.
- Transfer the batter into the prepared pan and spread it evenly.
- Bake for about 30 minutes until the top is golden and a toothpick inserted in the center comes out clean.
- Allow the cake to cool slightly before slicing into squares.
- Serve warm or at room temperature and enjoy.
Notes
- Make sure the pineapple is well drained to avoid excess moisture.
- Use room temperature ingredients for smoother mixing.
- Do not overmix the batter to keep the cake soft and tender.
- You can add a light dusting of powdered sugar before serving for extra sweetness.
- Prep Time: 15 minutes
- Cook Time: 30 minutes
- Category: Dessert
- Method: Baking
- Cuisine: Taiwanese
Nutrition
- Serving Size: 1 square
- Calories: 210
- Sugar: 18g
- Sodium: 120mg
- Fat: 9g
- Saturated Fat: 5g
- Unsaturated Fat: 3g
- Trans Fat: 0g
- Carbohydrates: 28g
- Fiber: 1g
- Protein: 3g
- Cholesterol: 55mg