Old Fashioned Chicken & Rice Casserole
There is something about pulling a bubbling casserole out of the oven that instantly makes the whole kitchen feel warmer. This Old Fashioned Chicken & Rice Casserole is one of those dishes that smells like comfort before you even take the first bite. Creamy rice, tender chicken, and simple pantry staples come together in the kind of meal that feels like it has always been part of the family table. Trust me, you’re going to love this.
A Cozy Classic That Feels Like Home
You know those dinners that do not need fancy ingredients or complicated steps to win everyone over? This is one of them. The rice soaks up every bit of savory broth and creamy soup, while the chicken cooks gently right on top, turning juicy and flavorful as it bakes. The top gets lightly golden, the edges slightly crisp, and the inside stays soft and comforting.
It is simple food, yes, but it is also deeply satisfying. This one’s a total game-changer on busy nights when you want something hearty without standing at the stove for hours.
A Little Backstory From Grandma’s Oven
Casseroles like this became popular in American kitchens in the mid twentieth century, when convenience ingredients like canned soups made home cooking faster and more approachable. Families loved them because everything could be layered into one dish and baked together.
Chicken and rice in particular became a staple because it was affordable, filling, and easy to stretch for a crowd. Over time, this comforting combination earned its place at potlucks, Sunday dinners, and weeknight meals alike. Let me tell you, it is worth every bite.
Why This Recipe Never Fails
There are so many reasons this dish keeps showing up on dinner tables year after year.
Versatile: You can dress it up with herbs or keep it simple and classic. It works for weeknights or casual gatherings.
Budget-Friendly: It uses pantry staples like rice, broth, and soup, along with affordable cuts of chicken.
Quick and Easy: Everything mixes together in one dish and bakes, no complicated techniques required.
Customizable: You can tweak the seasoning, adjust the creaminess, or add vegetables if you like.
Crowd-Pleasing: The creamy texture and mild, savory flavor make it a hit with both kids and adults.
Make-Ahead Friendly: You can assemble it earlier in the day and bake it when you are ready.
Great for Leftovers: The flavors deepen overnight, making tomorrow’s lunch just as delicious.
Chef-Level Secrets for Perfect Results
Before we dive into the ingredients, let me share a few insider tips that really elevate this dish.
- Use long grain white rice for the best texture. It stays fluffy and does not turn mushy.
- Season the chicken well with salt and pepper before baking, since the rice absorbs a lot of flavor.
- Make sure the rice is evenly spread in the dish so it cooks uniformly.
- Cover tightly with foil for most of the baking time to trap steam and ensure tender rice.
Essential Kitchen Tools for Success
You do not need anything fancy here, just a few reliable basics.
9×13 inch Baking Dish: This size allows the rice and chicken to cook evenly without overcrowding.
Mixing Bowl: For combining the soup, broth, milk, and seasonings smoothly.
Measuring Cups and Spoons: Accurate measurements keep the rice to liquid ratio just right.
Aluminum Foil: Helps seal in moisture while the casserole bakes.
Ingredients That Make It Magic
There is something beautiful about how a few humble ingredients come together in this Old Fashioned Chicken & Rice Casserole. Each one plays a role in building that creamy, savory comfort we are after.
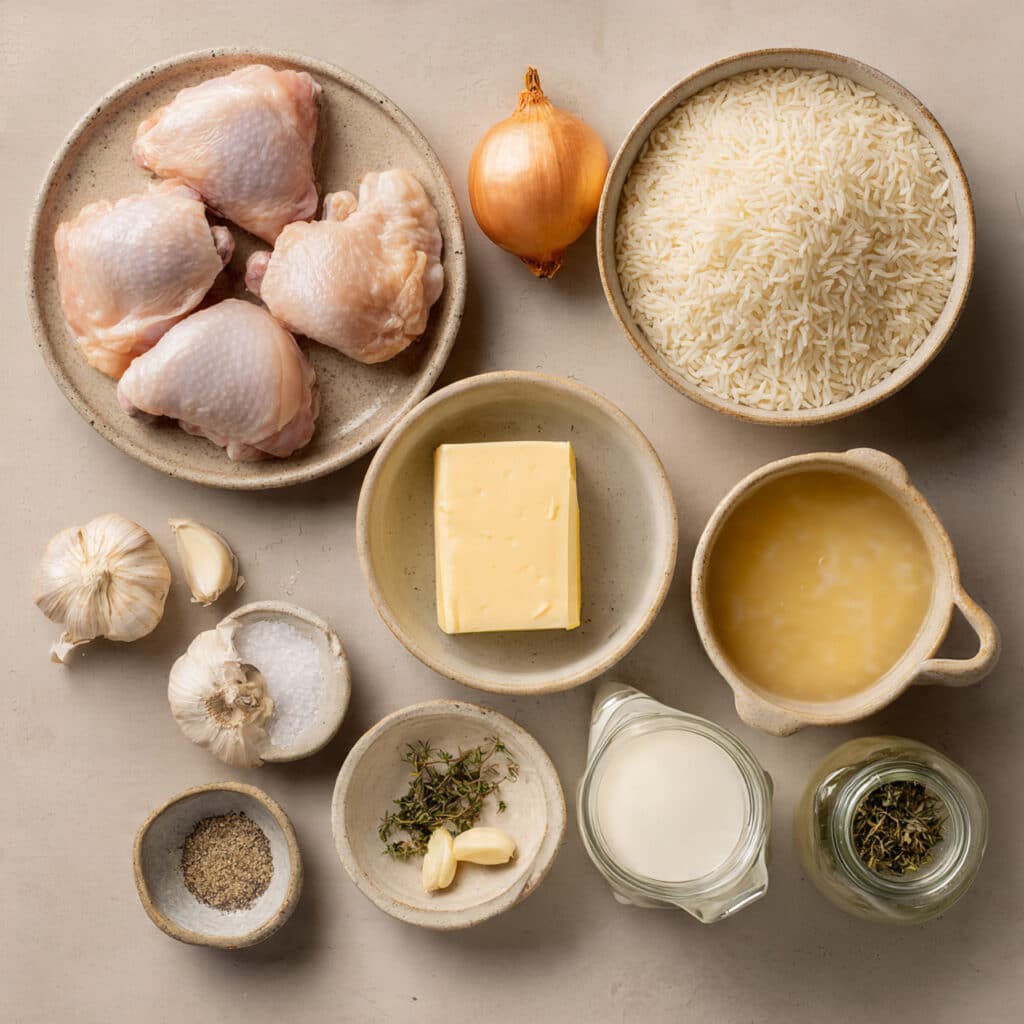
- Bone-In Chicken Thighs or Drumsticks: 2 pounds, about 4 to 6 pieces, provide juicy flavor as they bake over the rice.
- Long Grain White Rice: 1 cup, uncooked, absorbs the creamy broth and stays tender yet fluffy.
- Cream of Chicken Soup: 1 can, 10.5 ounces, adds rich body and classic casserole creaminess.
- Chicken Broth: 1 1/2 cups, creates the savory cooking liquid for the rice.
- Whole Milk: 1 cup, softens the flavor and adds extra creaminess.
- Unsalted Butter: 2 tablespoons, melted, enriches the rice and prevents dryness.
- Yellow Onion: 1 small, finely chopped, brings gentle sweetness.
- Garlic Cloves: 2 cloves, minced, add depth and aroma.
- Salt: 1 teaspoon, enhances all the flavors.
- Black Pepper: 1/2 teaspoon, freshly ground, gives a subtle kick.
- Dried Thyme: 1/2 teaspoon, adds an earthy herbal note.
Simple Swaps If You Need Them
Cooking should feel flexible, not stressful.
Bone-In Chicken Thighs or Drumsticks: Boneless chicken thighs can be used, but reduce cooking time slightly.
Whole Milk: Half and half can be used for an even richer result.
Cream of Chicken Soup: Cream of mushroom soup works well for a slightly different flavor.
Dried Thyme: Poultry seasoning or dried parsley can be substituted.
The Star Ingredients That Carry the Flavor
Some ingredients quietly do most of the heavy lifting here.
Long Grain White Rice: This is the backbone of the dish. It absorbs the broth and milk, turning creamy while still holding its shape.
Bone-In Chicken: As it bakes, it releases juices that drip into the rice below, infusing every spoonful with savory flavor.
Let’s Get Cooking Together
Now comes the fun part. Here are the steps you are going to follow.
- Preheat Your Equipment: Preheat your oven to 350 degrees Fahrenheit so it is ready for even baking.
- Combine Ingredients: In a large mixing bowl, stir together the uncooked rice, cream of chicken soup, chicken broth, whole milk, melted butter, chopped onion, minced garlic, salt, black pepper, and dried thyme until fully combined.
- Prepare Your Cooking Vessel: Lightly grease a 9×13 inch baking dish to prevent sticking.
- Assemble the Dish: Pour the rice mixture into the prepared dish and spread it evenly. Place the chicken pieces on top, skin side up if using skin-on pieces. Season the chicken lightly with a pinch of extra salt and pepper.
- Cook to Perfection: Cover the dish tightly with foil and bake for 1 hour. Then remove the foil and bake for an additional 20 to 30 minutes, until the chicken is cooked through and the rice is tender.
- Finishing Touches: Let the casserole rest for 10 minutes before serving so the rice can settle and absorb any remaining liquid.
- Serve and Enjoy: Spoon generous portions onto plates, making sure each serving gets both creamy rice and juicy chicken.
How Texture and Flavor Come Together
As it bakes, the rice slowly absorbs the creamy broth mixture, becoming tender and fluffy without losing structure. The chicken roasts gently on top, its juices seeping down into the rice, creating layers of savory flavor. The top turns lightly golden while the inside stays soft and rich. That contrast between the slightly crisp edges and the creamy center is what makes this dish so comforting.
Extra Tips for Foolproof Results
A few small tweaks can make a big difference.
- Stir the rice mixture well before pouring it into the dish so everything is evenly distributed.
- Keep the foil sealed tightly during the first stage of baking to trap steam.
- Check the rice near the end of cooking and add a splash of hot broth if it seems dry.
Common Mistakes and How to Avoid Them
Even simple dishes can have a few pitfalls, but they are easy to fix.
- Using instant rice, which can become mushy. Stick to long grain white rice.
- Skipping the foil, which can lead to undercooked rice.
- Cutting into the casserole too soon. Let it rest so the texture sets properly.
Nutrition Snapshot
Servings: 6
Calories per serving: Approximately 420
Note: These are approximate values.
Timing at a Glance
Prep Time: 15 minutes
Cook Time: 1 hour 30 minutes
Total Time: 1 hour 45 minutes
Make-Ahead and Storage Guide
You can assemble this casserole up to 8 hours in advance, cover it tightly, and refrigerate until ready to bake. If baking straight from the fridge, add an extra 10 to 15 minutes to the cooking time.
Store leftovers in an airtight container in the refrigerator for up to 4 days. It also freezes well for up to 2 months. Reheat in the oven with a splash of broth to bring back that creamy texture.
Serving Ideas to Complete the Meal
This casserole pairs beautifully with a crisp green salad or simple steamed green beans. Warm dinner rolls on the side make it feel extra special. For a brighter touch, add a squeeze of fresh lemon over the chicken before serving.
Turn Leftovers Into Something New
Leftovers are where this dish really shines.
You can shred the remaining chicken and mix it into the rice for a quick lunch bowl. Spoon it into a tortilla for a comforting wrap, or top it with a little shredded cheese and bake again for a second round of comfort.
Extra Advice for Even Better Flavor
Do not be afraid to adjust seasoning to your taste before baking. A little extra thyme or black pepper can deepen the flavor. If you like a golden top, broil for 2 to 3 minutes at the end, keeping a close eye on it.
Make It Look As Good As It Tastes
Serve it straight from the baking dish for that rustic charm, or transfer portions carefully to a wide platter and sprinkle with a touch of fresh chopped parsley for color. The golden chicken on top with creamy rice underneath is already beautiful.
Fun Variations to Try
- Add 1 cup of frozen peas or carrots to the rice mixture for extra color and sweetness.
- Stir in 1/2 cup shredded cheddar cheese for a richer finish.
- Use brown rice, increasing the broth by 1/2 cup and extending baking time.
- Add sliced mushrooms for an earthy twist.
FAQ’s
Q1: Can I use boneless chicken?
Yes, boneless thighs work well. Reduce the cooking time slightly and check for doneness.
Q2: Can I use brown rice?
You can, but you will need more liquid and a longer cooking time.
Q3: How do I know when the rice is done?
The rice should be tender and most of the liquid absorbed.
Q4: Can I make this dairy free?
You can substitute milk with an unsweetened plant based milk, though the flavor will change slightly.
Q5: Can I add vegetables?
Absolutely. Frozen peas, carrots, or green beans work well.
Q6: Why is my rice undercooked?
It may need more time or the foil may not have been sealed tightly.
Q7: Can I double the recipe?
Yes, use two baking dishes to ensure even cooking.
Q8: How do I reheat without drying it out?
Add a splash of broth and cover with foil before reheating.
Q9: Is this freezer friendly?
Yes, cool completely before freezing in airtight containers.
Q10: Can I prepare it the night before?
Yes, assemble and refrigerate, then bake the next day.
Conclusion
There is something timeless about a dish like this. It is simple, hearty, and deeply comforting, the kind of meal that brings everyone to the table without fuss. This Old Fashioned Chicken & Rice Casserole proves that classic recipes stick around for a reason. Give it a try, make it your own, and enjoy every creamy, savory bite.
Print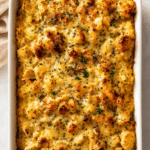
Old Fashioned Chicken & Rice Casserole
- Total Time: 1 hour 45 minutes
- Yield: 6 servings
- Diet: Low Lactose
Description
A creamy, comforting casserole made with tender bone-in chicken baked over savory long grain rice in a rich blend of chicken broth, milk, and cream of chicken soup. This old fashioned classic is simple, hearty, and perfect for family dinners.
Ingredients
- 2 pounds bone-in chicken thighs or drumsticks (about 4 to 6 pieces)
- 1 cup long grain white rice, uncooked
- 1 can (10.5 ounces) cream of chicken soup
- 1 1/2 cups chicken broth
- 1 cup whole milk
- 2 tablespoons unsalted butter, melted
- 1 small yellow onion, finely chopped
- 2 garlic cloves, minced
- 1 teaspoon salt
- 1/2 teaspoon black pepper
- 1/2 teaspoon dried thyme
Instructions
- Preheat oven to 350 degrees Fahrenheit.
- In a large mixing bowl, stir together the uncooked rice, cream of chicken soup, chicken broth, whole milk, melted butter, chopped onion, minced garlic, salt, black pepper, and dried thyme until fully combined.
- Lightly grease a 9×13 inch baking dish.
- Pour the rice mixture into the prepared dish and spread evenly. Place the chicken pieces on top, skin side up if using skin-on pieces. Season chicken lightly with additional salt and pepper.
- Cover tightly with foil and bake for 1 hour. Remove foil and continue baking for 20 to 30 minutes, until chicken is cooked through and rice is tender.
- Let rest for 10 minutes before serving to allow the rice to absorb remaining liquid.
- Serve warm, making sure each portion includes both chicken and creamy rice.
Notes
- Use long grain white rice for best texture and to avoid mushiness.
- Keep the foil tightly sealed during the first stage of baking to ensure properly cooked rice.
- If the rice seems dry near the end, add a small splash of hot broth before finishing baking.
- Leftovers can be refrigerated for up to 4 days or frozen for up to 2 months.
- Prep Time: 15 minutes
- Cook Time: 1 hour 30 minutes
- Category: Dinner
- Method: Baking
- Cuisine: American
Nutrition
- Serving Size: 1 serving
- Calories: 420
- Sugar: 3g
- Sodium: 780mg
- Fat: 22g
- Saturated Fat: 9g
- Unsaturated Fat: 11g
- Trans Fat: 0g
- Carbohydrates: 32g
- Fiber: 1g
- Protein: 25g
- Cholesterol: 105mg