Fried Cheese Curds
Crispy on the outside, irresistibly gooey on the inside, fried cheese curds are the kind of snack that makes people gather around the plate before it even hits the table. With every bite, there’s that gentle crunch followed by a rush of melted cheese that just hits all the comfort food notes. Whether you’re serving them as an appetizer, a game-day snack, or a late-night indulgence, these golden nuggets of joy never stick around for long.
Behind the Recipe
This recipe takes me straight back to Midwest fairs, where the scent of fried food lingered in the air and every other booth promised something hot and cheesy. I remember biting into my first cheese curd at a small stand with a red and white awning, barely able to hold in my grin as molten cheese stretched from one bite to the next. I’ve been chasing that moment ever since, and this recipe captures it perfectly.
Recipe Origin or Trivia
Fried cheese curds have deep roots in the American Midwest, especially in Wisconsin, where cheese is practically a way of life. Known as “squeaky cheese” before they’re fried, these curds are made from the freshest part of cheddar cheese production. Traditionally served at county fairs and taverns, fried cheese curds are now a staple in many restaurants and food trucks across the country. And yes, in Wisconsin, it’s almost a crime to not pair them with ranch.
Why You’ll Love Fried Cheese Curds
This is not just a snack. It’s a crowd magnet, a flavor bomb, and a crispy cheese dream.
Versatile: Great as a starter, snack, or party dish with different dipping sauces.
Budget-Friendly: Uses simple pantry staples and a handful of affordable ingredients.
Quick and Easy: Ready in under 30 minutes from prep to plate.
Customizable: Change up the seasonings or use your favorite cheese variety.
Crowd-Pleasing: No one can resist melty, fried cheese—trust me.
Make-Ahead Friendly: Bread them in advance and fry when ready.
Great for Leftovers: Reheat in the oven or air fryer for next-day crispiness.
Chef’s Pro Tips for Perfect Results
There’s an art to getting that perfect crunch and gooey center, but once you know the tricks, it’s a breeze.
- Freeze the curds first: A short chill helps prevent cheese from leaking during frying.
- Double-dip the coating: For an extra crispy shell, dip the curds in flour, then egg-milk, and then the flour mix again.
- Don’t overcrowd the pan: Fry in batches to maintain even temperature and golden texture.
- Keep oil hot but not smoking: 350°F is the sweet spot for bubbling, not burning.
- Drain on a wire rack: Keeps them from getting soggy on the bottom.
Kitchen Tools You’ll Need
A few basic tools will help you nail this recipe every time.
Mixing bowls: For flour, egg mixture, and dredging.
Slotted spoon or spider: For safely removing curds from hot oil.
Thermometer: To monitor oil temperature for the perfect fry.
Wire rack with tray: Helps cool the curds while keeping them crisp.
Frying pan or deep pot: Large enough to fry several curds at once.
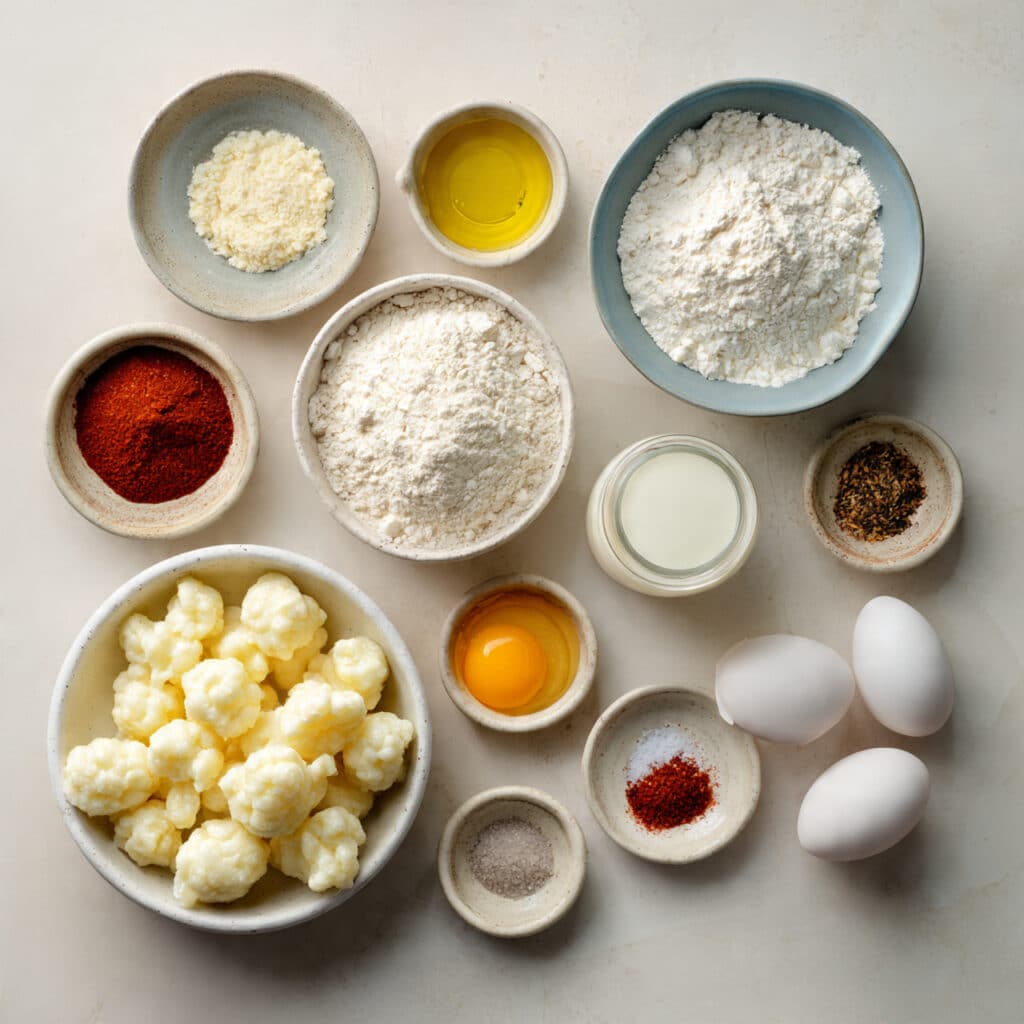
Ingredients in Fried Cheese Curds
This recipe is all about simple ingredients that work together to deliver bold, cheesy satisfaction.
- Cheese Curds: 1 pound – The star of the show, these offer the iconic squeaky texture and gooey melt.
- All-Purpose Flour: 1 cup – For that crispy golden coating.
- Cornstarch: 1/4 cup – Helps create a lighter, crunchier batter.
- Garlic Powder: 1 teaspoon – Adds a subtle savory note.
- Onion Powder: 1 teaspoon – Boosts the depth of flavor.
- Paprika: 1/2 teaspoon – Gives a warm, slightly smoky finish.
- Salt: 1/2 teaspoon – Enhances all the other flavors.
- Black Pepper: 1/4 teaspoon – Adds a hint of heat.
- Eggs: 2 large – Help bind the coating to the curds.
- Whole Milk: 1/4 cup – Makes the egg wash smooth and even.
- Vegetable Oil: For frying – Neutral flavor and high smoke point make it ideal for deep frying.
Ingredient Substitutions
You don’t need to run to the store if you’re missing a thing or two. Try these swaps.
Cheese curds: Chunks of mozzarella or Monterey Jack.
Vegetable oil: Use canola or peanut oil.
Whole milk: Swap with buttermilk or half-and-half.
Paprika: Smoked paprika or cayenne for heat.
Cornstarch: Use rice flour for similar crispness.
Ingredient Spotlight
Cheese Curds: Fresh cheese curds have a mild, milky flavor and that signature squeaky bite. Their high moisture content makes them perfect for frying.
Cornstarch: Often underrated, cornstarch gives the breading that extra crunch that flour alone can’t quite achieve.
Instructions for Making Fried Cheese Curds
This is where the magic begins, and once you start, it all comes together quickly and deliciously.
- Preheat Your Equipment:
Heat your vegetable oil in a deep frying pan or heavy-bottomed pot to 350°F. Line a tray with a wire rack or paper towels for draining. - Combine Ingredients:
In one bowl, whisk together the flour, cornstarch, garlic powder, onion powder, paprika, salt, and pepper. In another bowl, beat the eggs and milk until well mixed. - Prepare Your Cooking Vessel:
Make sure the oil is hot and ready. A thermometer should read a steady 350°F. - Assemble the Dish:
Dip each cheese curd into the flour mix, then the egg mixture, and then back into the flour mixture. Make sure they’re evenly coated. Place on a tray while you finish them all. - Cook to Perfection:
Fry the curds in batches, being careful not to overcrowd. Cook for about 1 to 2 minutes or until they are golden brown and crisp. - Finishing Touches:
Use a slotted spoon to remove the curds and place them on the prepared rack or paper towels. Let them cool for a minute or two. - Serve and Enjoy:
Serve immediately while the cheese is melty and the coating is still crisp. Offer ranch, marinara, or your favorite dipping sauce on the side.
Texture & Flavor Secrets
The first bite delivers a satisfying crunch, quickly followed by a soft, stretchy pull of melted cheese. The batter is lightly seasoned, allowing the rich, milky flavor of the cheese curds to shine through. The contrast between crispy and creamy is where all the magic lives.
Cooking Tips & Tricks
Little tweaks make a big difference. Here’s how to keep those curds top-tier.
- Let the coated curds rest for 10 minutes before frying for extra adhesion.
- Don’t fry too many at once or the temperature will drop and the curds may burst.
- A quick double fry can make them even crispier if needed.
What to Avoid
Mistakes happen, but they’re easy to fix once you know what to watch out for.
- Overcrowding the pan: This leads to soggy, unevenly cooked curds.
- Oil not hot enough: Cheese may melt too fast and leak out.
- Skipping the coating steps: Results in a sad, limp crust.
Nutrition Facts
Servings: 6
Calories per serving: 290
Note: These are approximate values.
Preparation Time
Prep Time: 15 minutes
Cook Time: 10 minutes
Total Time: 25 minutes
Make-Ahead and Storage Tips
If you want to save time later, coat the cheese curds and store them in the fridge for up to 4 hours before frying. Leftovers can be refrigerated and reheated in an air fryer or oven to bring back the crisp. Avoid microwaving, which makes them soggy. They can also be frozen pre-fried for up to a month.
How to Serve Fried Cheese Curds
Pile them up on a rustic plate with a side of tangy ranch or spicy chipotle aioli. Serve with fresh veggies for contrast or stack them on a snack board with wings and sliders. Perfect for parties, movie nights, or backyard hangouts.
Creative Leftover Transformations
You’ll rarely have leftovers, but if you do, turn them into something fun.
- Chop them and sprinkle over a salad for a crispy, cheesy topping.
- Tuck them inside a grilled cheese sandwich for extra melty magic.
- Reheat and toss into a poutine-style dish with fries and gravy.
Additional Tips
- Use a spider tool for easy scooping from the oil.
- Always season immediately after frying for better flavor.
- Let the oil reheat between batches to keep them evenly golden.
Make It a Showstopper
Serve in a parchment-lined basket or mini fry cone. Garnish with a sprinkle of fresh herbs like parsley or chives. Use a dipping sauce trio for that wow factor and always serve hot and fresh for the ultimate cheese pull moment.
Variations to Try
- Spicy Curds: Add cayenne or chili flakes to the coating.
- Herbed Coating: Mix in Italian seasoning or dried thyme.
- Beer Batter Version: Swap egg-milk wash with a beer-flour batter.
- Gluten-Free: Use rice flour or a gluten-free flour mix.
- Sweet and Savory: Serve with a drizzle of hot honey.
FAQ’s
Q1: Can I bake the cheese curds instead of frying?
A1: You can, but they won’t be as crispy. Use a high heat and a wire rack to improve texture.
Q2: How do I keep cheese from leaking out during frying?
A2: Chill the curds before frying and ensure a thick, even coating.
Q3: What kind of cheese works best if I can’t find curds?
A3: Mozzarella chunks are a solid alternative, though the texture will be different.
Q4: Can I make these ahead of time?
A4: Yes, you can coat them ahead and refrigerate until ready to fry.
Q5: Do I need a deep fryer?
A5: Nope. A heavy pot with enough oil works just fine.
Q6: Can I reuse the frying oil?
A6: Yes, strain it and store it in a cool place to use again.
Q7: What dipping sauces go well with fried cheese curds?
A7: Ranch, marinara, spicy aioli, or even honey mustard are great.
Q8: Are cheese curds vegetarian?
A8: Some are, but check labels for rennet type if that’s a concern.
Q9: Can I air fry these instead?
A9: Yes, though the texture may be slightly less crisp. Spray lightly with oil before air frying.
Q10: What drinks pair well with these?
A10: Cold beer, sparkling water, or even a citrusy soda balance the richness.
Conclusion
Fried cheese curds are more than just a treat. They’re nostalgic, delicious, and a guaranteed crowd-pleaser. With their golden crunch and melty center, they bring joy to any table they land on. Once you try them homemade, there’s no going back. Trust me, you’re going to love this.
Print
Fried Cheese Curds
- Total Time: 25 minutes
- Yield: 6 servings
- Diet: Vegetarian
Description
Golden, crispy, and gooey fried cheese curds made with a seasoned flour coating. The perfect appetizer or snack for any occasion, ready in under 30 minutes.
Ingredients
- 1 pound cheese curds
- 1 cup all-purpose flour
- 1/4 cup cornstarch
- 1 teaspoon garlic powder
- 1 teaspoon onion powder
- 1/2 teaspoon paprika
- 1/2 teaspoon salt
- 1/4 teaspoon black pepper
- 2 large eggs
- 1/4 cup whole milk
- Vegetable oil, for frying
Instructions
- Heat vegetable oil in a deep pan or pot to 350°F. Line a tray with a wire rack or paper towels.
- In one bowl, whisk together flour, cornstarch, garlic powder, onion powder, paprika, salt, and pepper. In another bowl, whisk eggs and milk.
- Dip each cheese curd into the flour mixture, then the egg mixture, then back into the flour mixture. Place on a tray.
- Fry curds in batches for 1 to 2 minutes until golden and crisp.
- Remove with a slotted spoon and drain on a rack or paper towels.
- Serve hot with your favorite dipping sauce.
Notes
- Freeze curds slightly before frying to prevent cheese from leaking.
- Don’t overcrowd the pan to maintain oil temperature.
- Double-dip for a crunchier coating.
- Use a wire rack for cooling instead of paper towels to keep them crispy.
- Prep Time: 15 minutes
- Cook Time: 10 minutes
- Category: Appetizer
- Method: Frying
- Cuisine: American
Nutrition
- Serving Size: 1 serving
- Calories: 290
- Sugar: 1g
- Sodium: 300mg
- Fat: 20g
- Saturated Fat: 9g
- Unsaturated Fat: 10g
- Trans Fat: 0g
- Carbohydrates: 18g
- Fiber: 1g
- Protein: 10g
- Cholesterol: 60mg