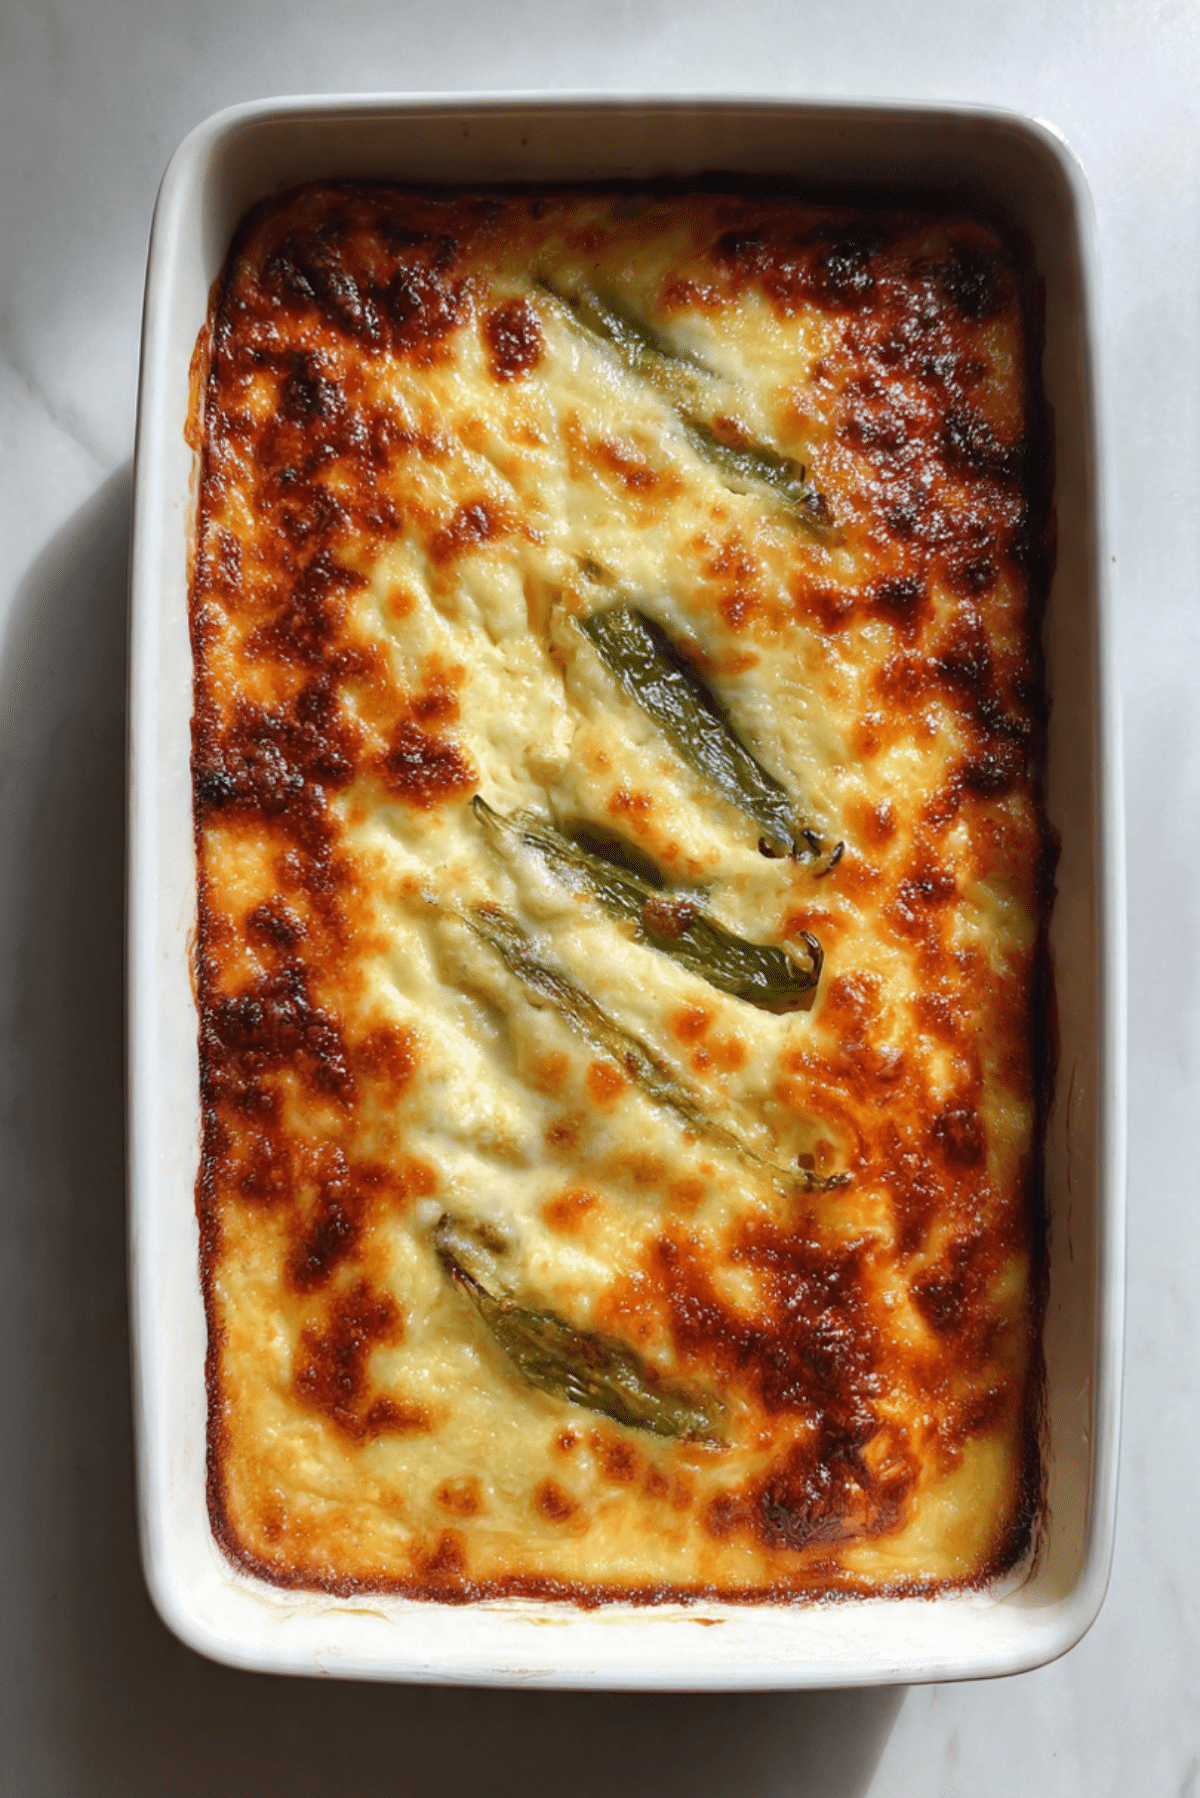
Easy Chile Relleno Casserole (No-Fry Cheesy Pepper Bake)
There is something incredibly comforting about a dish that delivers bold flavor without the extra effort, and this one truly delivers. Imagine tender roasted green chiles tucked into a soft, fluffy egg base, all wrapped in layers of melted cheese that bubble and turn golden in the oven. The aroma alone is enough to pull everyone into the kitchen. Trust me, you’re going to love this, especially on those days when you want something hearty but simple.
A Cozy Shortcut to Classic Flavors
This dish brings all the warmth and richness of traditional chile rellenos but skips the frying completely. Instead of stuffing and battering each pepper, everything comes together in one easy bake. The result is just as satisfying, with creamy textures and that signature pepper flavor in every bite.
And now let’s dive a little deeper into where this comforting idea comes from.
A Little Story Behind the Dish
Chile rellenos have roots in Mexican cuisine, where roasted peppers are stuffed, battered, and fried to perfection. Over time, home cooks began creating casserole versions to simplify the process while keeping the same delicious essence.
This baked version became especially popular in busy households, offering that same smoky pepper flavor with far less effort. Let me tell you, it’s worth every bite and feels like a modern twist on a beloved classic.
Why This Recipe Just Works Every Time
Before we get into the details, here’s why this dish is such a favorite in so many kitchens.
Versatile: You can serve it for breakfast, lunch, or dinner, and it fits right in every time.
Budget-Friendly: Simple pantry ingredients and affordable peppers make it easy on your wallet.
Quick and Easy: No frying, no complicated steps, just mix, layer, and bake.
Customizable: You can adjust the spice level or swap cheeses to suit your taste.
Crowd-Pleasing: That cheesy, comforting texture wins over just about everyone.
Make-Ahead Friendly: You can assemble it ahead of time and bake when ready.
Great for Leftovers: It reheats beautifully and tastes just as good the next day.
Pro Tips from the Kitchen
Now that you’re getting excited, here are a few insider tips to make sure everything turns out perfectly.
- Use well-drained roasted chiles to avoid excess moisture in the casserole
- Let the dish rest for a few minutes after baking so it sets nicely
- Mix cheeses for a richer flavor instead of using just one
- Lightly grease your baking dish to prevent sticking
Kitchen Tools You’ll Want Nearby
Before you start, gather a few essentials to make the process smooth and enjoyable.
Baking Dish: A medium rectangular dish works perfectly for even cooking
Mixing Bowl: Needed to combine the egg mixture smoothly
Whisk: Helps create a light and airy batter
Measuring Cups and Spoons: Keeps everything balanced and accurate
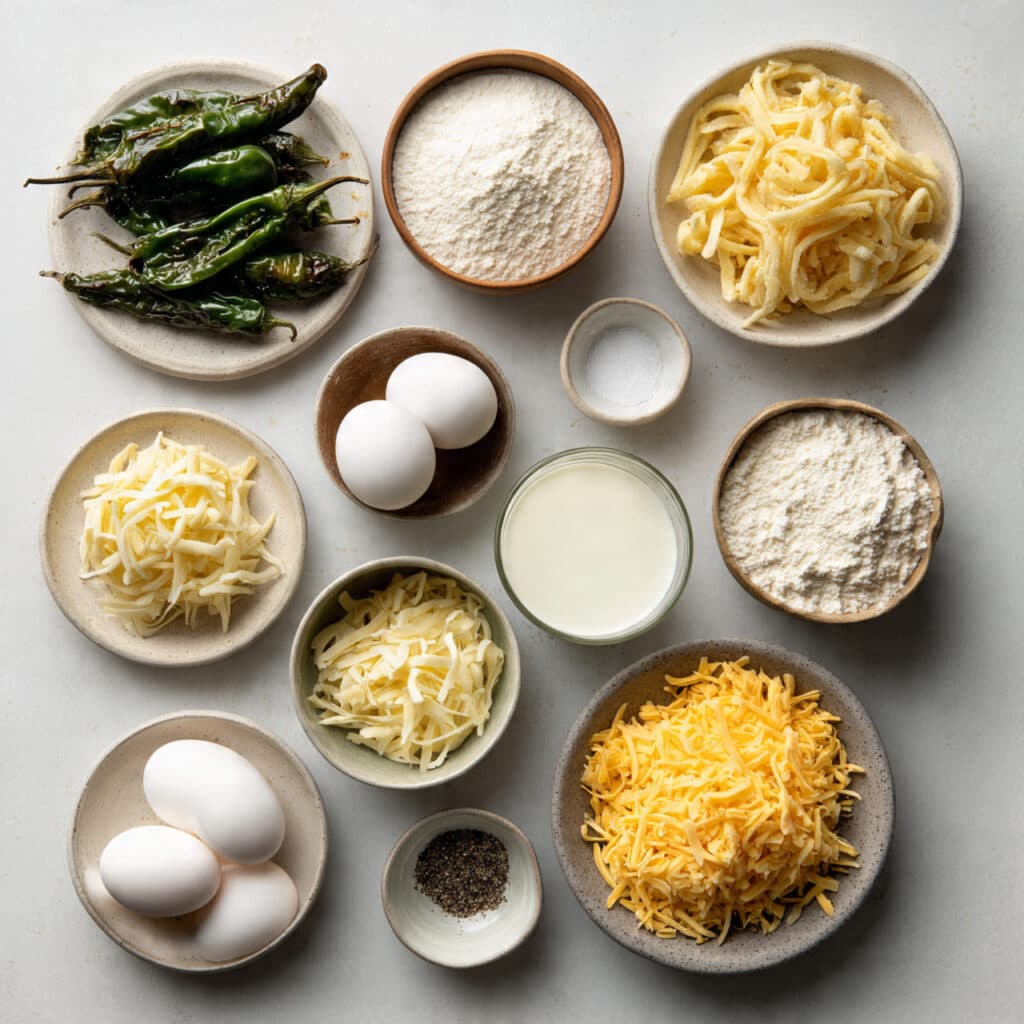
Ingredients That Bring It All Together
Now we reach the heart of the dish, where each ingredient plays its part in creating that perfect bite.
- Roasted Green Chiles: 8 whole, peeled and seeded, these bring smoky flavor and a soft texture
- Eggs: 5 large eggs, they create the fluffy, custard-like base
- Shredded Cheddar Cheese: 1 cup, adds sharpness and depth
- Shredded Monterey Jack Cheese: 1 cup, melts smoothly for that gooey finish
- Milk: 1 cup, helps create a creamy consistency
- All-Purpose Flour: 1/4 cup, gives structure to the casserole
- Baking Powder: 1 teaspoon, keeps the texture light and airy
- Salt: 1/2 teaspoon, enhances all the flavors
- Black Pepper: 1/4 teaspoon, adds a gentle kick
Easy Swaps if You Need Them
Sometimes you need to improvise, and that’s perfectly fine.
Cheddar Cheese: Use Colby or mild cheese instead
Monterey Jack Cheese: Mozzarella works for a milder melt
Milk: Substitute with half and half for extra richness
All-Purpose Flour: Use a gluten-free blend if needed
Spotlight on Key Ingredients
Let’s pause for a moment and appreciate what makes this dish truly shine.
Roasted Green Chiles: These are the star, bringing smoky depth and a soft, almost silky texture that defines every bite.
Monterey Jack Cheese: Known for its meltability, it creates that irresistible stretchy, creamy layer.
Let’s Get Cooking
Alright, here are the steps you’re going to follow, and they come together more easily than you might expect.
- Preheat Your Equipment: Set your oven to 350°F and lightly grease your baking dish
- Combine Ingredients: In a bowl, whisk together eggs, milk, flour, baking powder, salt, and pepper until smooth
- Prepare Your Cooking Vessel: Spread half of the roasted chiles evenly in the dish
- Assemble the Dish: Add half the cheese, pour the egg mixture, then layer remaining chiles and cheese
- Cook to Perfection: Bake for 40 minutes until golden and set in the center
- Finishing Touches: Let it rest for 5 to 10 minutes to firm up
- Serve and Enjoy: Slice into squares and serve warm
The Magic of Texture and Flavor
As it bakes, the eggs puff slightly, creating a soft and airy structure while the cheese melts into rich, creamy layers. The roasted peppers add a gentle heat and smoky aroma that balances perfectly with the savory base.
Helpful Tips for Best Results
- Use freshly roasted peppers for the best flavor
- Do not overbake, as it can dry out the texture
- Let it cool slightly before slicing for cleaner pieces
What to Watch Out For
Even simple recipes can have a few tricky spots, so here’s what to avoid.
- Adding too much liquid, which can make the casserole soggy
- Skipping the resting time, which helps it set properly
- Using undercooked peppers, which can affect texture
Nutrition Snapshot
Servings: 6
Calories per serving: 280
Note: These are approximate values.
Timing at a Glance
Prep Time: 10 minutes
Cook Time: 40 minutes
Total Time: 50 minutes
Make-Ahead and Storage Tips
This dish is perfect for planning ahead. You can assemble everything the night before and keep it in the fridge. When ready, just bake as directed.
Leftovers can be stored in an airtight container in the fridge for up to 3 days. Reheat in the oven or microwave until warmed through. It can also be frozen, just make sure it’s well wrapped.
How to Serve It
Serve it warm with a fresh salad, or pair it with rice and beans for a more filling meal. A spoonful of salsa on top adds a bright, fresh contrast.
Creative Ways to Use Leftovers
Turn leftovers into breakfast tacos, or cut into cubes and add to a salad. You can even reheat slices and serve them in a sandwich.
Extra Tips for Success
Keep your ingredients at room temperature before mixing, and always use a well-greased dish to avoid sticking.
Make It Look Amazing
Serve it in clean slices, letting those layers show. A sprinkle of fresh herbs on top adds a pop of color and freshness.
Fun Variations to Try
Add diced tomatoes for a juicy twist
Mix in sautéed onions for extra depth
Use pepper jack cheese for a spicier kick
Add cooked vegetables for more texture
FAQ’s
Q1: Can I use canned chiles?
Yes, just make sure to drain them well before using.
Q2: Can I make this ahead?
Absolutely, assemble and refrigerate, then bake when ready.
Q3: How do I know it’s done?
The center should be set and the top lightly golden.
Q4: Can I freeze it?
Yes, wrap tightly and freeze for up to 2 months.
Q5: What cheese works best?
A mix of cheddar and Monterey Jack gives the best flavor and melt.
Q6: Can I make it spicier?
Add spicy peppers or a pinch of chili flakes.
Q7: Why is my casserole watery?
It may be due to excess moisture in the peppers.
Q8: Can I double the recipe?
Yes, just use a larger baking dish.
Q9: How should I reheat it?
Use the oven for best texture, or microwave for convenience.
Q10: Can I make it gluten free?
Yes, use a gluten-free flour substitute.
Conclusion
This one’s a total game-changer when you want something comforting, flavorful, and easy all at once. With its cheesy layers and tender peppers, it brings warmth to every bite. Give it a try and see how quickly it becomes a favorite in your kitchen.
Print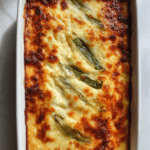
Easy Chile Relleno Casserole (No-Fry Cheesy Pepper Bake)
- Total Time: 50 minutes
- Yield: 6 servings
- Diet: Vegetarian
Description
A comforting, no-fry chile relleno casserole packed with roasted green chiles, fluffy eggs, and layers of melted cheese, baked to golden perfection.
Ingredients
- 8 whole roasted green chiles, peeled and seeded
- 5 large eggs
- 1 cup shredded cheddar cheese
- 1 cup shredded Monterey Jack cheese
- 1 cup milk
- 1/4 cup all-purpose flour
- 1 teaspoon baking powder
- 1/2 teaspoon salt
- 1/4 teaspoon black pepper
Instructions
- Preheat your oven to 350°F and lightly grease a baking dish.
- In a mixing bowl, whisk together eggs, milk, flour, baking powder, salt, and black pepper until smooth.
- Spread half of the roasted green chiles evenly in the prepared baking dish.
- Sprinkle half of the cheddar and Monterey Jack cheese over the chiles.
- Pour the egg mixture evenly over the layers.
- Add the remaining chiles on top, followed by the rest of the cheese.
- Bake for 40 minutes, or until the casserole is set in the center and golden on top.
- Remove from the oven and let it rest for 5 to 10 minutes before slicing.
- Serve warm and enjoy.
Notes
- Make sure chiles are well drained to prevent excess moisture.
- Let the casserole rest before slicing for cleaner portions.
- You can substitute cheeses based on preference.
- Store leftovers in the fridge for up to 3 days.
- Prep Time: 10 minutes
- Cook Time: 40 minutes
- Category: Main Course
- Method: Baking
- Cuisine: Mexican-inspired
Nutrition
- Serving Size: 1 serving
- Calories: 280
- Sugar: 3g
- Sodium: 420mg
- Fat: 18g
- Saturated Fat: 10g
- Unsaturated Fat: 6g
- Trans Fat: 0g
- Carbohydrates: 12g
- Fiber: 2g
- Protein: 15g
- Cholesterol: 170mg