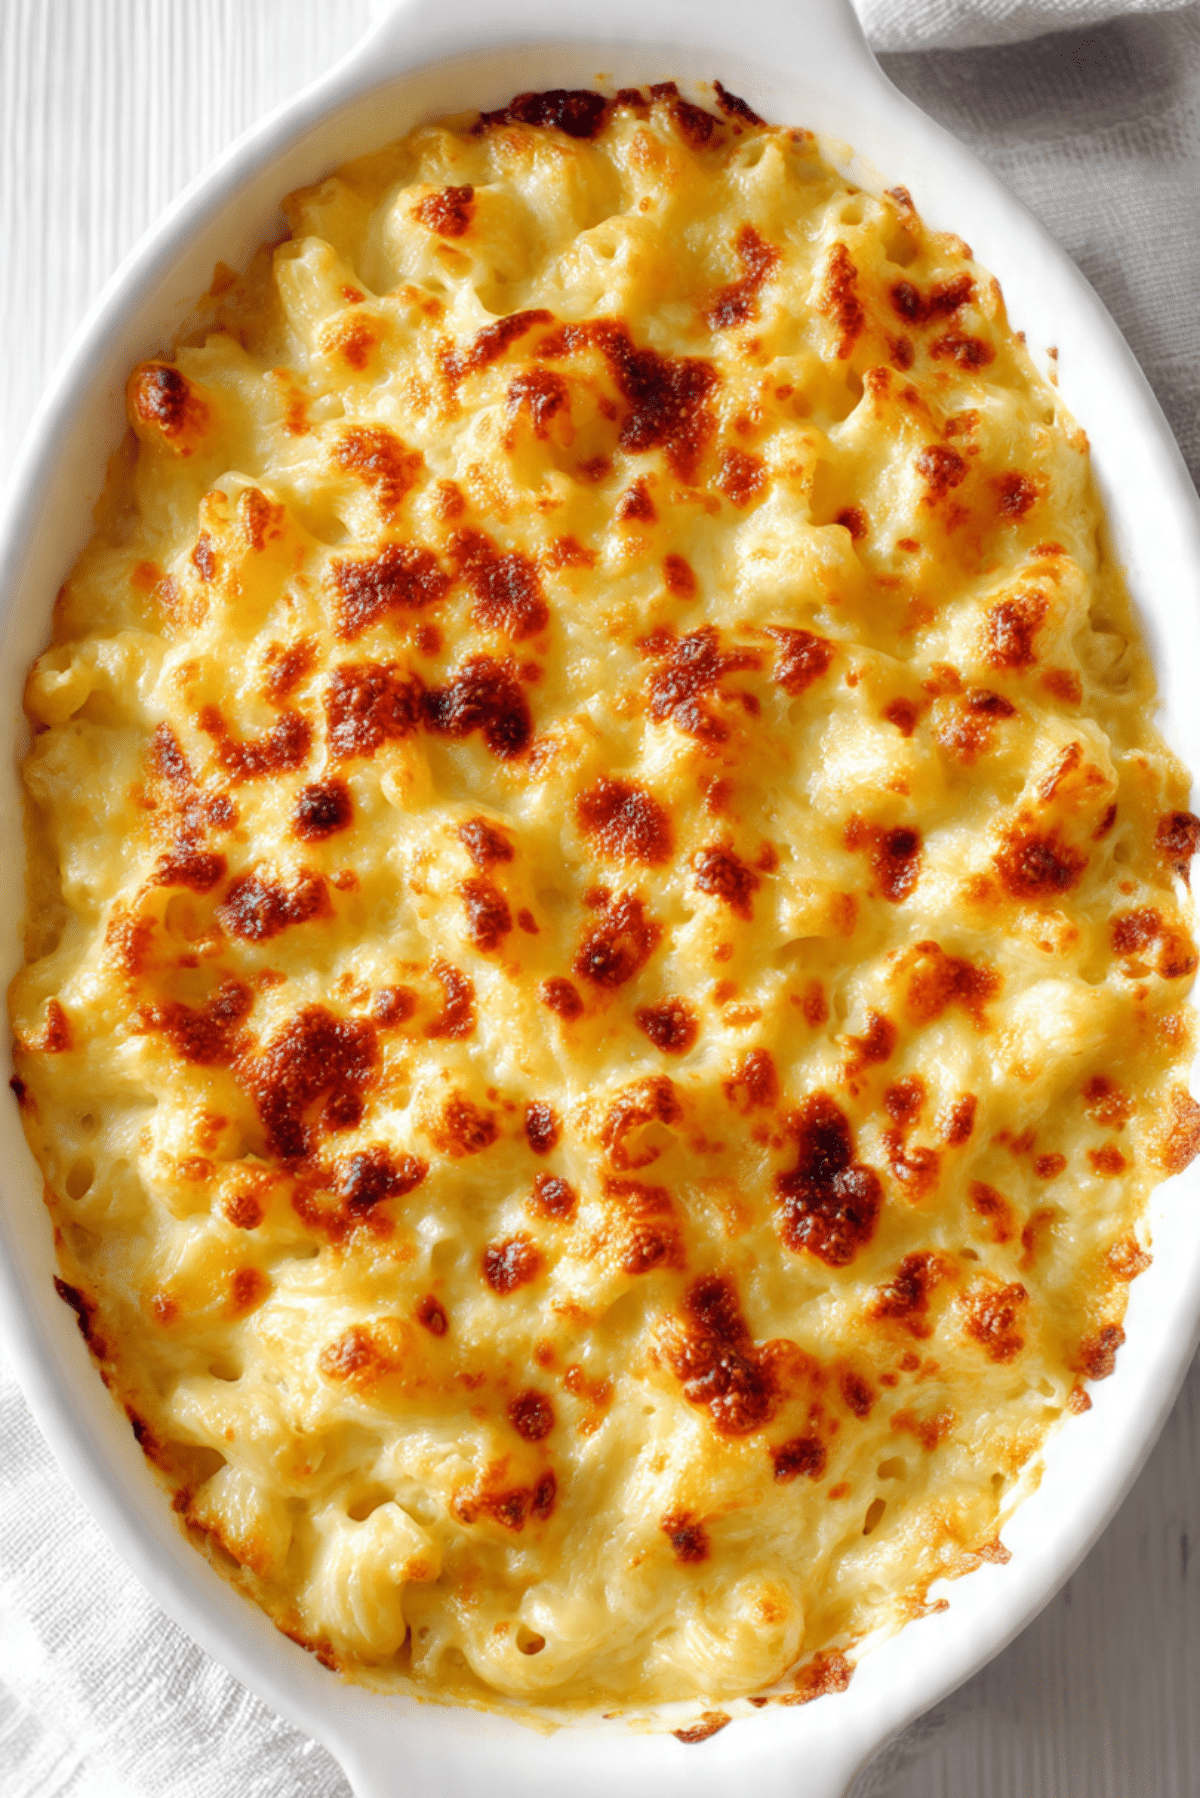
Dump-and-Bake Mac & Cheese
There are nights when you just want something warm, creamy, and ridiculously comforting without juggling three pots on the stove. That is exactly where Dump-and-Bake Mac & Cheese steps in and saves the day. You stir, you pour, you bake, and somehow magic happens in the oven. The pasta turns tender, the cheese melts into a silky sauce, and the top bubbles into golden perfection. Trust me, you’re going to love this.
Why This Creamy Classic Feels Like a Weeknight Superpower
Some recipes feel like a project, this one feels like a gift. You skip the roux, skip the boiling, and skip the extra dishes. Everything cooks together in one baking dish, which means the starch from the pasta helps create that luscious sauce right in the oven. It is cozy, simple, and deeply satisfying in the best way.
This one’s a total game-changer when time is tight but comfort is non negotiable.
A Little Backstory Behind This Oven-Baked Comfort Food
Mac and cheese has roots that stretch back centuries, with early versions appearing in European cookbooks before making its way to American kitchens. Over time, it became a staple of family dinners and holiday tables alike. The baked version, with its golden top and creamy center, became especially beloved in Southern homes.
The dump-and-bake method is a modern twist, created for busy cooks who still crave that nostalgic flavor. It keeps the spirit of tradition while making life just a bit easier.
Reasons This Recipe Never Lets You Down
Before we dive into the details, let me tell you why this dish earns a permanent spot in your rotation.
Versatile: It pairs beautifully with salads, roasted vegetables, or even as a side for grilled dishes.
Budget-Friendly: Simple pantry ingredients like pasta, cheese, and milk keep costs low.
Quick and Easy: No pre boiling pasta and no stovetop sauce required. Everything bakes together.
Customizable: You can adjust the cheeses or add spices to suit your taste.
Crowd-Pleasing: Creamy, cheesy pasta wins over kids and adults every single time.
Make-Ahead Friendly: You can assemble it in advance and bake when ready.
Great for Leftovers: It reheats beautifully and stays creamy with a splash of milk.
Insider Secrets for Ultra Creamy Results
A few small tricks make a big difference here.
- Use freshly shredded cheese for smoother melting and better flavor.
- Stir halfway through baking to ensure even cooking and sauce development.
- Cover tightly with foil for the first part of baking to trap moisture.
- Let it rest for five minutes after baking so the sauce thickens perfectly.
Kitchen Tools That Make It Effortless
You do not need fancy equipment, which is part of the charm.
Large Baking Dish: A 9 by 13 inch dish allows the pasta to cook evenly.
Mixing Spoon: For stirring everything together right in the dish.
Measuring Cups: Accuracy keeps the sauce creamy and balanced.
Aluminum Foil: Helps trap steam during baking.
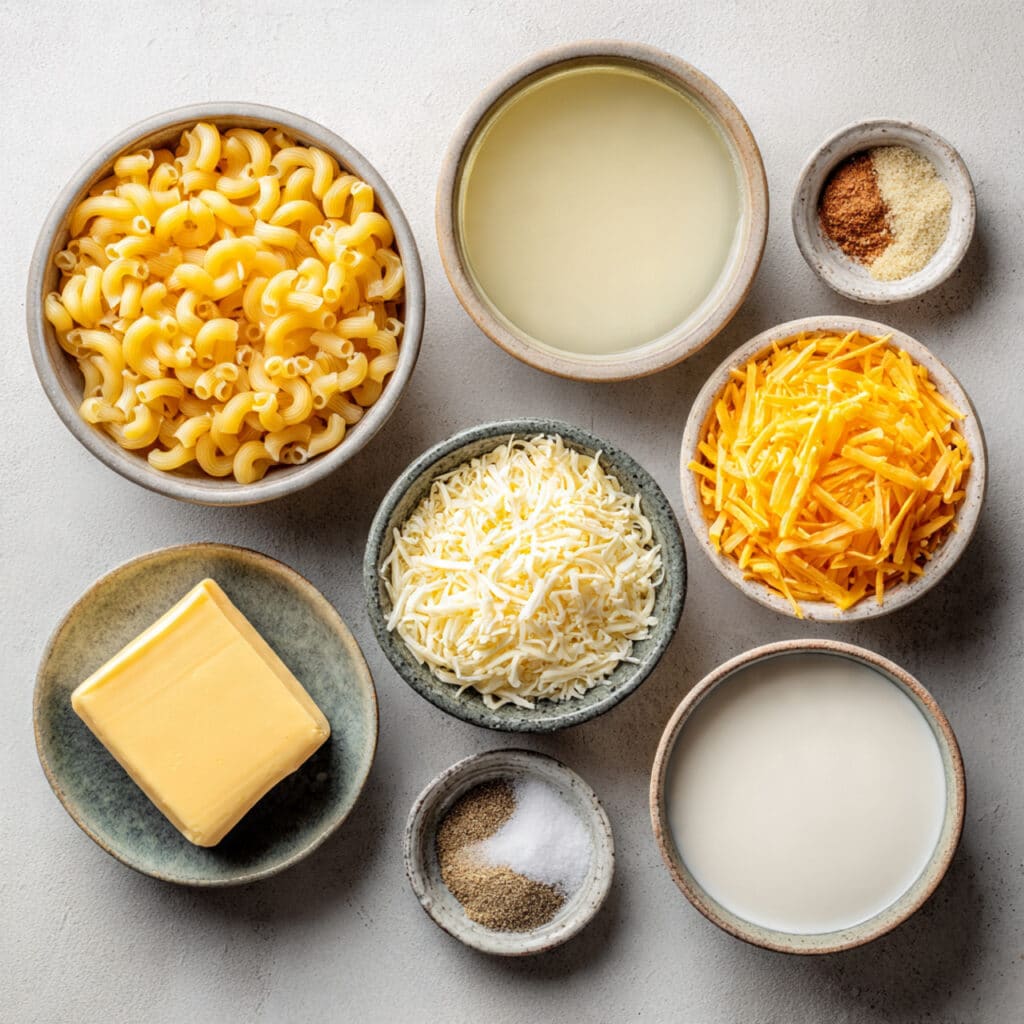
Ingredients That Come Together Like Magic
This is where simple ingredients transform into something truly special.
- Elbow Macaroni: 2 cups dry, this cooks directly in the oven and absorbs the creamy liquid.
- Sharp Cheddar Cheese: 2 cups freshly shredded, brings bold flavor and rich color.
- Mozzarella Cheese: 1 cup freshly shredded, adds that irresistible stretch.
- Whole Milk: 2 cups, creates the base of the creamy sauce.
- Low-Sodium Vegetable Broth: 1 cup, enhances flavor while helping cook the pasta.
- Unsalted Butter: 2 tablespoons melted, adds richness and depth.
- Garlic Powder: 1 teaspoon, gives gentle savory warmth.
- Onion Powder: 1 teaspoon, rounds out the flavor.
- Salt: 1 teaspoon, balances everything.
- Black Pepper: 1/2 teaspoon, adds subtle heat.
Easy Swaps If You Need Them
Sometimes you work with what you have, and that is perfectly fine.
Sharp Cheddar Cheese: Use mild cheddar or Colby for a softer flavor.
Mozzarella Cheese: Monterey Jack works beautifully.
Whole Milk: Substitute with 2 percent milk, though the sauce may be slightly lighter.
Vegetable Broth: Water can work in a pinch, but broth adds more flavor.
Spotlight on the Stars of the Dish
Let’s pause and appreciate what makes this so special.
Sharp Cheddar Cheese: This is the backbone of flavor, delivering that classic tangy richness.
Elbow Macaroni: Its curved shape traps the creamy sauce in every bite, which is exactly what you want.
Let’s Get Cooking
Now let’s dive into the part where everything comes together. It is almost too easy, but that is the beauty of it.
- Preheat Your Equipment: Preheat your oven to 375 degrees Fahrenheit so it is ready to cook the pasta evenly.
- Combine Ingredients: In a large 9 by 13 inch baking dish, add the dry elbow macaroni, sharp cheddar cheese, mozzarella cheese, whole milk, vegetable broth, melted butter, garlic powder, onion powder, salt, and black pepper. Stir thoroughly so the pasta is evenly coated.
- Prepare Your Cooking Vessel: Make sure the pasta is submerged in liquid as much as possible. Spread everything into an even layer.
- Assemble the Dish: Cover the baking dish tightly with aluminum foil to trap steam.
- Cook to Perfection: Bake for 30 minutes covered. Remove the foil, stir well, then bake uncovered for another 15 minutes until the pasta is tender and the top is bubbly and lightly golden.
- Finishing Touches: Let the dish rest for 5 minutes so the sauce thickens and settles into creamy perfection.
- Serve and Enjoy: Spoon into bowls while warm and watch the cheese stretch beautifully with every serving.
The Texture and Flavor Story
As it bakes, the pasta absorbs the seasoned milk and broth, releasing starch that thickens the sauce naturally. The cheddar melts into a sharp, creamy base while the mozzarella adds silky stretch. The top becomes lightly golden and slightly crisp, giving you that perfect contrast between creamy center and delicate crust.
Let me tell you, it’s worth every bite.
Smart Tips for Foolproof Results
If you want to guarantee success, keep these in mind.
- Stir halfway through baking for even cooking.
- Shred cheese fresh for smoother melting.
- Do not skip the resting time, it helps the sauce thicken.
- Taste and adjust seasoning before serving.
Common Pitfalls and How to Avoid Them
Even simple recipes have a few watch outs.
- Using pre shredded cheese can lead to a grainy texture.
- Not covering the dish at first may cause dry pasta.
- Skipping the stir halfway can result in uneven cooking.
- Baking too long uncovered may dry the top.
Nutrition Snapshot
Servings: 6
Calories per serving: 420
Note: These are approximate values.
Time Breakdown at a Glance
Prep Time: 10 minutes
Cook Time: 45 minutes
Total Time: 55 minutes
Make It Ahead and Store It Smart
You can assemble everything up to one day in advance and keep it covered in the refrigerator. When ready to bake, add a few extra minutes to the cooking time. Store leftovers in an airtight container in the refrigerator for up to 4 days. Reheat gently with a splash of milk to bring back the creaminess. It can also be frozen for up to 2 months and thawed overnight before reheating.
Serving Ideas That Elevate the Meal
Serve it alongside a crisp green salad with a bright vinaigrette to balance the richness. Steamed broccoli or roasted carrots add color and freshness. For a cozy dinner, pair it with warm crusty bread.
Give Leftovers a Delicious Second Life
Turn leftovers into baked mac and cheese cups by spooning into muffin tins and reheating. Stir in sautéed vegetables for a quick pasta bowl. You can even use it as a filling for stuffed bell peppers.
Extra Pointers for Even Better Flavor
Add a pinch of smoked paprika for subtle warmth. Stir in a handful of extra cheese on top before the final bake for a more golden crust. Use high quality cheese for the best overall taste.
Make It Look as Good as It Tastes
Sprinkle a little extra shredded cheese on top before baking uncovered so it browns beautifully. Serve in the baking dish for rustic charm or spoon into white bowls for a clean, inviting presentation.
Fun Twists to Try
- Add sautéed mushrooms for earthy depth.
- Stir in spinach before baking for added color.
- Use a blend of white cheddar and Monterey Jack for a different flavor profile.
- Sprinkle breadcrumbs on top during the final bake for extra crunch.
FAQ’s
Q1: Can I use a different pasta shape?
Yes, small shapes like shells or rotini work well, but cooking time may vary slightly.
Q2: Can I make it gluten free?
Yes, use gluten free pasta and check that your broth is gluten free.
Q3: Why is my sauce too thin?
It may need a few more minutes to rest and thicken after baking.
Q4: Can I double the recipe?
Yes, use two baking dishes to ensure even cooking.
Q5: Can I use low fat milk?
You can, but the sauce will be slightly less rich.
Q6: How do I keep it from drying out?
Cover tightly during the first bake and avoid overbaking.
Q7: Can I add vegetables?
Absolutely, just chop them small so they cook evenly.
Q8: Does it reheat well?
Yes, add a splash of milk before reheating.
Q9: Can I prepare it the night before?
Yes, assemble and refrigerate, then bake when ready.
Q10: How do I know it is done?
The pasta should be tender and the top lightly golden.
Conclusion
If you are craving something cozy, simple, and deeply satisfying, this Dump-and-Bake Mac & Cheese delivers every single time. It is creamy, golden, and wonderfully comforting without the fuss. Give it a try, make it your own, and enjoy every cheesy bite.
Print
Dump-and-Bake Mac & Cheese
- Total Time: 55 minutes
- Yield: 6 servings
- Diet: Vegetarian
Description
This Dump-and-Bake Mac & Cheese is a creamy, oven-baked comfort classic made with simple pantry ingredients. No boiling, no roux, just stir everything together and let the oven do the magic. The result is tender pasta coated in a rich, cheesy sauce with a lightly golden top.
Ingredients
- 2 cups dry elbow macaroni
- 2 cups freshly shredded sharp cheddar cheese
- 1 cup freshly shredded mozzarella cheese
- 2 cups whole milk
- 1 cup low-sodium vegetable broth
- 2 tablespoons unsalted butter, melted
- 1 teaspoon garlic powder
- 1 teaspoon onion powder
- 1 teaspoon salt
- 1/2 teaspoon black pepper
Instructions
- Preheat oven to 375°F.
- In a 9 by 13 inch baking dish, combine dry elbow macaroni, sharp cheddar cheese, mozzarella cheese, whole milk, vegetable broth, melted butter, garlic powder, onion powder, salt, and black pepper. Stir thoroughly to coat the pasta evenly.
- Ensure the pasta is mostly submerged in liquid and spread into an even layer.
- Cover tightly with aluminum foil.
- Bake for 30 minutes covered. Remove foil, stir well, then bake uncovered for another 15 minutes until pasta is tender and the top is bubbly and lightly golden.
- Let rest for 5 minutes before serving to allow the sauce to thicken.
Notes
- Use freshly shredded cheese for the smoothest sauce.
- Stir halfway through baking for even cooking.
- Add a splash of milk when reheating leftovers to restore creaminess.
- Let the dish rest before serving so the sauce thickens properly.
- Prep Time: 10 minutes
- Cook Time: 45 minutes
- Category: Main Course
- Method: Baking
- Cuisine: American
Nutrition
- Serving Size: 1 serving
- Calories: 420
- Sugar: 8g
- Sodium: 620mg
- Fat: 22g
- Saturated Fat: 13g
- Unsaturated Fat: 7g
- Trans Fat: 0.5g
- Carbohydrates: 38g
- Fiber: 2g
- Protein: 18g
- Cholesterol: 65mg