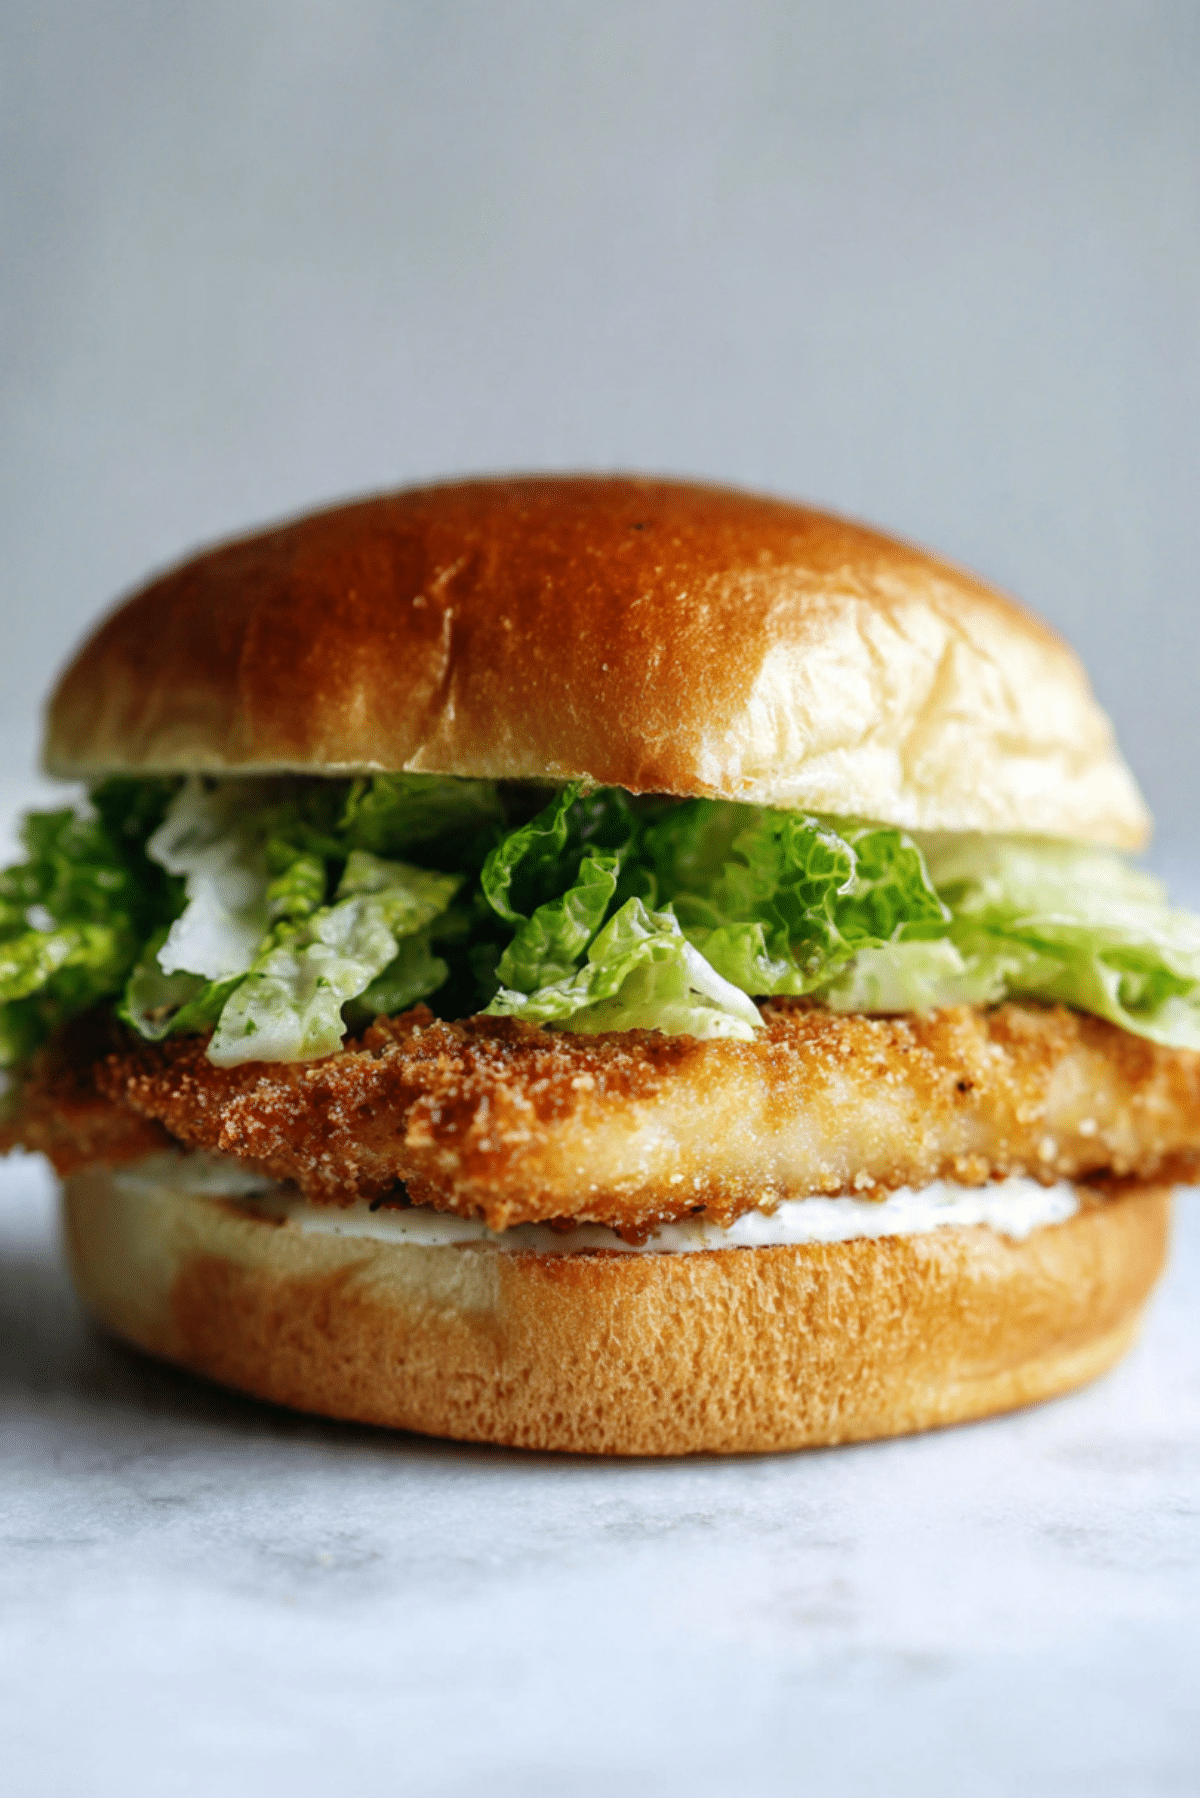
Crispy Chicken Caesar Sandwich
There is something deeply satisfying about biting into a sandwich that delivers crunch, creaminess, and freshness all at once. This Crispy Chicken Caesar Sandwich is exactly that kind of experience. You get the golden crunch of perfectly breaded chicken, the cool snap of romaine lettuce, the salty richness of parmesan, and that creamy Caesar dressing that ties everything together. Trust me, you’re going to love this. It is hearty, comforting, and just fancy enough to feel like you ordered it from your favorite café.
Why This Sandwich Deserves a Spot in Your Weekly Rotation
Sometimes you just want a meal that feels indulgent but still fresh. That is where this sandwich shines. It hits all the right notes. The crispy chicken brings warmth and crunch, the lettuce keeps things light, and the dressing adds that bold garlicky tang. This one’s a total game-changer for lunch or even a relaxed dinner.
It feels special, yet it is simple enough to make at home without stress. And once you taste that combination of textures, you will understand why it is worth every bite.
A Little Backstory Behind the Caesar Flavor
The Caesar flavor profile actually traces back to the famous Caesar salad, which was created in Mexico in the 1920s by Caesar Cardini. The original version focused on crisp romaine, parmesan, and a rich dressing built from garlic, lemon, anchovy, and egg. Over time, people started adding grilled or crispy chicken to make it more filling.
Turning that beloved salad into a sandwich was only a matter of time. And honestly, wrapping those bold flavors into a toasted brioche bun makes perfect sense. It is like your favorite salad decided to level up.
What Makes This Recipe So Reliable and Irresistible
Before we dive into the cooking, let me tell you why this recipe works so beautifully every single time.
Versatile: You can serve it for lunch, dinner, or even slice it into halves for a casual gathering. It fits almost any occasion.
Budget-Friendly: Simple pantry staples like flour, eggs, and breadcrumbs help you create that crispy coating without fancy ingredients.
Quick and Easy: The steps are straightforward and beginner-friendly, so you do not need advanced skills to nail it.
Customizable: You can adjust the seasoning, add extra parmesan, or even swap the bun style if you like.
Crowd-Pleasing: Crispy chicken and creamy dressing are a combination that rarely disappoints.
Make-Ahead Friendly: You can bread the chicken ahead of time and keep it chilled until you are ready to cook.
Great for Leftovers: Extra chicken can be sliced and used in wraps or salads the next day.
Chef-Level Secrets for the Perfect Crunch
Let me share a few insider tips that elevate this sandwich from good to unforgettable.
- Pat the chicken completely dry before coating it, this helps the breading stick properly.
- Season each layer, meaning the flour and breadcrumbs should both have salt and pepper.
- Press the breadcrumbs firmly onto the chicken so you get that thick, crunchy crust.
- Let the breaded chicken rest for about 10 minutes before cooking, this helps the coating stay intact.
Tools That Make Everything Easier
You do not need a fancy kitchen, but a few tools make the process smoother.
Mixing Bowls: For organizing your flour, egg wash, and breadcrumbs in separate stations.
Large Skillet: For pan frying the chicken evenly with enough space.
Tongs: To flip the chicken without disturbing the crust.
Cutting Board and Knife: For prepping lettuce and slicing the sandwich cleanly.
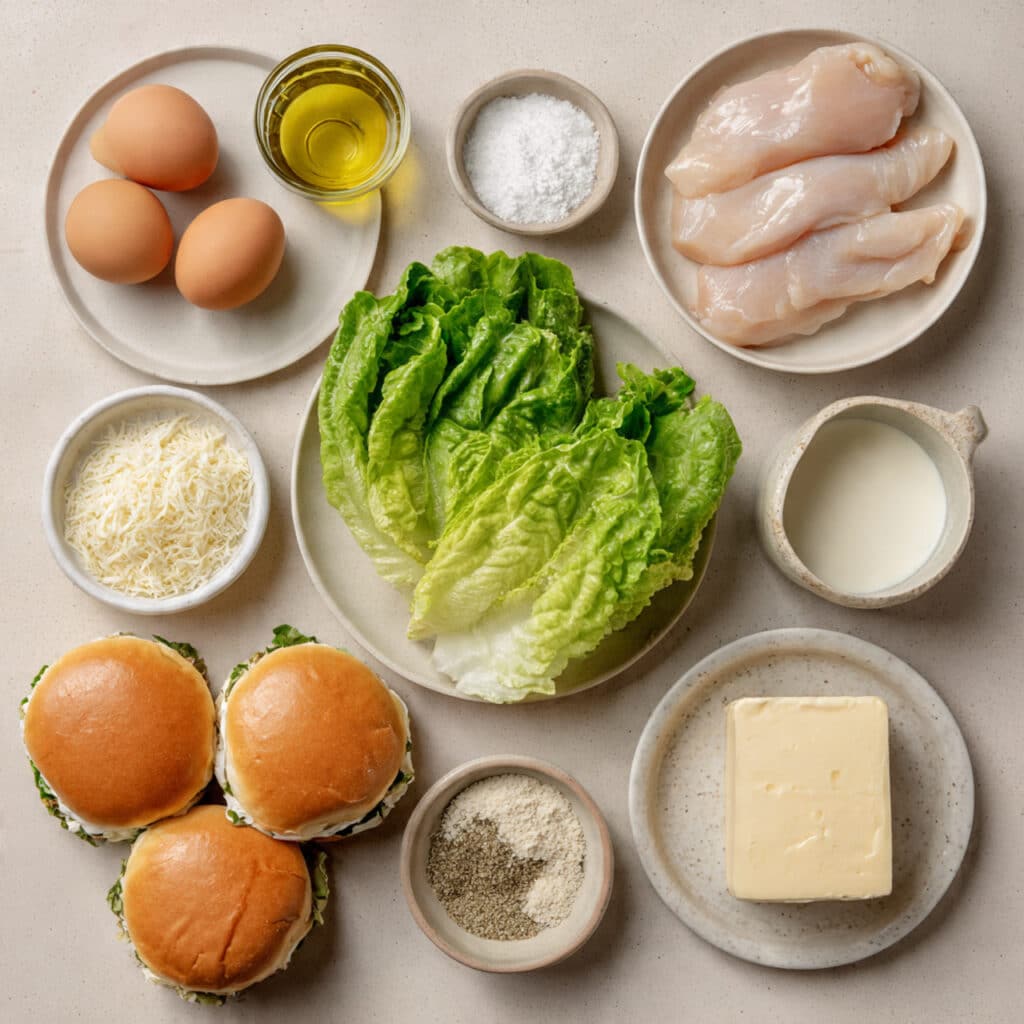
Ingredients You Will Need for This Crispy Delight
Every ingredient here plays a role in building flavor and texture. When they come together, it feels effortless.
- Boneless Skinless Chicken Fillets: 2 large fillets, about 450 grams total, these form the hearty, juicy base of the sandwich.
- All Purpose Flour: 1 cup, about 120 grams, helps create the first layer of coating.
- Large Eggs: 2 eggs, beaten, act as the glue that binds the breadcrumbs.
- Plain Breadcrumbs: 1 cup, about 100 grams, give that signature crisp texture.
- Garlic Powder: 1 teaspoon, adds warm savory depth.
- Salt: 1 teaspoon, enhances every flavor in the sandwich.
- Black Pepper: 1 teaspoon, brings subtle heat.
- Olive Oil: 4 tablespoons, about 60 ml, for pan frying the chicken until golden.
- Brioche Burger Buns: 4 buns, lightly toasted for softness with structure.
- Romaine Lettuce Leaves: 1 cup chopped, fresh and crisp for contrast.
- Parmesan Cheese: ½ cup shaved, about 50 grams, adds salty richness.
- Caesar Dressing: ½ cup, about 120 ml, creamy and tangy to tie everything together.
Smart Swaps If You Need Them
Cooking should feel flexible, not rigid.
Brioche Buns: Use ciabatta rolls or whole wheat buns if preferred.
Parmesan Cheese: Pecorino Romano can offer a sharper, saltier twist.
Olive Oil: Use a neutral oil like sunflower oil for frying.
Plain Breadcrumbs: Panko breadcrumbs create an even lighter crunch.
Spotlight on Key Flavors
Some ingredients truly define this sandwich.
Romaine Lettuce: Its crisp, watery crunch balances the richness of the chicken and dressing.
Parmesan Cheese: That salty, nutty flavor deepens the Caesar profile and makes each bite more complex.
Let’s Bring It All Together in the Kitchen
Now let’s dive into the cooking process. This is where the magic happens.
- Preheat Your Equipment: Heat a large skillet over medium heat and add the olive oil, allowing it to warm gently.
- Combine Ingredients: In three separate bowls, place the flour in one, the beaten eggs in another, and the breadcrumbs mixed with garlic powder, salt, and black pepper in the third.
- Prepare Your Cooking Vessel: Ensure the oil is hot but not smoking, it should shimmer slightly in the pan.
- Assemble the Dish: Dredge each chicken fillet in flour, dip into the eggs, then coat thoroughly in the seasoned breadcrumbs, pressing gently to adhere.
- Cook to Perfection: Place the coated chicken into the skillet and cook for 5 to 6 minutes per side, until golden brown and cooked through with an internal temperature of 75 degrees Celsius.
- Finishing Touches: Lightly toast the brioche buns. Spread Caesar dressing on the bottom half, add chopped romaine, place the crispy chicken on top, sprinkle with shaved parmesan, and drizzle a bit more dressing if desired.
- Serve and Enjoy: Close the sandwich with the top bun, press gently, and serve immediately while warm and crispy.
The Texture and Flavor Symphony
The first thing you notice is that crunch. It is crisp and audible, followed by juicy chicken that feels tender inside. Then comes the cool lettuce and creamy dressing, which softens the bite in the best way. The parmesan melts slightly from the warmth, releasing a nutty aroma. Every layer works together, and the balance is honestly beautiful.
Helpful Tips for Even Better Results
A few small adjustments can make a big difference.
- Toast the buns lightly so they do not get soggy from the dressing.
- Shave the parmesan fresh for the best flavor.
- Let the chicken rest for a couple of minutes before assembling.
- Do not overcrowd the pan when frying.
Mistakes to Avoid for a Perfect Result
Even simple recipes have little traps, but they are easy to avoid.
- Skipping seasoning in the coating, which can lead to bland crust.
- Using oil that is too hot, causing the outside to burn before the inside cooks.
- Assembling the sandwich too early, which can soften the crust.
- Overloading with dressing, which can overpower the balance.
Nutrition Breakdown You Should Know
Servings: 4
Calories per serving: Approximately 650
Note: These are approximate values.
Time Needed from Start to Finish
Prep Time: 20 minutes
Cook Time: 15 minutes
Total Time: 35 minutes
Make-Ahead and Storage Tips
If you want to get ahead, bread the chicken and store it covered in the fridge for up to 24 hours before cooking. Cooked chicken can be stored in an airtight container in the refrigerator for up to 3 days. Reheat in an oven or air fryer to bring back the crisp texture. Freezing is possible for the cooked chicken, just wrap tightly and freeze for up to 2 months.
How to Serve It Like a Pro
Serve this sandwich with crispy oven fries, a light coleslaw, or even a simple lemony side salad. For gatherings, cut each sandwich in half and secure with a toothpick for easy handling. It looks inviting and generous on a big serving platter.
Creative Leftover Transformations
Leftover chicken can be sliced and tossed into a fresh Caesar salad. You can also chop it up and use it in a wrap with extra lettuce and dressing. Even a simple grain bowl becomes more exciting with those crispy pieces on top.
Extra Little Touches That Make a Difference
Freshly cracked black pepper right before serving adds aroma. A squeeze of lemon over the lettuce brightens the flavors. And if you love bold taste, add a touch more shaved parmesan on top.
Turn It Into a Showstopper
Stack the sandwich tall and let the lettuce peek out slightly for a fresh look. Use a sharp knife to cut cleanly so the layers are visible. The golden crust against the green lettuce and pale dressing creates a beautiful contrast.
Variations to Try When You Feel Creative
- Add sliced tomatoes for extra juiciness.
- Mix a bit of Dijon mustard into the Caesar dressing for added depth.
- Swap brioche for a crusty baguette for a rustic feel.
- Add thinly sliced red onions for sharpness.
- Use spicy breadcrumbs for a subtle kick.
FAQ’s
Q1: Can I bake the chicken instead of frying it?
Yes, bake at 200 degrees Celsius for about 20 to 25 minutes, flipping halfway through, until fully cooked.
Q2: Can I use store bought Caesar dressing?
Absolutely, just choose one with a rich, garlicky flavor.
Q3: How do I keep the chicken extra crispy?
Reheat in an oven or air fryer instead of a microwave.
Q4: Can I make it gluten free?
Yes, use gluten free flour and breadcrumbs, and a gluten free bun.
Q5: Can I use chicken thighs?
Yes, boneless thighs work well and stay juicy.
Q6: Is this suitable for meal prep?
Yes, keep components separate and assemble just before eating.
Q7: What oil works best for frying?
Olive oil works well, but any neutral oil with medium heat tolerance is fine.
Q8: How do I prevent soggy buns?
Toast them lightly and avoid overloading with dressing.
Q9: Can I add extra toppings?
Yes, sliced avocado or crispy onions can add texture.
Q10: What makes this sandwich stand out?
The balance between crunch, creaminess, and freshness makes it truly special.
Conclusion
This Crispy Chicken Caesar Sandwich is everything you want in a comforting meal. It is crunchy, creamy, fresh, and deeply satisfying. Let me tell you, it is worth every bite. Once you make it at home, you might not go back to ordering it out. So grab those ingredients, head to the kitchen, and enjoy the process. You are about to create something seriously delicious.
Print
Crispy Chicken Caesar Sandwich
- Total Time: 35 minutes
- Yield: 4 sandwiches
- Diet: Low Lactose
Description
A crispy, golden breaded chicken fillet layered with fresh romaine lettuce, shaved parmesan, and creamy Caesar dressing inside a lightly toasted brioche bun. This sandwich delivers the perfect balance of crunch, freshness, and bold flavor in every bite.
Ingredients
- 2 large boneless skinless chicken fillets (about 450 grams total)
- 1 cup (120 grams) all purpose flour
- 2 large eggs, beaten
- 1 cup (100 grams) plain breadcrumbs
- 1 teaspoon garlic powder
- 1 teaspoon salt
- 1 teaspoon black pepper
- 4 tablespoons (60 ml) olive oil
- 4 brioche burger buns
- 1 cup chopped romaine lettuce
- 1/2 cup (50 grams) shaved parmesan cheese
- 1/2 cup (120 ml) Caesar dressing
Instructions
- Preheat a large skillet over medium heat and add the olive oil, allowing it to warm gently.
- Place the flour in one bowl, the beaten eggs in a second bowl, and mix the breadcrumbs with garlic powder, salt, and black pepper in a third bowl.
- Ensure the oil is hot but not smoking and shimmering slightly.
- Dredge each chicken fillet in flour, dip into the eggs, then coat thoroughly in the seasoned breadcrumbs, pressing gently to adhere.
- Cook the chicken in the skillet for 5 to 6 minutes per side until golden brown and fully cooked through to an internal temperature of 75 degrees Celsius.
- Lightly toast the brioche buns. Spread Caesar dressing on the bottom half, add chopped romaine lettuce, place the crispy chicken on top, sprinkle with shaved parmesan, and drizzle with additional dressing if desired.
- Close the sandwich with the top bun and serve immediately while warm and crispy.
Notes
- Toast the buns lightly to prevent them from becoming soggy.
- Do not overcrowd the pan while frying to maintain crispiness.
- Let the chicken rest for a few minutes before assembling for best texture.
- Reheat leftovers in an oven or air fryer to restore crunch.
- Prep Time: 20 minutes
- Cook Time: 15 minutes
- Category: Main Course
- Method: Pan Frying
- Cuisine: American
Nutrition
- Serving Size: 1 sandwich
- Calories: 650
- Sugar: 6 g
- Sodium: 980 mg
- Fat: 34 g
- Saturated Fat: 7 g
- Unsaturated Fat: 24 g
- Trans Fat: 0 g
- Carbohydrates: 52 g
- Fiber: 3 g
- Protein: 38 g
- Cholesterol: 165 mg