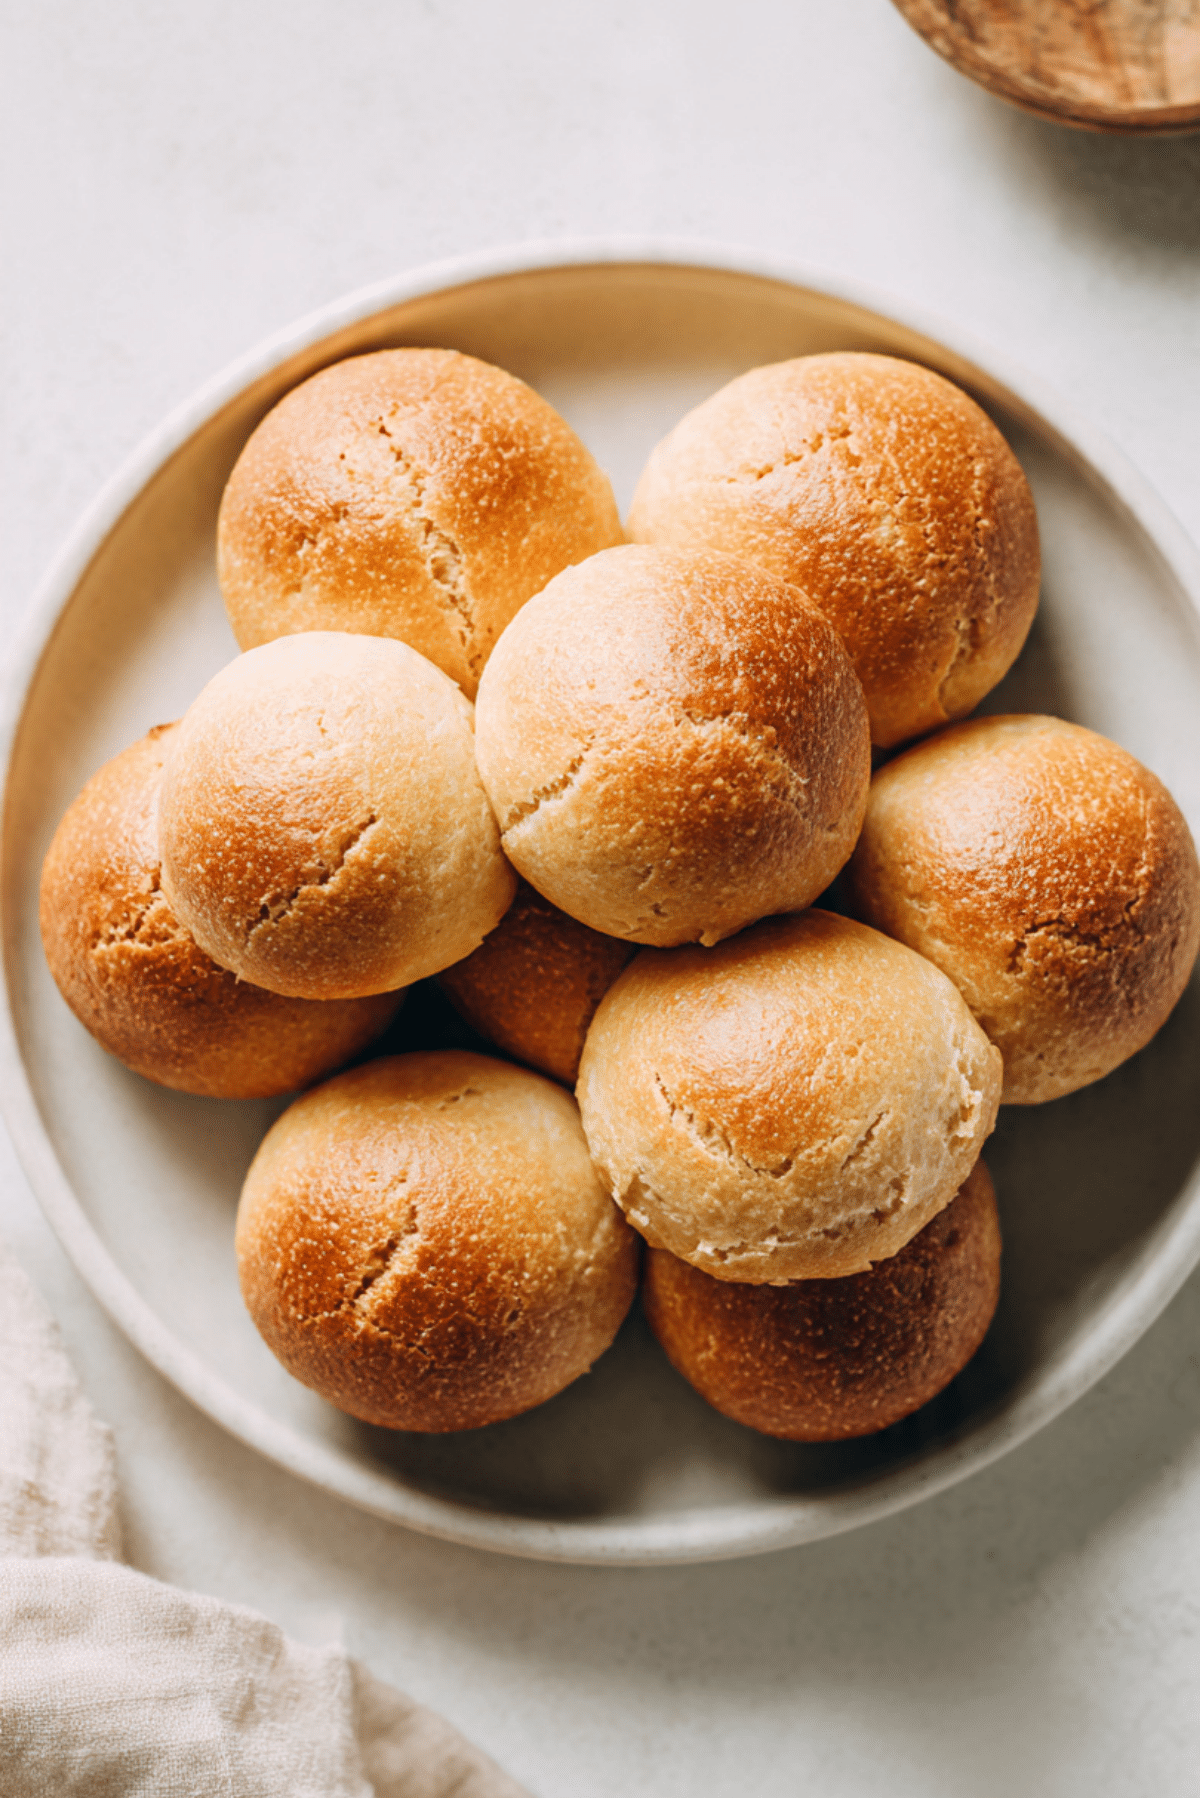
Coconut Flour Dinner Rolls
There is something incredibly comforting about pulling a tray of warm dinner rolls out of the oven, especially when they are golden, tender, and smell faintly sweet from coconut flour. These Coconut Flour Dinner Rolls are soft on the inside, lightly crisp on the outside, and surprisingly satisfying. If you are looking for something gluten free that still feels like a proper bread basket moment, trust me, you’re going to love this. This one’s a total game-changer for weeknight dinners and holiday tables alike.
Why These Rolls Deserve a Spot on Your Table
You know that feeling when you tear open a warm roll and steam escapes, carrying that buttery aroma with it? That is exactly what happens here. These rolls are light yet rich, slightly nutty from the coconut flour, and beautifully golden on top.
They are not heavy or dense like some alternative flour breads can be. Instead, they have a soft crumb that holds together well, making them perfect for soaking up soups, stews, or even a swipe of softened butter. Let me tell you, it’s worth every bite.
A Little Background on Coconut Flour Baking
Coconut flour has become a favorite in gluten free kitchens, especially in low carb and grain free baking. It is made from dried coconut meat that has been finely ground, and it behaves very differently from traditional wheat flour.
Because it absorbs a lot of moisture, it requires more eggs and liquid to create structure. That is why these rolls rely on eggs for lift and tenderness. The result is a bread that feels rich, nourishing, and satisfying without any gluten at all.
Why This Recipe Works Every Single Time
Before we move into the mixing bowl, let’s talk about why this method is so reliable.
Versatile: These rolls pair beautifully with soups, roasted meats, salads, or even as a base for mini sandwiches.
Budget-Friendly: Coconut flour stretches far because you use less of it than regular flour, making this surprisingly economical.
Quick and Easy: The batter comes together in one bowl and bakes in under half an hour.
Customizable: You can add herbs, garlic powder, or even a sprinkle of seeds on top.
Crowd-Pleasing: Even people who are not gluten free enjoy these rolls because they taste rich and comforting.
Make-Ahead Friendly: You can bake them earlier in the day and gently reheat before serving.
Great for Leftovers: Slice and toast the next morning for a savory breakfast option.
Chef’s Insider Tips for Perfect Texture
Getting coconut flour just right is all about understanding its personality.
- Let the batter rest for a few minutes before shaping, this allows the coconut flour to fully absorb moisture.
- Do not overbake, they should be lightly golden, not dark brown.
- Use room temperature eggs so the mixture blends smoothly.
- Measure coconut flour carefully, too much can make the rolls dry.
Essential Kitchen Tools for Success
Before we begin, gather your tools so everything flows smoothly.
Mixing Bowl: A medium bowl gives you enough space to combine everything without spills.
Whisk: Helps incorporate the eggs and liquids evenly.
Measuring Cups and Spoons: Accuracy matters with coconut flour.
Baking Sheet or Muffin Tin: Either works, depending on your preferred shape.
Parchment Paper: Prevents sticking and ensures easy cleanup.
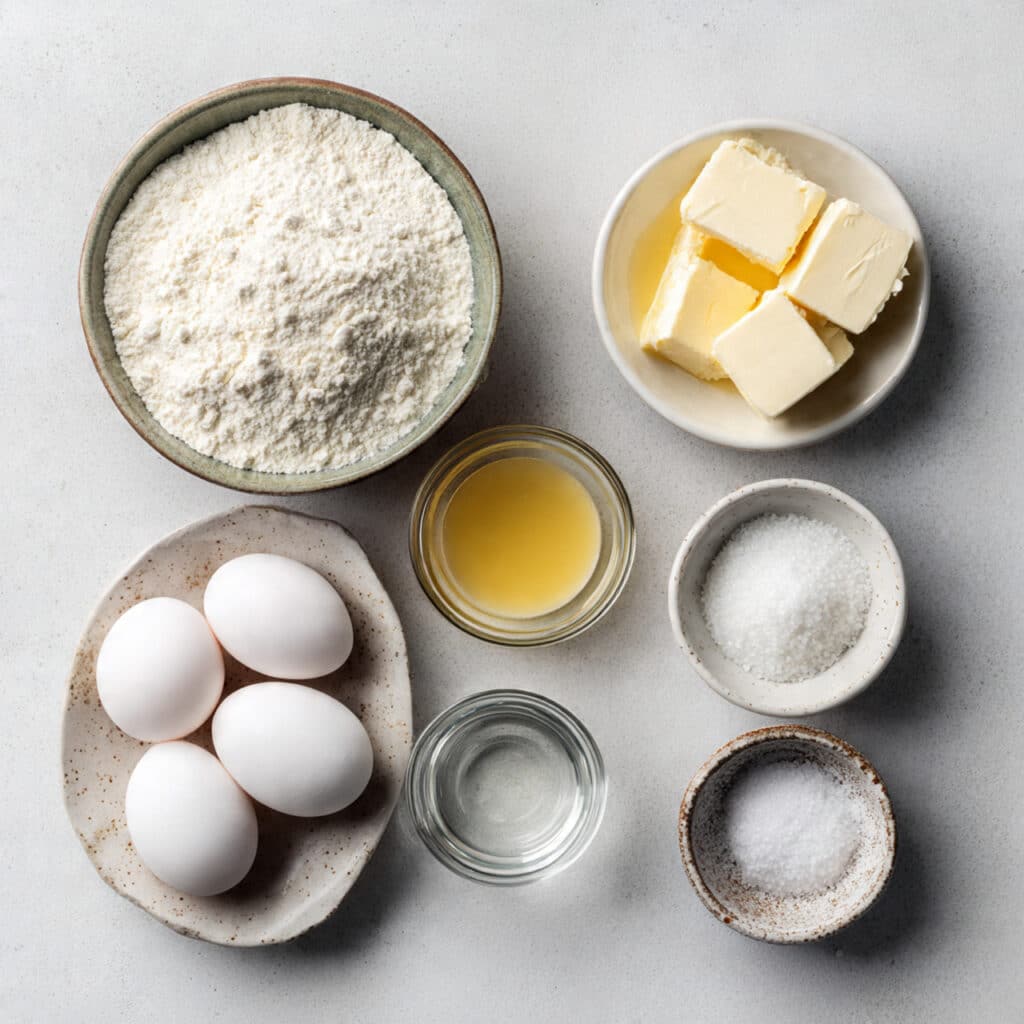
The Simple Ingredients That Make Magic Happen
What I love most about this recipe is how short and straightforward the ingredient list is. Each one plays an important role in building flavor and structure.
- Coconut Flour: 1/2 cup, finely sifted, provides structure and that gentle nutty flavor.
- Large Eggs: 4 large, room temperature, create lift and bind the dough.
- Unsalted Butter: 1/4 cup melted, adds richness and moisture.
- Warm Water: 1/4 cup, helps loosen the batter and create a tender crumb.
- Baking Powder: 1 teaspoon, gives the rolls their rise.
- Salt: 1/4 teaspoon, enhances all the flavors.
Easy Swaps If You Need Them
Sometimes you have to work with what is in your pantry.
Unsalted Butter: Replace with melted coconut oil for a dairy free option.
Warm Water: Unsweetened almond milk works well for a slightly richer taste.
Salt: A pinch of sea salt flakes can be used instead of fine salt.
Spotlight on the Key Ingredients
Let’s pause for a second and appreciate the stars of the show.
Coconut Flour: Highly absorbent and naturally gluten free, it creates a soft, tender roll when properly hydrated.
Eggs: They provide structure and moisture, giving these rolls their fluffy interior.
Let’s Bake These Rolls Together
Now let’s dive into the fun part, bringing everything together.
- Preheat Your Equipment: Preheat your oven to 350°F and line a baking sheet with parchment paper or lightly grease a muffin tin.
- Combine Ingredients: In a mixing bowl, whisk the eggs until smooth. Add melted butter and warm water, then whisk again. Stir in coconut flour, baking powder, and salt until fully combined. Let the batter rest for 3 to 5 minutes to thicken.
- Prepare Your Cooking Vessel: If using a baking sheet, scoop the batter into small mounds. If using a muffin tin, divide evenly among the cups.
- Assemble the Dish: Smooth the tops gently with the back of a spoon so they bake evenly.
- Cook to Perfection: Bake for 20 to 25 minutes until the tops are lightly golden and the centers feel set.
- Finishing Touches: Remove from the oven and allow them to cool slightly, this helps the texture finish setting.
- Serve and Enjoy: Serve warm with butter or alongside your favorite meal.
The Texture and Flavor Journey
As they bake, the aroma becomes warm and slightly sweet. The outside turns golden and delicate, while the inside stays soft and moist. The flavor is mild, with a subtle coconut note that does not overpower. Instead, it complements savory dishes beautifully.
Helpful Tips to Make It Even Better
A few small adjustments can elevate your results.
- Lightly oil your hands if shaping by hand to prevent sticking.
- Allow the rolls to cool slightly before slicing for the best texture.
- Store leftovers in an airtight container to maintain moisture.
Common Mistakes and How to Avoid Them
Even simple recipes can have small pitfalls, so here is what to watch for.
- Adding too much coconut flour, which can make the rolls dry. Measure carefully.
- Skipping the resting time, which helps the batter thicken properly.
- Overbaking, which can lead to a crumbly texture. Keep an eye on them near the end.
Nutrition Snapshot
Servings: 6
Calories per serving: 170
Note: These are approximate values.
Time Breakdown for Busy Days
Prep Time: 10 minutes
Cook Time: 25 minutes
Total Time: 35 minutes
Make-Ahead and Storage Advice
You can prepare the batter a few hours ahead and keep it covered in the refrigerator. Bake just before serving for the freshest result.
Store cooled rolls in an airtight container at room temperature for one day or in the refrigerator for up to four days. For longer storage, freeze in a sealed bag for up to two months. Reheat in a warm oven for a few minutes to bring back that fresh baked softness.
How to Serve Them
Serve alongside hearty soups, roasted vegetables, or grilled chicken. They also make a wonderful base for breakfast sandwiches with eggs and cheese. Split and toast them lightly for a crisp edge and soft center.
Creative Ways to Use Leftovers
Turn them into mini sliders, cube them for a gluten free stuffing, or slice and toast for a savory snack with avocado. They even work as a base for small open faced sandwiches.
Extra Tips for Even More Flavor
Brush the tops with melted butter right after baking for added richness. Sprinkle sesame seeds or dried herbs before baking for extra texture and aroma.
Make Them Look Bakery Worthy
Arrange them in a basket lined with a clean kitchen towel to keep them warm. A light brush of butter gives them a soft sheen that looks inviting and irresistible.
Variations to Try
- Add dried rosemary and garlic powder for a savory herb version.
- Mix in shredded cheddar for a cheesy twist.
- Stir in a pinch of paprika for subtle warmth.
- Add a sprinkle of everything bagel seasoning on top before baking.
FAQ’s
Q1: Can I make these dairy free?
Yes, simply use melted coconut oil instead of butter.
Q2: Why is coconut flour so dry?
It absorbs a lot of liquid, which is why eggs and water are essential.
Q3: Can I freeze them?
Absolutely, freeze in an airtight bag and reheat gently.
Q4: Do they taste strongly of coconut?
No, the flavor is mild and blends well with savory dishes.
Q5: Can I use fewer eggs?
The eggs are necessary for structure, reducing them will change the texture.
Q6: Can I double the recipe?
Yes, just double all ingredients evenly.
Q7: Why did mine turn crumbly?
They may have been overbaked or had too much coconut flour.
Q8: Can I shape them differently?
Yes, you can make them slightly flatter for sandwich style rolls.
Q9: How do I know they are done?
The tops will be lightly golden and the centers will feel set.
Q10: Can I add sweet flavors?
Yes, a small amount of honey and cinnamon can turn them into a breakfast style roll.
Conclusion
There is something so satisfying about baking bread that fits your lifestyle without sacrificing flavor or comfort. These Coconut Flour Dinner Rolls are soft, golden, and deeply comforting. They come together quickly, fill your kitchen with warmth, and bring everyone to the table. Give them a try and see just how delicious gluten free baking can be.
Print
Coconut Flour Dinner Rolls
- Total Time: 35 minutes
- Yield: 6 rolls
- Diet: Gluten Free
Description
Soft, golden Coconut Flour Dinner Rolls that are fluffy inside with a lightly crisp exterior. These gluten free rolls are rich, tender, and perfect for pairing with soups, salads, or hearty dinners.
Ingredients
- 1/2 cup coconut flour
- 4 large eggs, room temperature
- 1/4 cup unsalted butter, melted
- 1/4 cup warm water
- 1 teaspoon baking powder
- 1/4 teaspoon salt
Instructions
- Preheat oven to 350°F and line a baking sheet with parchment paper or lightly grease a muffin tin.
- In a mixing bowl, whisk the eggs until smooth. Add melted butter and warm water, whisk again until fully combined.
- Stir in coconut flour, baking powder, and salt until a thick batter forms. Let the batter rest for 3 to 5 minutes to thicken.
- Scoop the batter into 6 evenly sized mounds on the baking sheet or divide evenly into muffin cups. Smooth the tops gently.
- Bake for 20 to 25 minutes, or until the tops are lightly golden and the centers are set.
- Remove from oven and allow to cool slightly before serving.
Notes
- Let the batter rest before shaping to allow the coconut flour to fully absorb moisture.
- Do not overbake to prevent dryness.
- Store leftovers in an airtight container for up to 4 days in the refrigerator.
- Freeze for up to 2 months and reheat gently before serving.
- Prep Time: 10 minutes
- Cook Time: 25 minutes
- Category: Bread
- Method: Baking
- Cuisine: American
Nutrition
- Serving Size: 1 roll
- Calories: 170
- Sugar: 1g
- Sodium: 160mg
- Fat: 13g
- Saturated Fat: 8g
- Unsaturated Fat: 4g
- Trans Fat: 0g
- Carbohydrates: 7g
- Fiber: 3g
- Protein: 6g
- Cholesterol: 125mg