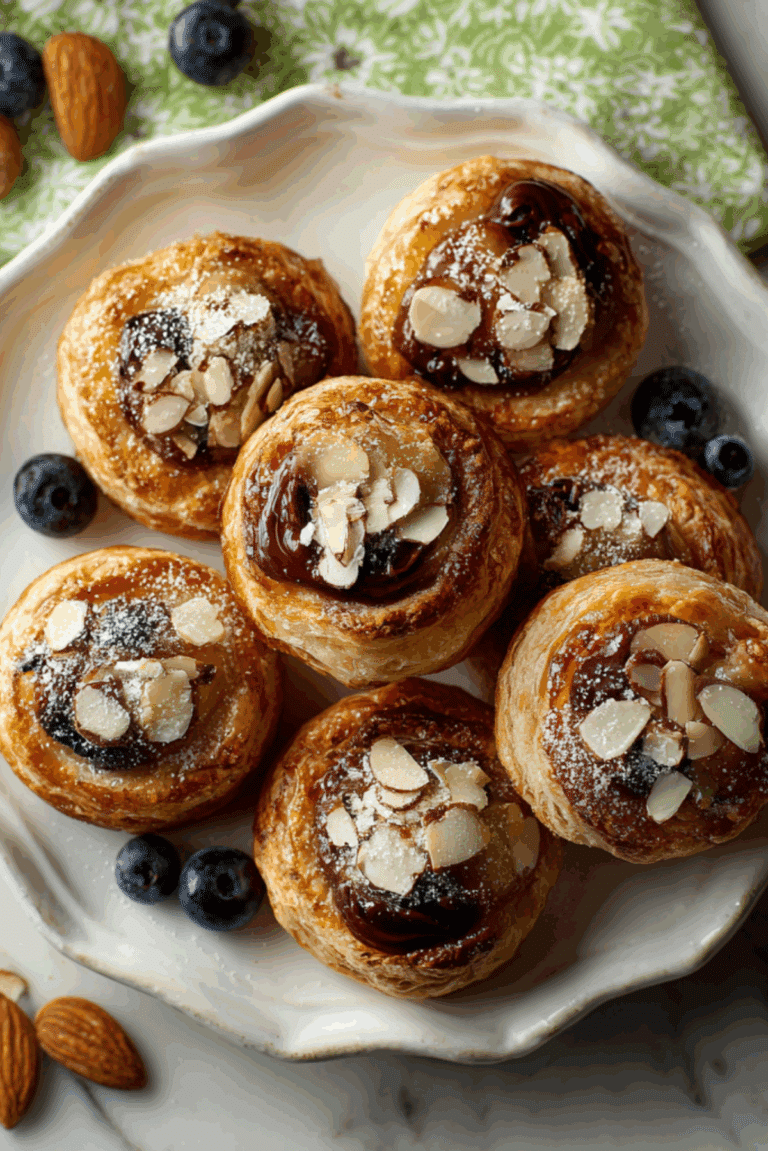
Chocolate Miso Pan-Bang Cookies
Crispy edges, gooey centers, and layers of deep flavor that will catch you off guard in the best way — these Chocolate Miso Pan-Bang Cookies are not your average treat. Each bite surprises with salty-sweet harmony, thanks to the umami twist from miso paste and the bittersweet swirls of dark chocolate. The signature ripples formed by pan-banging give them a bakery-style appearance that feels indulgent and homemade all at once.
Behind the Recipe
This recipe was born out of one of those “what if?” kitchen experiments. One rainy afternoon, with a craving for cookies and a tub of white miso paste in the fridge, curiosity took over. The result? A beautiful fusion of savory and sweet in cookie form. The pan-banging technique wasn’t just a fun name — it gave those cookies their unique rippled look and crisp, buttery edges. And trust me, it was love at first bite.
Recipe Origin or Trivia
The concept of pan-banging was popularized by baker Sarah Kieffer, who discovered that gently slamming the pan mid-bake created dramatic ripples and crispy edges. This method quickly went viral, and home bakers around the world started “banging” their cookie trays. Adding miso is a nod to Japanese cuisine, where miso paste is often used to bring out complex umami flavor — and here, it works like magic against the backdrop of rich chocolate and caramelized sugar.
Why You’ll Love Chocolate Miso Pan-Bang Cookies
This recipe delivers more than just cookies. It gives you a showstopper dessert with flavor complexity that keeps people guessing and going back for seconds.
Versatile: Great with coffee, as an afternoon snack, or even for a cheeky midnight treat.
Budget-Friendly: All pantry staples with a touch of miso, which lasts long and is great for multiple recipes.
Quick and Easy: No fancy tools or chill time needed, just good old-fashioned cookie-making fun.
Customizable: Swap the chocolate or try adding nuts if you like a bit of crunch.
Crowd-Pleasing: That salty-sweet combo with the chewy center and crispy edge is a hit every time.
Make-Ahead Friendly: Dough can be frozen and baked fresh whenever the craving hits.
Great for Leftovers: They stay delicious for days and make amazing ice cream sandwich bases.
Chef’s Pro Tips for Perfect Results
Getting those ripples and textures just right is easier than it looks — but here are a few insider secrets to help you master it.
- Room Temperature Butter: Softened butter creams better with sugar, creating the right structure for spread.
- Don’t Skip the Pan Bangs: Tap that pan gently but firmly at the right moments — this gives the cookies their signature look.
- Space Generously: These cookies spread a lot, so give them room to dance.
- Use Parchment Paper: It helps control spread and makes pan removal easier.
- Chop Your Own Chocolate: It melts more naturally and creates gooey pockets rather than staying in uniform chips.
Kitchen Tools You’ll Need
Before we dive in, make sure your kitchen is armed and ready.
Mixing Bowls: For creaming butter and combining dry ingredients.
Hand or Stand Mixer: Essential for getting that fluffy, creamy butter-sugar blend.
Baking Sheets: Flat and sturdy to handle the banging.
Parchment Paper: For even baking and easy cookie removal.
Measuring Cups and Spoons: Precision is key for the perfect balance of flavors.
Cookie Scoop: Optional, but makes portioning a breeze.
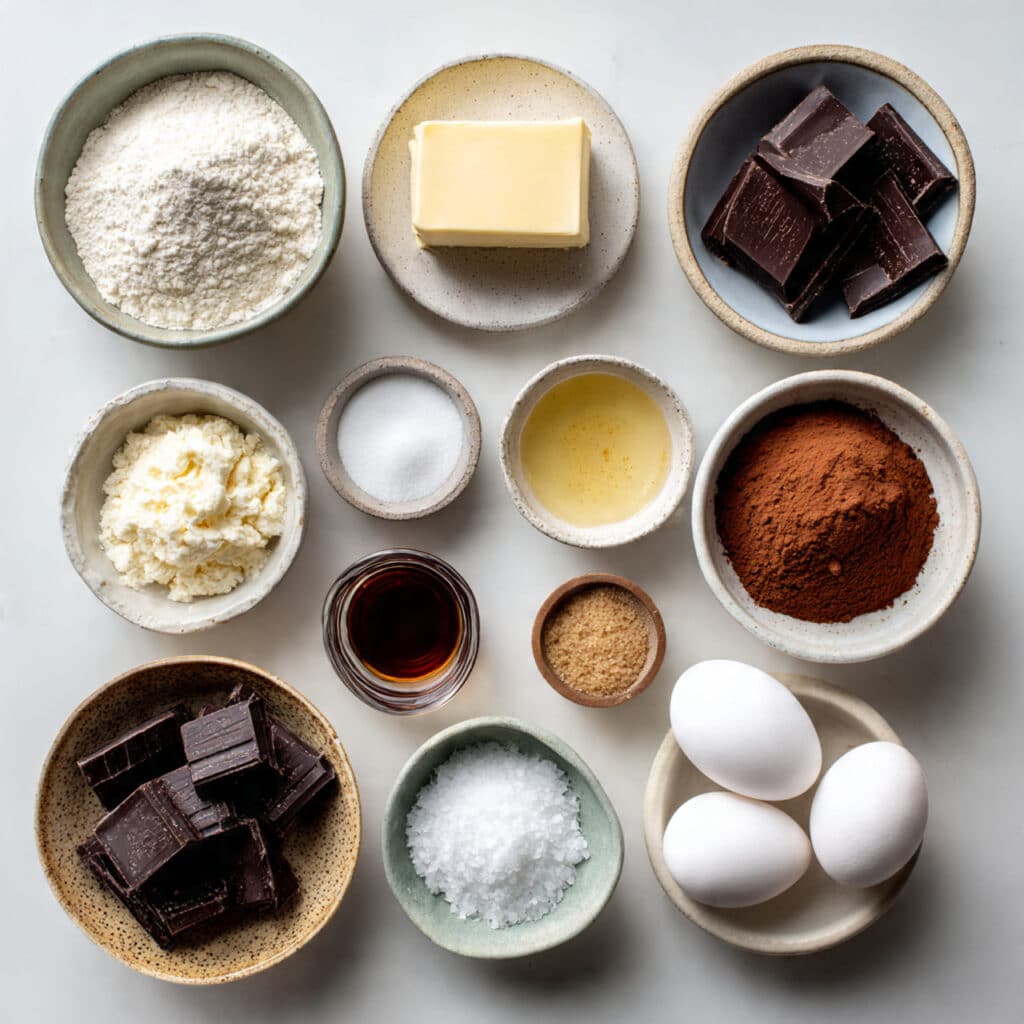
Ingredients in Chocolate Miso Pan-Bang Cookies
This lineup is where the magic begins — a blend of sweet, salty, rich, and creamy.
- All-Purpose Flour: 2 1/4 cups — forms the base and structure of the cookie.
- Unsalted Butter: 1 cup (2 sticks), softened — adds richness and helps with the chewy center.
- White Sugar: 1 cup — helps create crisp edges and a classic cookie sweetness.
- Brown Sugar: 1/2 cup — brings moisture and a caramel depth.
- White Miso Paste: 2 tablespoons — delivers an unexpected umami balance.
- Eggs: 2 large — binds everything together and gives the dough structure.
- Baking Soda: 1 teaspoon — helps with rise and spread.
- Vanilla Extract: 2 teaspoons — adds a warm aroma and depth.
- Dark Chocolate Chunks: 1 1/2 cups — gives bursts of bittersweet flavor throughout.
- Flaky Sea Salt: for sprinkling — amplifies all the flavors and finishes with a perfect salty bite.
Ingredient Substitutions
Don’t worry if you’re missing something — here’s how to pivot without losing flavor.
All-Purpose Flour: Use 1-to-1 gluten-free flour blend for a gluten-free version.
White Sugar: Replace with coconut sugar for a slightly different sweetness.
Brown Sugar: Maple sugar or date sugar can work in a pinch.
White Miso Paste: Try chickpea miso for a soy-free alternative.
Dark Chocolate Chunks: Swap in semi-sweet chocolate chips or chopped milk chocolate if desired.
Unsalted Butter: Use plant-based butter for a dairy-free option.
Eggs: Substitute with flax eggs (1 tbsp flaxseed + 3 tbsp water per egg) for a vegan twist.
Ingredient Spotlight
White Miso Paste: This fermented soybean paste is traditionally used in soups and marinades, but in baking, it offers a unique umami layer that deepens sweetness without overpowering it.
Dark Chocolate Chunks: Unlike chips, chunks melt into gooey puddles and provide intense chocolate moments throughout each bite.
Instructions for Making Chocolate Miso Pan-Bang Cookies
This is where things get exciting. Ready to bake up some ripple magic?
- Preheat Your Equipment:
Preheat your oven to 350°F (175°C). Line two large baking sheets with parchment paper. - Combine Ingredients:
In a large bowl, cream together the softened butter, white sugar, and brown sugar until light and fluffy. Beat in the miso paste, followed by the eggs and vanilla extract. In a separate bowl, whisk the flour and baking soda together, then gradually add it to the wet ingredients until fully combined. Fold in the chocolate chunks. - Prepare Your Cooking Vessel:
Scoop large balls of dough (about 3 tablespoons each) and place them well-spaced apart on the baking sheets — 3 to 4 per sheet. These cookies will spread significantly. - Assemble the Dish:
Gently press the tops of each dough ball to flatten slightly. Sprinkle with a pinch of flaky sea salt. - Cook to Perfection:
Bake for 9 minutes, then open the oven and firmly bang the tray against the rack. Repeat every 2 minutes until edges are rippled and centers are set, about 13 to 15 minutes total. - Finishing Touches:
Let cookies cool on the baking sheet for 5 minutes, then transfer to a wire rack. - Serve and Enjoy:
Best served warm while the centers are still soft and the chocolate is melty. Enjoy with a cold glass of milk or your favorite cozy drink.
Texture & Flavor Secrets
These cookies are the best of both worlds — crunchy edges and soft, chewy centers. The miso adds a salty, savory contrast to the sweet sugars, while the chocolate chunks give each bite bursts of richness. The pan-bang method creates those ripples that bring crispiness without drying out the middle.
Cooking Tips & Tricks
Here’s how to make your batch unforgettable:
- Use good quality chocolate for maximum flavor impact.
- Always bang the pan gently — too hard can deflate the cookie.
- Try chilling the dough for a deeper flavor, though it’s not required.
- Don’t overbake — pull them when the center is just set.
What to Avoid
Keep an eye out for these common missteps:
- Skipping the pan-banging means no signature ripples.
- Using cold butter makes it harder to cream and affects texture.
- Crowding the pan will lead to cookies merging into one giant slab.
Nutrition Facts
Servings: 16
Calories per serving: 240
Note: These are approximate values.
Preparation Time
Prep Time: 15 minutes
Cook Time: 15 minutes
Total Time: 30 minutes
Make-Ahead and Storage Tips
These cookies are perfect for planning ahead. You can make the dough and freeze the cookie balls for up to 2 months. Just bake straight from frozen, adding an extra minute or two. Store baked cookies in an airtight container at room temperature for up to 5 days. Reheat briefly in the microwave to revive the gooey centers.
How to Serve Chocolate Miso Pan-Bang Cookies
Pair them with a scoop of vanilla ice cream or crumble them into yogurt for a fun dessert parfait. They’re also fantastic with coffee or a glass of oat milk for a sweet, cozy treat.
Creative Leftover Transformations
Turn leftovers into something new:
- Ice Cream Sandwiches: Scoop your favorite ice cream between two cookies.
- Cookie Crumble Topping: Crush and sprinkle over cakes, puddings, or fruit bowls.
- Dessert Parfait: Layer with whipped cream and berries for a quick layered dessert.
Additional Tips
- Let cookies cool completely before storing to prevent sogginess.
- For extra richness, brown the butter before creaming.
- Add a pinch of cinnamon for a subtle warmth.
Make It a Showstopper
Stack cookies in a glass jar with a ribbon for gifting. Or serve on a cake stand with a drizzle of chocolate sauce for a dramatic dessert spread.
Variations to Try
- Peanut Butter Swirl: Add peanut butter dollops to the dough before baking.
- Espresso Infusion: Mix in 1 teaspoon of instant espresso powder for a mocha twist.
- Nutty Crunch: Stir in chopped toasted pecans or walnuts.
- Caramel Drizzle: Finish with a light caramel drizzle after baking.
- White Chocolate Swap: Replace dark chocolate with white chocolate for a sweeter profile.
FAQ’s
Q1: Can I use red miso instead of white miso?
No, red miso is too strong and will overpower the flavor. Stick with white miso for best balance.
Q2: Why are my cookies not rippling?
You may not be banging the pan enough, or your dough might be too cold. Let it sit at room temperature before baking.
Q3: Can I use chocolate chips instead of chunks?
Yes, but chunks give you better melt and texture contrast.
Q4: Is the miso flavor noticeable?
It’s subtle and savory, not overpowering. Most people can’t even tell what it is, just that it tastes amazing.
Q5: Do I need to chill the dough?
No chilling is required, but it helps deepen flavor if you have time.
Q6: Can I double the recipe?
Absolutely. Just bake in batches and keep the dough covered between rounds.
Q7: What’s the best pan for banging?
Use a sturdy, rimmed baking sheet that doesn’t warp under heat.
Q8: Can I make this gluten-free?
Yes, a 1-to-1 gluten-free flour blend works well.
Q9: How long do these stay fresh?
Up to 5 days in an airtight container at room temperature.
Q10: Can I freeze the dough?
Yes, freeze shaped dough balls and bake directly from frozen when ready.
Conclusion
Chocolate Miso Pan-Bang Cookies are a unique treat that delivers bold flavor, amazing texture, and bakery-style looks with surprisingly little effort. The miso might sound unconventional, but once you try it, you’ll understand why these cookies have earned a spot in the favorites folder. Trust me, they’re worth every bite.
Print
Chocolate Miso Pan-Bang Cookies
- Total Time: 30 minutes
- Yield: 16 cookies
- Diet: Vegetarian
Description
Crispy-edged, gooey-centered cookies with rich dark chocolate and a savory hint of miso. These Chocolate Miso Pan-Bang Cookies are unforgettable and seriously addictive.
Ingredients
- 2 1/4 cups all-purpose flour
- 1 cup (2 sticks) unsalted butter, softened
- 1 cup white sugar
- 1/2 cup brown sugar
- 2 tablespoons white miso paste
- 2 large eggs
- 1 teaspoon baking soda
- 2 teaspoons vanilla extract
- 1 1/2 cups dark chocolate chunks
- Flaky sea salt, for sprinkling
Instructions
- Preheat your oven to 350°F (175°C). Line two large baking sheets with parchment paper.
- Cream together the softened butter, white sugar, and brown sugar until light and fluffy. Beat in the miso paste, then add eggs and vanilla extract.
- In a separate bowl, whisk the flour and baking soda. Gradually add to the wet mixture until fully combined. Fold in chocolate chunks.
- Scoop large dough balls (about 3 tablespoons) onto the baking sheets, spacing them well apart.
- Gently press the tops to slightly flatten and sprinkle with flaky sea salt.
- Bake for 9 minutes, then bang the tray firmly against the oven rack. Repeat every 2 minutes until edges are rippled and centers are just set (13–15 minutes total).
- Cool on the baking sheet for 5 minutes, then transfer to a wire rack. Serve warm or store in an airtight container.
Notes
- Use parchment paper for better spreading and easy cleanup.
- Freeze dough balls for later baking on demand.
- Chop your own chocolate for gooey melt pockets.
- Prep Time: 15 minutes
- Cook Time: 15 minutes
- Category: Dessert
- Method: Baking
- Cuisine: American
Nutrition
- Serving Size: 1 cookie
- Calories: 240
- Sugar: 18g
- Sodium: 160mg
- Fat: 12g
- Saturated Fat: 7g
- Unsaturated Fat: 4g
- Trans Fat: 0g
- Carbohydrates: 30g
- Fiber: 2g
- Protein: 3g
- Cholesterol: 35mg