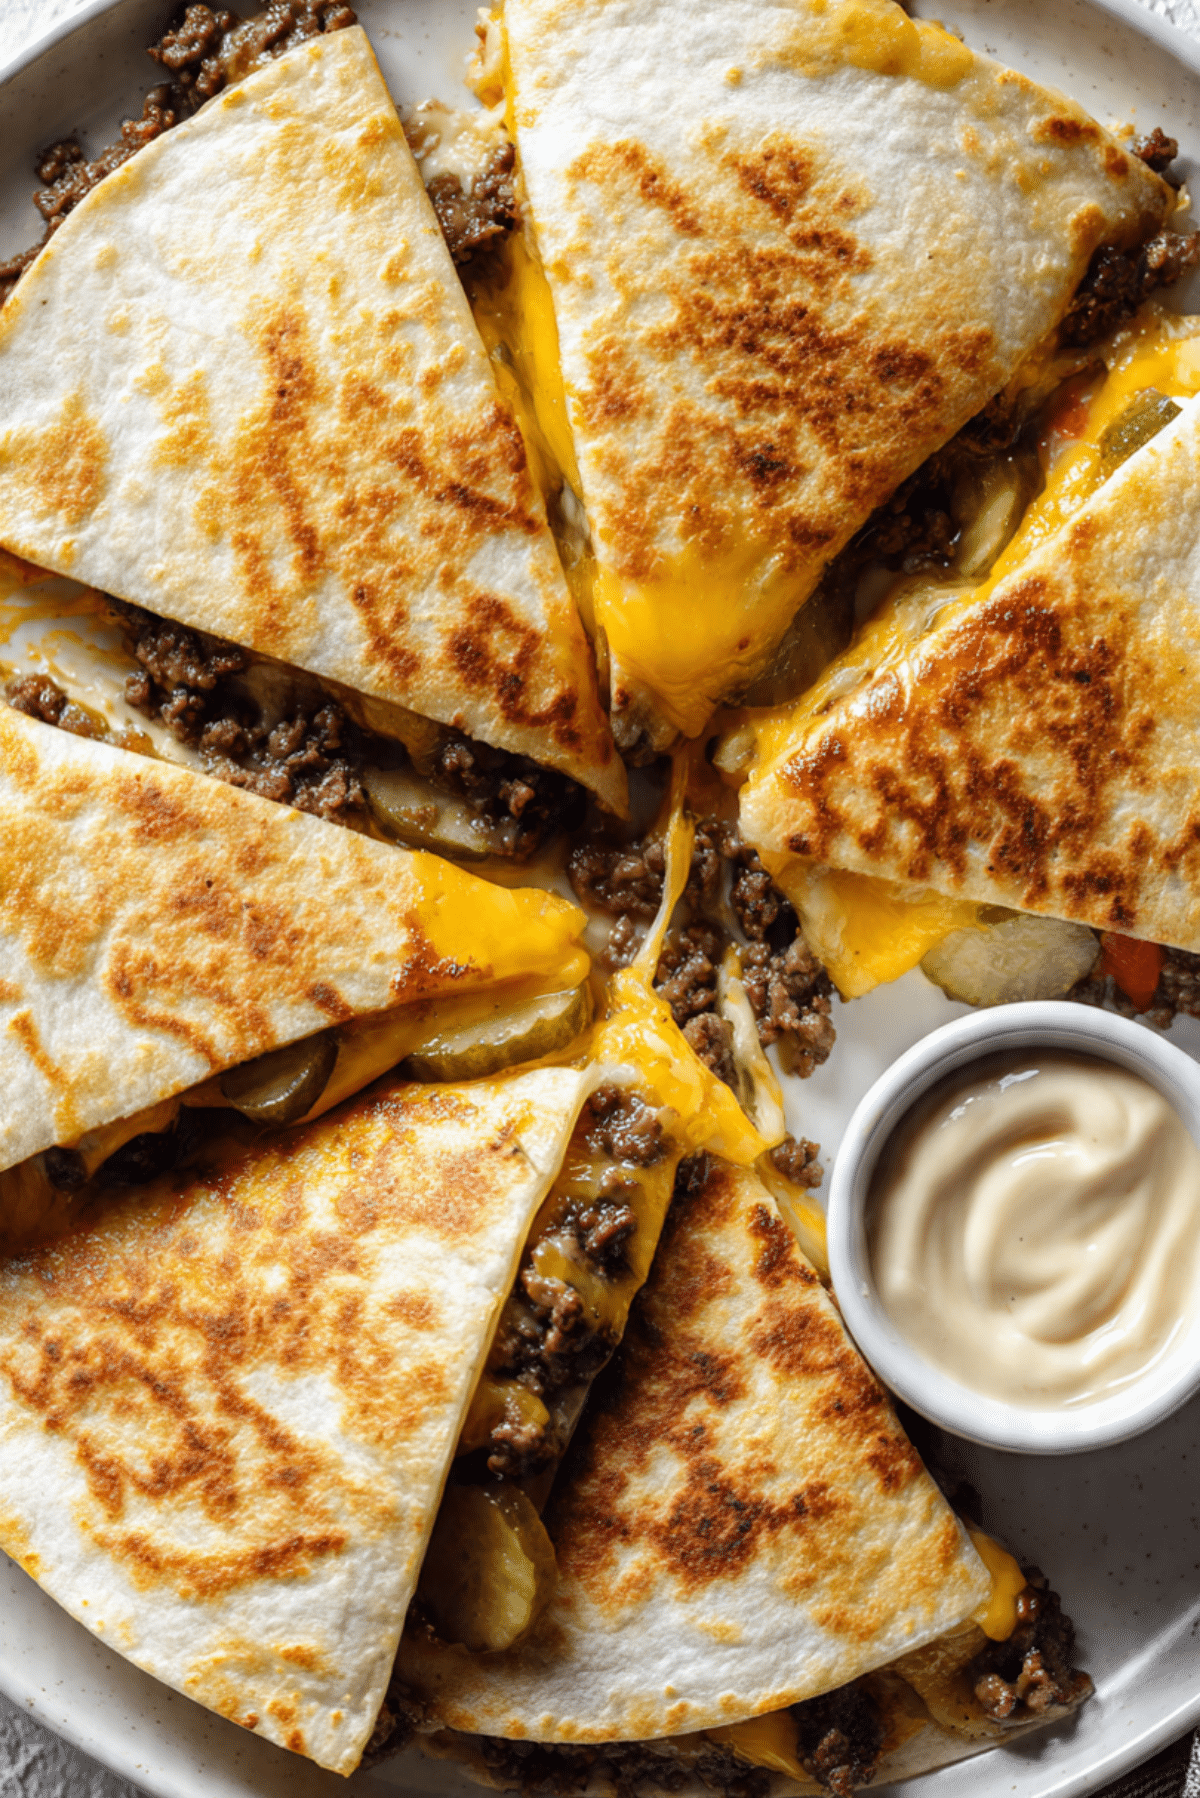
Cheeseburger Quesadillas
There is something ridiculously fun about taking two comfort food favorites and tucking them into one crispy, melty bite. These quesadillas bring all the cozy, familiar flavor of a backyard burger into a skillet dinner that feels fast, cheesy, and honestly a little irresistible. You get savory beef, gooey cheese, tangy pickles, and those classic burger sauces, all wrapped in a golden tortilla that turns crisp around the edges. Trust me, you’re going to love this.
Why This Skillet Favorite Wins Every Time
Some dinners just know how to make life easier, and this is one of them. It gives you that cheeseburger satisfaction without firing up the grill, shaping patties, or juggling buns and toppings at the last minute. Every wedge comes out warm, crisp, and packed with flavor, which makes it perfect for busy nights when you still want something that feels exciting.
The best part is the contrast. The outside gets lightly crisp and buttery, while the inside stays rich and melty with seasoned beef and cheddar. Add a little ketchup, mustard, and pickle in the filling, and suddenly it tastes like your favorite diner order in a whole new form. This one’s a total game-changer.
A Little Backstory Behind This Mashup
As we move from that first tempting bite into the story behind it, it helps to remember that food mashups often happen in home kitchens first. Quesadillas have deep roots in Mexican cooking, built around tortillas and melted cheese, while the American cheeseburger became a comfort food icon through diners, grills, and weeknight family meals.
At some point, it was only natural that home cooks would bring those two ideas together. The result feels playful, a little nostalgic, and surprisingly practical. It keeps the burger flavors people already love, then tucks them into a format that is easy to slice, share, and cook on the stovetop.
Reasons You’ll Keep Coming Back to This One
Before we get into the details, let me tell you, this is the kind of meal that earns a repeat spot fast because it checks so many boxes at once.
Versatile: You can serve it for lunch, dinner, game day, or even a casual movie night. It fits just about any laid-back craving.
Budget-Friendly: The ingredients are simple, easy to find, and usually affordable. Ground beef, cheese, tortillas, and pantry condiments do most of the heavy lifting.
Quick and Easy: Once the beef is cooked, everything comes together in minutes. It feels special without making your kitchen look like a disaster.
Customizable: You can tweak the cheese, sauce, or toppings depending on what you have. It is very forgiving, which always feels like a win.
Crowd-Pleasing: Crispy wedges and melty cheese are hard to resist. Even picky eaters usually lean in for this one.
Make-Ahead Friendly: You can prep the beef mixture in advance and assemble later. That makes dinner feel much less rushed.
Great for Leftovers: Extra slices reheat beautifully in a skillet or air fryer. They stay tasty and satisfying the next day.
Smart Kitchen Secrets for Better Results
Now let’s dive into the little details that make the difference between good and truly crave-worthy.
- Drain the beef well after cooking so the filling stays rich, not greasy.
- Shred your own cheese when possible, because it melts more smoothly and gives you that dreamy pull.
- Keep the heat at medium so the tortilla crisps slowly while the cheese has time to melt.
- Do not overfill the tortillas, because too much filling can spill out and make flipping tricky.
- Let the wedges rest for a minute before slicing so the filling settles and stays tucked inside.
Kitchen Tools That Make It Easy
Before the skillet heats up, it helps to gather a few basics so the whole process feels smooth and stress-free.
Large skillet: This is where the beef cooks and where the tortillas turn golden and crisp.
Spatula: A wide spatula makes flipping much easier and helps keep the quesadillas intact.
Cutting board: You will need it for chopping onion, pickles, and slicing the finished wedges.
Chef’s knife: A sharp knife makes prep faster and cleaner.
Mixing bowl: Useful for stirring together the burger-style sauce and holding the cooked beef mixture if needed.
Cheese grater: Freshly grated cheese melts beautifully and gives the filling a creamier texture.
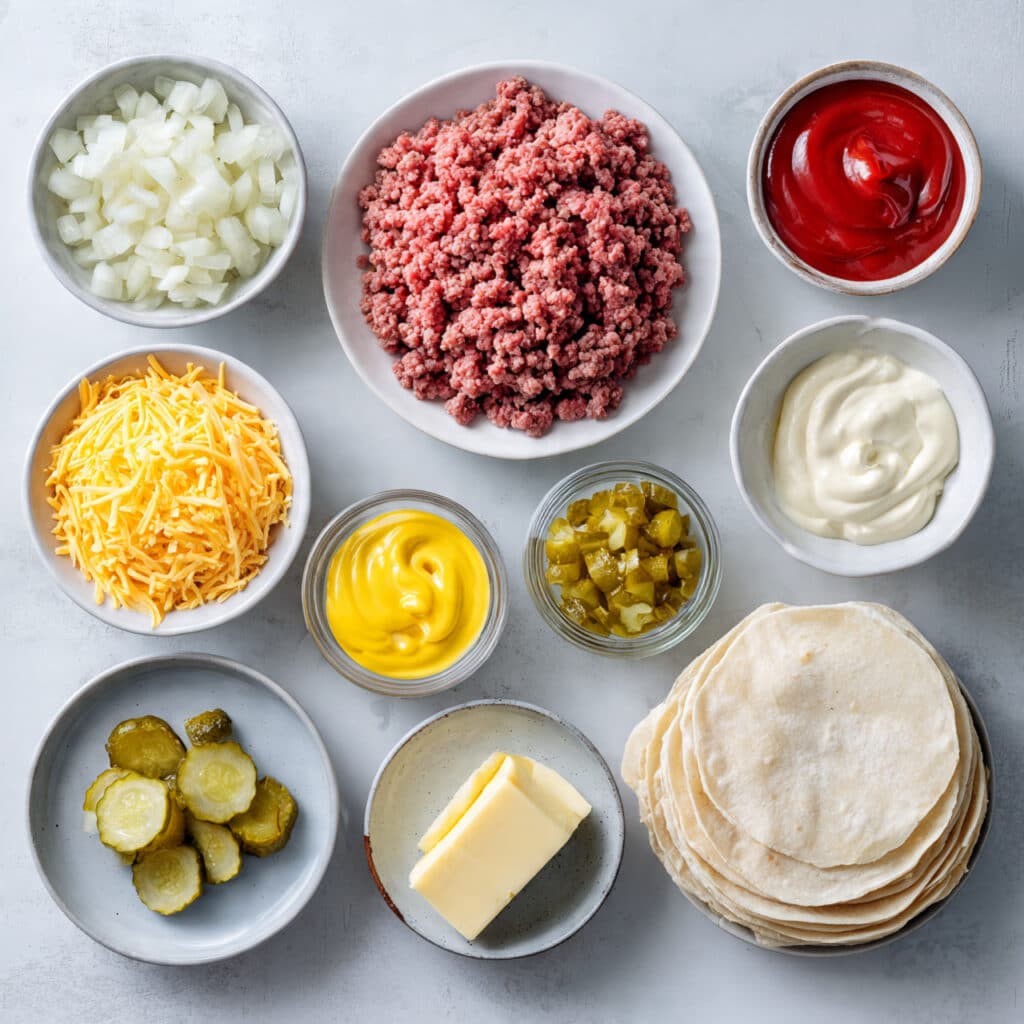
Everything That Goes Into the Filling
And now we get to the part where all the familiar burger flavors start coming together in the most delicious way. Each ingredient has a job here, and together they build that cheesy, savory, tangy balance that makes every bite pop.
- Ground beef: 1 pound lean ground beef, this gives the filling its hearty, juicy burger flavor.
- Yellow onion: 1/2 cup finely diced onion, it adds sweetness and a little bite as it cooks down with the beef.
- Garlic powder: 1 teaspoon, this brings a gentle savory depth without overpowering the burger-style flavor.
- Salt: 1/2 teaspoon, it seasons the beef and helps all the other flavors shine.
- Black pepper: 1/4 teaspoon, for a subtle warmth that rounds everything out.
- Ketchup: 2 tablespoons, this adds sweetness and that classic burger note.
- Yellow mustard: 1 tablespoon, it brings a tangy sharpness that keeps the filling lively.
- Dill pickles: 1/3 cup finely chopped dill pickles, these add crunch and that unmistakable burger-shop tang.
- Cheddar cheese: 2 cups freshly shredded cheddar cheese, this melts into the filling and gives the quesadillas their gooey center.
- Large flour tortillas: 4 large flour tortillas, these hold everything together and crisp up beautifully in the pan.
- Butter: 1 tablespoon, used for the skillet so the tortillas turn golden and flavorful.
- Mayonnaise: 2 tablespoons, stirred into the sauce for a creamy burger-inspired finish.
- Relish: 1 tablespoon sweet relish, it adds a little pop of sweetness and classic burger stand flavor.
Easy Swaps When You Need Them
Once you see how the ingredients work together, it becomes easy to play around a little based on what is in your fridge.
Ground beef: Ground turkey or ground chicken.
Cheddar cheese: Colby Jack, American cheese, or Monterey Jack.
Yellow onion: Red onion or shallots.
Dill pickles: Sweet pickles or chopped burger relish.
Yellow mustard: Dijon mustard.
Mayonnaise: Plain Greek yogurt for a lighter sauce.
Butter: Neutral oil or cooking spray.
The Ingredients That Really Make It Sing
There are a couple of ingredients here that quietly do a lot of work, and they deserve a little spotlight before we start cooking.
Cheddar cheese: Sharp cheddar brings richness, saltiness, and that stretchy melt that makes every slice feel extra satisfying. It is bold enough to stand up to the beef and sauces, which is exactly what you want.
Dill pickles: These cut through the richness with bright, briny crunch. Without them, the filling would still be tasty, but with them, it instantly tastes more like a true burger experience.
Let’s Get Cooking
This is where the fun really starts. The kitchen smells savory and warm, the skillet begins to sizzle, and suddenly dinner feels a lot more exciting. Here are the steps you’re going to follow.
- Preheat Your Equipment: Set a large skillet over medium heat and let it warm up while you prep your ingredients. A properly heated pan helps the beef brown nicely and later gives the tortillas that crisp golden finish.
- Combine Ingredients: Add the ground beef and diced onion to the skillet. Cook for 6 to 8 minutes, breaking up the meat with a spatula, until the beef is browned and the onion is soft. Stir in the garlic powder, salt, and black pepper. Drain excess grease if needed, then mix in the ketchup, mustard, chopped pickles, and relish. Stir everything together until the mixture looks glossy and well combined.
- Prepare Your Cooking Vessel: Wipe out the skillet if it looks too greasy, then return it to medium heat. Lightly brush or melt a little butter across the pan so the tortillas crisp instead of sticking.
- Assemble the Dish: Lay one tortilla in the skillet or on a board for easier filling. Sprinkle cheese over one half, spoon on some of the beef mixture, then add a little more cheese on top. Fold the tortilla over to make a half-moon. Repeat with the remaining tortillas and filling.
- Cook to Perfection: Cook each quesadilla for about 2 to 3 minutes per side, until the outside is golden brown and the cheese inside is fully melted. Work in batches if needed so the skillet does not get crowded.
- Finishing Touches: Stir the mayonnaise with a small spoonful of ketchup and mustard if you want a quick creamy dipping sauce. Let the cooked quesadillas rest for 1 minute, then slice into wedges.
- Serve and Enjoy: Serve hot while the cheese is still melty and the edges are crisp. Add extra pickles or dipping sauce on the side for that full burger-inspired finish.
What Makes the Texture and Flavor So Good
Once they hit the plate, the magic becomes obvious. The tortilla gets crisp and lightly buttery, almost like the best part of grilled bread, while the inside stays juicy and rich from the seasoned beef and melted cheddar. Then the pickles come in with a cool, tangy snap that keeps every bite from feeling too heavy.
The sauces do their job in a quieter way. Ketchup adds sweetness, mustard adds brightness, and the onions bring mellow savoriness that ties it all together. It tastes layered, cozy, and familiar, which is exactly why people go back for another slice before the first one has even cooled.
Helpful Tricks for the Best Batch
A few simple habits can make this even better, especially if you want those picture-perfect wedges.
- Use medium heat so the tortillas brown slowly and evenly.
- Press lightly with a spatula while cooking to help the cheese melt into the filling.
- Slice with a sharp knife or pizza cutter for cleaner edges.
- Serve right away for the best mix of crunch and melt.
Mistakes Worth Skipping
Even easy dinners have a few traps, but they are easy to avoid once you know what to watch for.
- Overfilling the tortillas, which can make them burst open. Keep the filling in a moderate layer.
- Using high heat, which can burn the outside before the cheese melts.
- Skipping the cheese on both sides of the filling, because that cheese helps hold everything together.
- Forgetting to drain greasy beef, which can make the tortillas soggy.
A Quick Look at the Nutrition
Before we wrap up the practical details, here is a simple nutrition snapshot to help you plan the meal.
Servings: 4
Calories per serving: 620
Note: These are approximate values.
Time Breakdown at a Glance
This is another reason these quesadillas are such a weeknight hero. They move fast and still taste like you put in real effort.
Prep Time: 10 minutes
Cook Time: 15 minutes
Total Time: 25 minutes
Make-Ahead and Storage Tips
If you like getting ahead, this one makes life easy. You can cook the beef mixture up to 2 days in advance and keep it chilled in an airtight container. When dinner rolls around, all you need to do is assemble, crisp, and slice.
Leftovers should be stored in the refrigerator for up to 3 days. For the best texture, reheat them in a dry skillet or air fryer so the tortilla crisps back up. You can freeze assembled, uncooked quesadillas between layers of parchment for up to 1 month, then cook them straight from cold with a little extra time.
My Favorite Ways to Serve Them
These wedges are rich and satisfying on their own, but a few simple sides make the whole meal feel complete. Serve them with shredded lettuce, sliced tomatoes, extra pickle chips, or a little burger sauce for dipping. A crisp salad, oven fries, or even roasted potato wedges all fit beautifully here.
They also work well for casual entertaining. Arrange the slices on a platter, set out dipping sauces, and let everyone grab what they like. It feels relaxed and fun, which matches the spirit of the dish perfectly.
Leftovers That Turn Into Something New
And now let’s talk about one of the best parts, because leftovers do not need to feel repetitive.
Tuck chopped leftover wedges into a lunch wrap with lettuce and extra sauce. Dice them and turn them into a cheesy skillet hash with potatoes. You can even reheat a slice and top it with a fried egg for a seriously satisfying brunch moment. Let me tell you, it’s worth every bite.
A Few More Little Wins
Sometimes the smallest details make dinner feel easier and tastier, so here are a few extra ideas to keep in your back pocket.
Use freshly chopped pickles instead of very wet pickle slices if you want a tidier filling. Let the beef cool slightly before assembling so the tortillas stay easier to handle. And if you want a stronger burger-shop feel, add a tiny sprinkle of smoked paprika to the beef.
Make It Look as Good as It Tastes
Presentation is easy here, which is great because these already come out looking delicious. Slice each quesadilla into even triangles and overlap them slightly on a serving plate. Add a small bowl of dipping sauce in the center and a few pickle slices on the side.
A little contrast goes a long way, so serve them on a simple platter where the golden tortillas and melted cheese really stand out. That crisp edge and cheesy center do most of the work for you.
Fun Variations to Try Next Time
Once you have the basic version down, there are plenty of ways to riff on it without losing the cozy burger vibe.
American Diner Style: Swap part of the cheddar for sliced American cheese for an extra creamy melt.
Spicy Burger Version: Add chopped pickled jalapeños and a little hot sauce to the filling.
Mushroom Swiss Twist: Cook finely chopped mushrooms with the beef and use Swiss cheese instead of cheddar.
Loaded Burger Style: Add shredded lettuce and chopped tomato after cooking for a fresh finish.
Double Cheese Version: Mix cheddar with Monterey Jack for an even richer, stretchier center.
FAQ’s
Q1: Can I make these ahead of time?
Yes. You can cook the beef mixture ahead and refrigerate it, then assemble and cook the quesadillas when you are ready to eat.
Q2: What kind of cheese melts best here?
Cheddar works beautifully, but Colby Jack, Monterey Jack, and American cheese also melt very well.
Q3: Can I use corn tortillas instead of flour tortillas?
You can, but flour tortillas are easier to fold and usually hold the filling better for this style.
Q4: How do I keep them crispy after cooking?
Place cooked wedges on a wire rack for a minute instead of stacking them immediately.
Q5: Are pickles necessary?
They are not required, but they really help create that classic burger flavor.
Q6: Can I freeze them?
Yes. Freeze assembled quesadillas between parchment layers, then cook when needed.
Q7: What sauce goes best on the side?
A quick mix of mayonnaise, ketchup, and mustard makes an easy burger-style dipping sauce.
Q8: Can I make them with turkey?
Absolutely. Ground turkey works well, though you may want a little extra seasoning for depth.
Q9: Why is my filling falling out?
That usually happens when the tortillas are overfilled or the cheese is not layered to help hold the filling together.
Q10: What should I serve with them?
Fries, salad, slaw, extra pickles, or a simple dipping sauce all work really well.
Conclusion
These quesadillas are the kind of dinner that feels playful, comforting, and just plain satisfying from the first sizzling moment to the last cheesy wedge. They bring together crispy tortillas, savory beef, melty cheese, and tangy burger flavors in a way that feels both familiar and fresh. Whether you make them for a fast weeknight dinner or a fun shareable platter, they deliver big flavor with very little fuss. Trust me, once you try them, they are going to earn a regular spot in your kitchen.
Print
Cheeseburger Quesadillas
- Total Time: 25 minutes
- Yield: 4 servings
- Diet: Low Lactose
Description
Crispy, cheesy quesadillas filled with seasoned ground beef, cheddar, pickles, onion, and classic burger-style sauces for an easy weeknight dinner.
Ingredients
- 1 pound lean ground beef
- 1/2 cup finely diced onion
- 1 teaspoon garlic powder
- 1/2 teaspoon salt
- 1/4 teaspoon black pepper
- 2 tablespoons ketchup
- 1 tablespoon yellow mustard
- 1/3 cup finely chopped dill pickles
- 1 tablespoon sweet relish
- 2 cups freshly shredded cheddar cheese
- 4 large flour tortillas
- 1 tablespoon butter
- 2 tablespoons mayonnaise
Instructions
- Heat a large skillet over medium heat. Add the ground beef and diced onion, then cook for 6 to 8 minutes, breaking up the meat, until browned and the onion is softened.
- Stir in the garlic powder, salt, and black pepper. Drain excess grease if needed.
- Mix in the ketchup, yellow mustard, chopped dill pickles, and sweet relish. Stir until well combined and heated through.
- Wipe out the skillet if needed and return it to medium heat. Lightly coat the pan with some of the butter.
- Place one tortilla on a work surface. Sprinkle cheddar cheese over one half, add a portion of the beef mixture, then top with a little more cheese. Fold the tortilla over. Repeat with remaining tortillas and filling.
- Cook each quesadilla in the buttered skillet for 2 to 3 minutes per side, until golden brown and the cheese is fully melted.
- In a small bowl, stir the mayonnaise with a small spoonful of ketchup and mustard if desired for dipping.
- Let the quesadillas rest for 1 minute, then slice into wedges and serve hot.
Notes
- Drain the beef well so the filling stays rich but not greasy.
- Freshly shredded cheese melts more smoothly than pre-shredded cheese.
- Cook over medium heat so the tortillas crisp without burning.
- Serve with extra pickles or burger sauce for even more flavor.
- Prep Time: 10 minutes
- Cook Time: 15 minutes
- Category: Main Course
- Method: Stovetop
- Cuisine: American Fusion
Nutrition
- Serving Size: 1 quesadilla
- Calories: 620
- Sugar: 6g
- Sodium: 980mg
- Fat: 38g
- Saturated Fat: 16g
- Unsaturated Fat: 18g
- Trans Fat: 1g
- Carbohydrates: 32g
- Fiber: 2g
- Protein: 34g
- Cholesterol: 105mg