Brownie Pine Cones
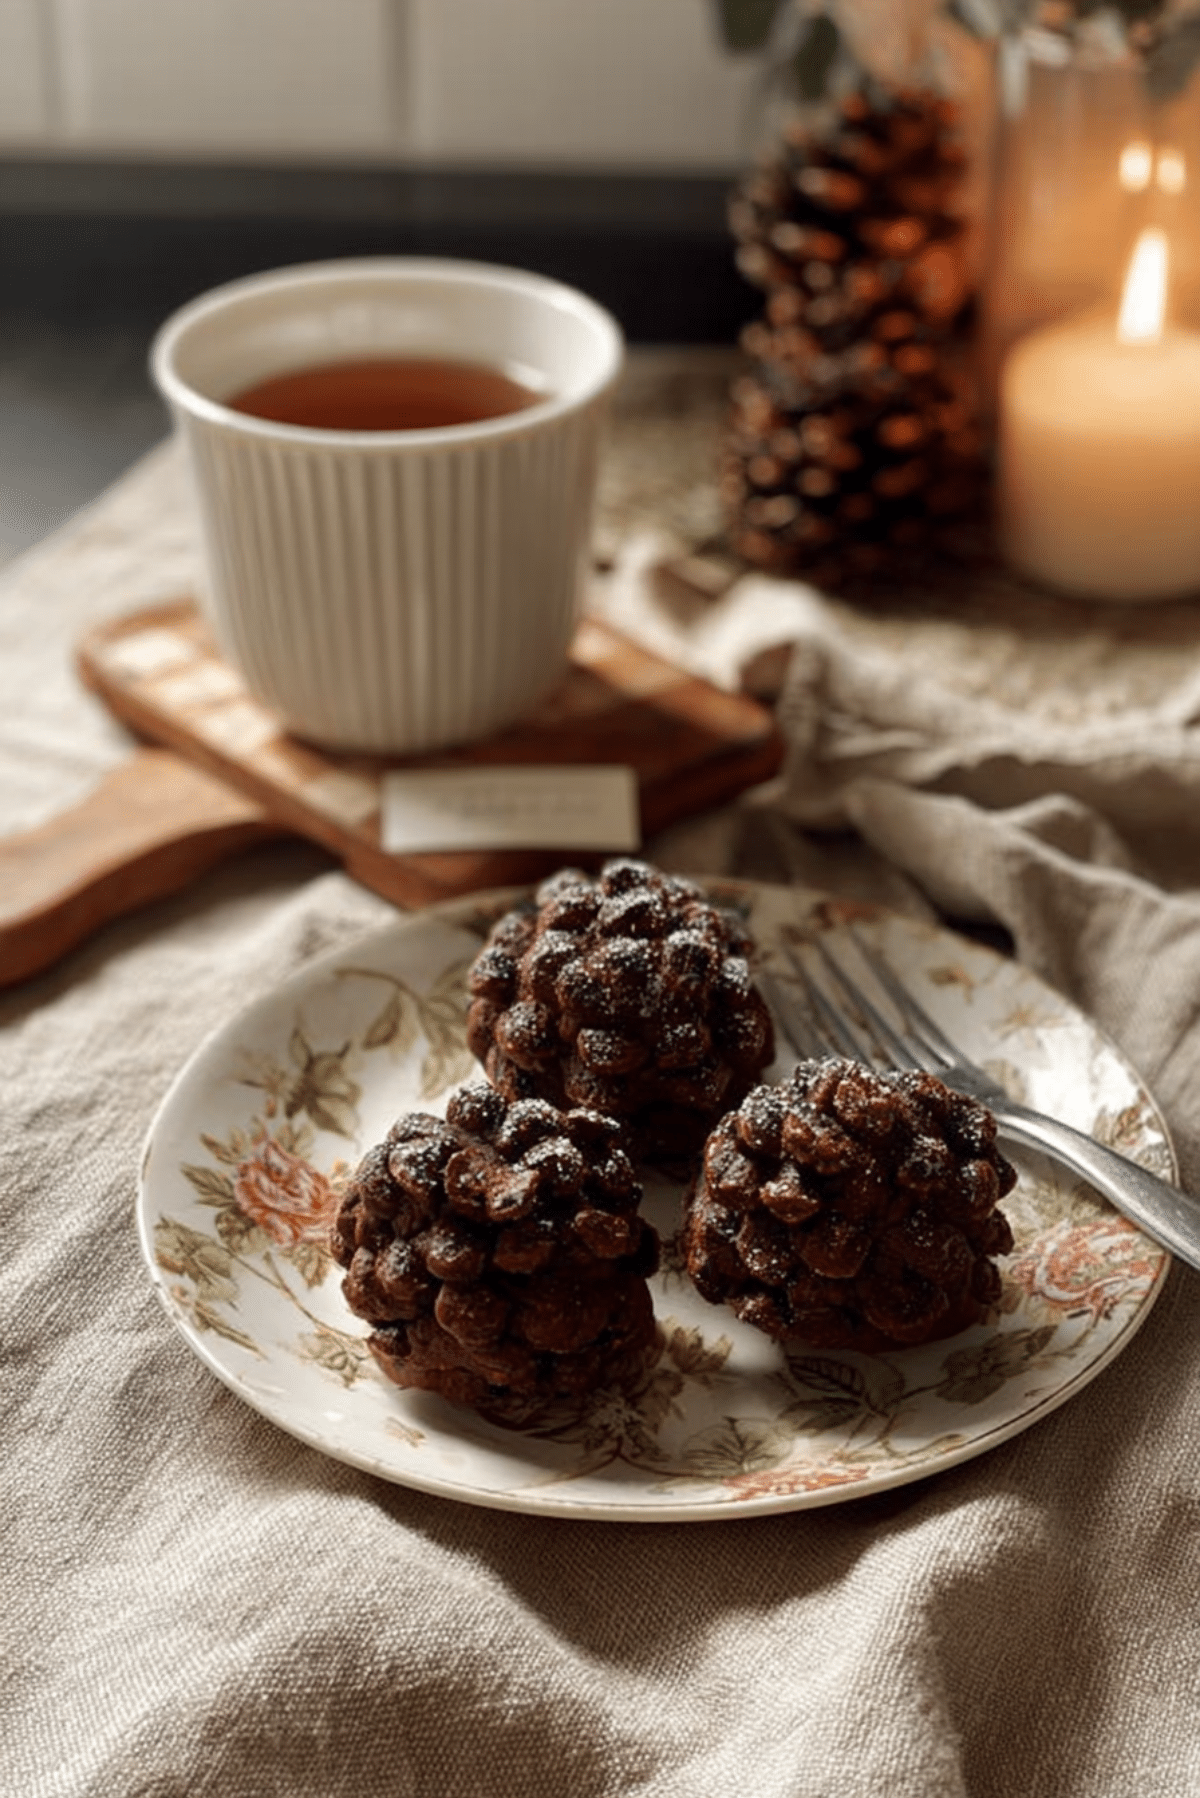
There’s something wonderfully magical about desserts that don’t just taste good but also look like a piece of holiday art. These Brownie Pine Cones are exactly that. Fudgy, chocolatey brownie dough is transformed into rustic, cozy pine cones that are perfect for winter gatherings or festive gifting. They’re rich, chewy, and charmingly rustic — like a bite of a snowy woodland dream.
Behind the Recipe
The first time I made these Brownie Pine Cones, it was a snowy afternoon, and I was craving something sweet and whimsical. I had a batch of brownies sitting in the fridge, and a spark of creativity (and a little Pinterest inspiration) led me to reshape them into pine cones. The result was such a hit that they’ve become a seasonal staple, especially when I want to impress without spending hours in the kitchen.
Recipe Origin or Trivia
Shaping desserts into pine cones is a playful idea that’s been passed around in festive circles for a while, often using cereal or chocolate-based doughs. What makes this version special is the brownie base — a twist on classic holiday treats that combines visual delight with rich, nostalgic flavor. These edible pine cones bring a woodland charm to dessert tables, often seen in Scandinavian-inspired holiday spreads and rustic-themed winter feasts.
Why You’ll Love Brownie Pine Cones
These little beauties are more than just cute to look at. Here’s why they’re about to become your new favorite:
Versatile: They’re perfect for Christmas parties, edible gifts, or just a cozy movie night snack.
Budget-Friendly: Made with pantry staples and basic brownie ingredients, no fancy tools needed.
Quick and Easy: Once your brownie base is ready, shaping and decorating is simple and fun.
Customizable: You can dust them with powdered sugar, dip them in melted chocolate, or add crushed nuts.
Crowd-Pleasing: Kids love the look, adults love the taste — they’re always a hit.
Make-Ahead Friendly: You can shape them a day ahead and keep them chilled until ready to serve.
Great for Leftovers: Got leftover brownies? Turn them into something stunning instead of tossing them.
Chef’s Pro Tips for Perfect Results
If you’re aiming for pine cone perfection, keep these little tricks in mind:
- Chill the brownies before shaping. Cold brownies hold their form better.
- Use food-safe gloves when shaping to keep things tidy and less sticky.
- Mini spoon handles or tweezers can help place almond slices precisely for that pine cone texture.
- Don’t skip the powdered sugar dusting — it mimics snow and adds that magical winter vibe.
- Let them chill again before serving for clean edges and firm shape.
Kitchen Tools You’ll Need
You won’t need anything fancy, just a few basics:
Mixing Bowls: For preparing your brownie mixture and shaping dough.
Baking Tray: To chill and store the pine cones without sticking.
Parchment Paper: Keeps your tray clean and makes transferring easier.
Rubber Gloves: Helps with shaping the dough neatly.
Small Spoon or Tweezers: For placing almond slices like scales.
Fine Mesh Sieve: For that pretty snowy sugar dusting.
Ingredients in Brownie Pine Cones
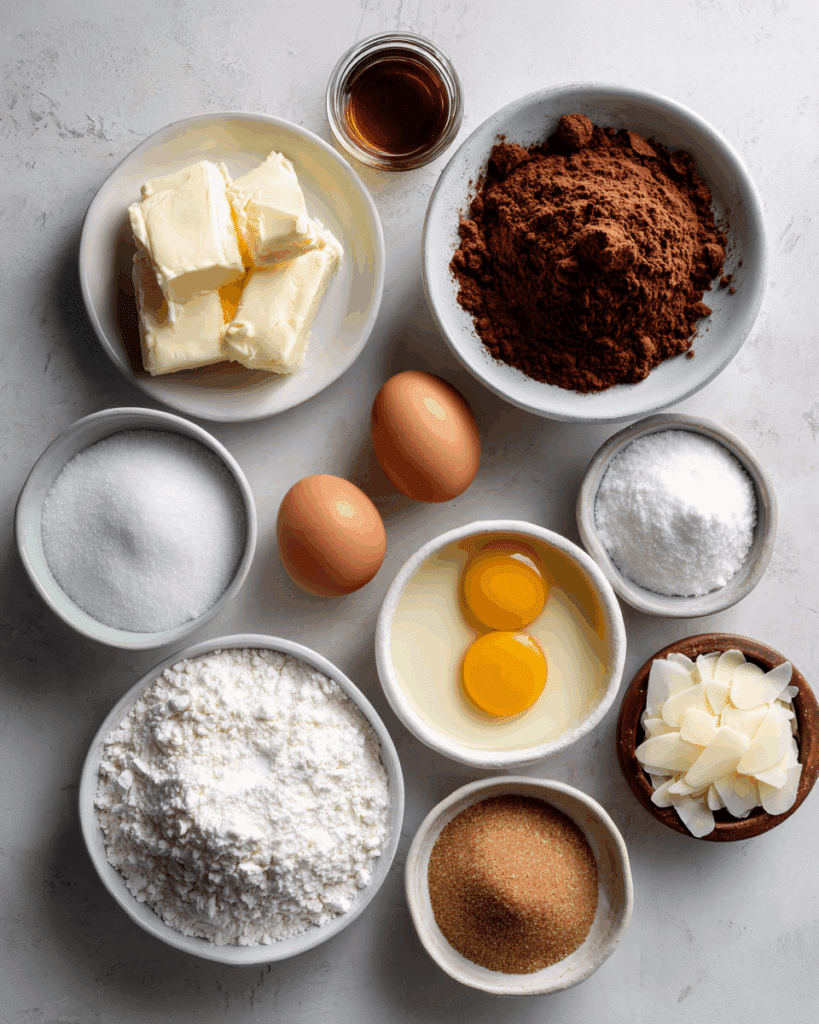
Every element plays a role in building that rich, chewy base and crisp finish. Here’s what you’ll need:
- Unsalted Butter: 1/2 cup (113 g) Melted butter gives the brownies their dense, fudgy texture.
- Granulated Sugar: 1 cup (200 g) Adds sweetness and helps develop that shiny brownie top.
- Brown Sugar: 1/4 cup (50 g) Enhances moisture and adds a hint of molasses flavor.
- Large Eggs: 2 These bind the batter together and add richness.
- Vanilla Extract: 1 teaspoon Adds warmth and depth to the chocolate flavor.
- All-Purpose Flour: 3/4 cup (90 g) The structure-builder for the brownies.
- Unsweetened Cocoa Powder: 1/2 cup (45 g) The main source of chocolate flavor.
- Salt: 1/4 teaspoon Balances the sweetness.
- Almond Slices: 1/2 cup Used to mimic pine cone scales.
- Powdered Sugar: For dusting Gives that snowy, festive finish.
Ingredient Substitutions
Swaps that still keep the magic alive:
Unsalted Butter: Coconut oil or vegan butter.
Brown Sugar: Use all white sugar or add a touch of maple syrup.
All-Purpose Flour: Gluten-free flour blend works well here.
Almond Slices: Use mini pretzels or cereal for a nut-free option.
Vanilla Extract: Almond or hazelnut extract for a different twist.
Ingredient Spotlight
Cocoa Powder: This is where the deep, dark chocolate flavor lives. Opt for high-quality unsweetened cocoa for the richest taste.
Almond Slices: These delicate slivers transform the brownie dough into something beautifully natural-looking — essential for that pine cone texture.
Instructions for Making Brownie Pine Cones
Ready to get your hands deliciously messy? Here’s how to bring these pine cones to life:
- Preheat Your Equipment:
No oven time here if using leftover brownies. But if making fresh, preheat your oven to 350°F (175°C). - Combine Ingredients:
In a bowl, whisk melted butter, sugars, eggs, and vanilla. Stir in flour, cocoa powder, and salt until a smooth, thick batter forms. - Prepare Your Cooking Vessel:
Pour batter into a lined 8×8 inch pan and bake for 25-30 minutes. Let cool completely, then chill in the fridge for 1 hour. - Assemble the Dish:
Crumble chilled brownies into a bowl and knead into a soft dough. Roll into small oval shapes resembling pine cones. - Cook to Perfection:
No more baking! Just gently press almond slices into the dough at an angle to create the layered pine cone effect. - Finishing Touches:
Place on a parchment-lined tray and chill for 30 minutes. Dust with powdered sugar for a snowy look. - Serve and Enjoy:
Serve chilled or at room temperature with hot cocoa or coffee. They’re a visual delight and a sweet finish to any winter meal.
Texture & Flavor Secrets
These brownie pine cones are all about contrast. The center is soft, fudgy, and rich, while the almond slices add a slight crunch. When chilled, they firm up just enough to hold shape, but still melt-in-your-mouth when you take a bite. The cocoa flavor is bold, deep, and satisfying with hints of vanilla and a nutty finish from the almonds.
Cooking Tips & Tricks
A few things to keep in mind as you shape and serve:
- Chill the brownies for easier shaping.
- Keep your hands slightly oiled or gloved.
- Store in a single layer to preserve shape.
- Use a fine sieve to dust powdered sugar evenly.
What to Avoid
Here are a few common slip-ups and how to steer clear:
- Skipping the chill: Warm brownies won’t hold shape well.
- Overloading almonds: Too many slices can cause the dough to crumble.
- Not pressing slices deep enough: They should be snug so they stay put.
Nutrition Facts
Servings: 8
Calories per serving: 280
Note: These are approximate values.
Preparation Time
Prep Time: 25 minutes
Cook Time: 30 minutes
Total Time: 1 hour 30 minutes (including chill time)
Make-Ahead and Storage Tips
You can easily prepare the brownie base a day in advance and shape the pine cones later. Once assembled, store them in an airtight container in the fridge for up to 4 days. They also freeze beautifully — just thaw in the fridge before serving. Re-dust with powdered sugar for a fresh snowy look.
How to Serve Brownie Pine Cones
Serve on a wooden board or slate tray with sprigs of rosemary or pine for a wintery woodland vibe. Pair them with mugs of hot chocolate or spiced tea. They also make stunning edible place settings for a holiday table.
Creative Leftover Transformations
Have a few pine cones left? Here’s what to do:
- Crumble into ice cream or yogurt.
- Flatten and sandwich with marshmallow fluff.
- Chop into chunks and mix into trail mix or granola.
Additional Tips
- For extra depth, add a pinch of espresso powder to the brownie batter.
- Mix in mini chocolate chips for extra fudginess.
- Dust with cocoa instead of sugar for a darker finish.
Make It a Showstopper
Present them on a rustic wooden board, surrounded by pine needles or cinnamon sticks. Add a gentle snowfall of powdered sugar right before serving for that wow factor.
Variations to Try
- Mint Chocolate: Add mint extract to the dough and decorate with crushed candy canes.
- Nut-Free: Use sunflower seed butter and cereal instead of almonds.
- White Chocolate: Dip the base in melted white chocolate for contrast.
- Espresso Boosted: Stir in instant coffee powder for mocha flavor.
- Holiday Spice: Add cinnamon and nutmeg for a festive twist.
FAQ’s
Q1: Can I make these without nuts?
A1: Absolutely. Swap almond slices for mini pretzels, cereal pieces, or chocolate chips.
Q2: Do they need to be refrigerated?
A2: Yes, refrigeration helps them hold shape and keeps them fresh.
Q3: Can I use boxed brownie mix?
A3: Yes! Just make sure the result is dense and fudgy, not cakey.
Q4: How long do they last?
A4: Up to 4 days refrigerated or 2 weeks frozen.
Q5: What’s the best way to serve them?
A5: Slightly chilled with hot cocoa or coffee.
Q6: Can kids help make these?
A6: Definitely. It’s a fun, creative kitchen project.
Q7: How do I make them look more realistic?
A7: Place almond slices at angles and dust lightly with sugar.
Q8: Can I make them vegan?
A8: Yes. Use vegan butter, flax eggs, and a dairy-free brownie base.
Q9: What if my dough is too dry?
A9: Add a teaspoon of milk or melted chocolate to soften it.
Q10: How can I package them as gifts?
A10: Place each in a cupcake liner, box snugly, and tie with ribbon.
Conclusion
Brownie Pine Cones are more than just a sweet treat. They’re a little piece of edible art that brings joy, coziness, and a touch of magic to your holiday table. Whether you’re gifting them, serving them, or just sneaking one on a snowy afternoon, trust me, they’re worth every bite.
Print
Brownie Pine Cones
- Total Time: 1 hour 30 minutes
- Yield: 8 servings
- Diet: Vegetarian
Description
These adorable Brownie Pine Cones are a whimsical and delicious treat perfect for winter and holiday celebrations. With a fudgy brownie base and almond slice scales, they look just like real pine cones and taste even better.
Ingredients
- 1/2 cup (113 g) unsalted butter, melted
- 1 cup (200 g) granulated sugar
- 1/4 cup (50 g) brown sugar
- 2 large eggs
- 1 teaspoon vanilla extract
- 3/4 cup (90 g) all-purpose flour
- 1/2 cup (45 g) unsweetened cocoa powder
- 1/4 teaspoon salt
- 1/2 cup almond slices
- Powdered sugar, for dusting
Instructions
- Preheat oven to 350°F (175°C) if making fresh brownies.
- In a bowl, whisk together melted butter, granulated sugar, brown sugar, eggs, and vanilla extract until smooth.
- Add flour, cocoa powder, and salt. Mix until a thick batter forms.
- Pour into a lined 8×8 inch pan and bake for 25-30 minutes. Cool completely, then chill for 1 hour.
- Crumble chilled brownies into a bowl and knead into a soft dough.
- Shape into small ovals and press almond slices into the surface to mimic pine cone scales.
- Place shaped pine cones on a parchment-lined tray and chill for 30 minutes.
- Dust with powdered sugar before serving.
Notes
- Chill brownies before shaping for best results.
- Use gloves to keep the dough from sticking to your hands.
- Store in the fridge for up to 4 days or freeze for longer storage.
- Perfect for edible holiday gifts or festive dessert tables.
- Prep Time: 25 minutes
- Cook Time: 30 minutes
- Category: Dessert
- Method: No-Bake / Bake (if needed)
- Cuisine: American
Nutrition
- Serving Size: 1 pine cone
- Calories: 280
- Sugar: 24g
- Sodium: 60mg
- Fat: 14g
- Saturated Fat: 7g
- Unsaturated Fat: 6g
- Trans Fat: 0g
- Carbohydrates: 36g
- Fiber: 3g
- Protein: 3g
- Cholesterol: 55mg